
Table of Contents
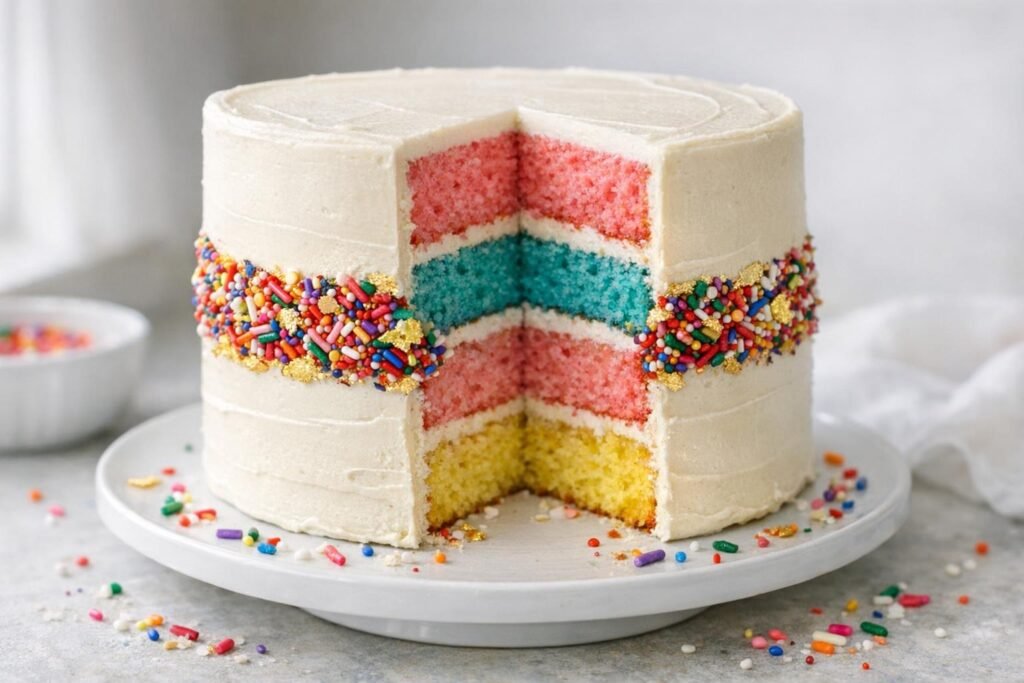
Let’s be honest, birthday cakes are good, but sprinkle fault line birthday cake catapults the excitement straight to rainbow-level. Picture thick, soft vanilla cake layers tinted in bright party colors, stacked tall with swoops of creamy vanilla buttercream, and wrapped with a glimmering, craggy band of sprinkles bursting through a ‘fault line’ mid-cake.
For this sprinkle fault line birthday cake recipe, I build the layers for both flavor and height: oil and buttermilk make the sponge moist but never dense, and that sturdy crumb means easy stacking and slicing. The best part? That fault line isn’t just drama, it’s surprisingly achievable and forgives the buttercream quirks every home baker faces. The textural contrast from the crisp rainbow sprinkles against the smooth, airy cake gives every bite a feeling of pure celebration, just the way birthdays should be. If you want a showstopper that’s as fun to bake as it is to slice, this is your moment.

What Makes this Cake Deliciously Ridiculous
- Vibrant color payoff: Separate dyed batters baked as individual layers keep the colors vivid and prevent muddy blending, so every slice looks intentionally bright and bold.
- Oil and buttermilk for plush crumb: The combination of neutral oil for moisture and buttermilk for tangy tenderness ensures the cake stays soft for days without going stodgy.
- Easy stacking architecture: This formula bakes up nearly level layers, while room-temperature buttercream provides just enough structure to build tall without wobbles.
- Buttercream ‘crumb coat’ secret: A thin first coat of buttercream traps stray crumbs and gives the final layer a pristine finish, a must for sharp-edged, sprinkle-banded cakes.
- Fault line technique made simple: Decorating in stages locks in the sprinkle zone and lets you sculpt dramatic, clean edges between sprinkle and buttercream without frustration.
What Is a Sprinkle Fault Line Birthday Cake?
A sprinkle fault line birthday cake is a colorful layer cake decorated with a band of rainbow sprinkles that looks like it’s bursting through a crack in the buttercream. Don’t worry, there’s nothing actually broken! The fault line is a cake decorating technique where thicker sections of frosting are applied above and below an exposed strip of sprinkles, leaving deliberately uneven edges that create the illusion of a crack running around the cake.
For my version, I stack four soft vanilla cake layers in yellow, pink, blue, and pink from bottom to top, with creamy vanilla buttercream between each. Then comes the fun part: I create the sprinkle-covered band around the middle and build up the buttercream above and below it. I love the surprise of those bright layers when you slice into the cake. It’s a playful birthday cake that looks like it took some serious decorating skills, even though the technique is much easier than it appears!
Ingredient Notes for Sprinkle Fault Line Birthday Cake
- All-purpose flour: Creates the cake’s structure while keeping the crumb light and stackable. Sift before using for the softest layers.
- Granulated sugar: Sweetens and helps keep the cake moist. Adequate sugar prevents a dry, tough sponge.
- Vegetable oil: Maintains tenderness and moisture longer than butter alone, especially in colorful cakes that can bake a touch longer.
- Buttermilk: Adds tang and reacts with baking soda for a fluffy, soft texture. Bring it to room temperature so the batter blends evenly.
- Eggs: Bind ingredients and add richness; use large eggs for best consistency.
- Vanilla extract: Rounds out sweet flavors and gives a classic party cake aroma.
- Cornstarch: Tenderizes by reducing gluten formation, producing a fine, delicate crumb.
- Baking powder and baking soda: Both are needed, baking powder gives primary rise, soda helps with extra lift due to buttermilk’s acidity.
- Salt: Balances flavors and keeps the sweetness from tasting flat.
- Unsalted butter (for frosting): Foundation for the silkiest buttercream; room temp makes for smooth mixing.
- Confectioners’ sugar: Sweetens buttercream while ensuring a creamy, pipeable finish.
- Milk or cream (for frosting): Just a splash to get the right spreading consistency.
- Gel food coloring: Delivers bold color with minimal moisture, water-based colors might thin your batter or frosting.
- Rainbow sprinkles: Use confetti or jimmies for best adhesion and crunch in the fault line.
- Optional gold leaf or edible luster dust: For finishing, if you want to get fancy.
Expert Baking Tips
- Embrace cold cake layers: Chill your layers before stacking for way less shifting and a sturdier cake during assembly, don’t skip this.
- Color boldly: Use gel food color for vibrant, even cake hues. Liquid dyes can throw off batter texture and mute your rainbow effect.
- Work in cool conditions: Warm kitchens make buttercream soft and tricky to smooth, so chill your cake between every major step.
- Sprinkle with confidence: Press sprinkles on while buttercream is fresh. If it sets, spritz with a touch of water before adding more for best adhesion.
- Don’t stress perfection: The signature jagged buttercream edges are meant to look a bit rugged, focus more on contrast and coverage than exact lines.
My Best Tips for Stacking and Decorating a Sprinkle Fault Line Birthday Cake
When it comes to building a sprinkle fault line birthday cake, handling the fault line technique and neat buttercream finishing are everything. Here’s how I get crisp layers and that photogenic sprinkle band every time:
- Chill before stacking: Firm, cool cake layers make stacking so much less stressful and prevent buttercream from sliding between tiers.
- Mark your fault line: Use an offset spatula to draw a gentle rough line around the cake before you begin the sprinkle zone, so your band is even and intentional.
- Sprinkle application tip: Stick sprinkles into a thick buttercream band while it’s still soft, gently pressing with your hand’s curve to avoid gouging the cake.
- Chill again after sprinkles: Set the cake in the fridge for 20-30 minutes so the sprinkle zone hardens before finishing the top and base buttercream edges.
- Use a bench scraper for sharp edges: Skim your buttercream with long, steady strokes, cleaning the edge between the sprinkle band and the rest of the frosting for that signature fault line look.
- Work in batches: If the room is warm, assemble your cake in stages, chilling as needed so buttercream stays workable and neat.
Take your time and don’t stress about perfection, the beauty of this style is in its joyful, handmade burst of color and texture.
Ingredients for Sprinkle Fault Line Birthday Cake
For the Cake Layers
- 500 g all-purpose flour, sifted
- 60 g cornstarch
- 2⅔ teaspoons baking powder
- ⅔ teaspoon baking soda
- 1⅓ teaspoons fine salt
- 533 g granulated sugar
- 240 ml vegetable oil
- 6 large eggs, plus 30 g beaten whole egg from a seventh egg, at room temperature
- 2⅔ teaspoons pure vanilla extract
- 440 ml buttermilk, at room temperature
- 67 ml whole milk
- Pink, blue, and yellow gel food coloring, as needed
For the Vanilla Buttercream
- 425 g unsalted butter, softened
- 875 g confectioners’ sugar, sifted
- 75–100 ml whole milk or heavy cream, as needed
- 1¼ teaspoons pure vanilla extract
- ¼ teaspoon fine salt
For Decorating
- 200 g rainbow sprinkles, plus more if needed
- Edible gold leaf or luster dust, optional
How to Make Sprinkle Fault Line Birthday Cake
- STEP 1). Prep cake pans and oven Preheat the oven to 350°F (175°C). Grease four 8-inch round cake pans and line the bases with parchment. I like to have all four pans ready before mixing, so the batter is ready to go as soon as it’s colored.
- STEP 2). Combine dry ingredients In a large bowl, whisk together the flour, cornstarch, baking powder, baking soda, and salt. A thorough whisk distributes the leaveners evenly, helping the layers rise consistently.
- STEP 3). Mix wet ingredients In the bowl of a stand mixer fitted with a paddle, mix the sugar and oil on medium speed for 1 minute, until evenly combined. Oil won’t turn pale and fluffy like creamed butter, so look for evenly moistened sugar instead. Add the measured whole egg gradually, mixing well after each addition. Scrape down the bowl, then mix in the vanilla.
- STEP 4). Alternate dry mix and buttermilk With the mixer on low, add the dry mixture in three additions, alternating with the buttermilk and whole milk together in two additions. Begin and end with the dry mixture. Mix just until the flour disappears, scraping the bowl as needed. That light touch helps keep the cake tender.
- STEP 5). Color and portion batter Divide the batter evenly by weight among four bowls. Tint two portions pink, one blue, and one yellow, folding each gently until the color is even. This gives you the pink, blue, pink, and yellow layers shown in the cake when stacked from top to bottom. Transfer each portion to a prepared pan and smooth the top.
- STEP 6). Bake colored layers Arrange two pans on each oven rack, leaving space around them so air can circulate. Bake for 24 to 28 minutes, switching the pans between racks and rotating them front to back halfway through. The layers are ready when the centers spring back lightly and a toothpick inserted near the center comes out clean or with a few moist crumbs. If your oven cannot fit all four pans comfortably, bake in batches and get the remaining batter into the oven promptly.
- STEP 7). Cool and level cakes Let the cakes cool in their pans for 10 to 15 minutes. Loosen the edges, then turn them onto racks and cool completely. I wait until the layers are fully cool before trimming or stacking, since warm cake can soften the buttercream and slide around.
- STEP 8). Make vanilla buttercream Beat the softened butter with a paddle on medium speed for 2 to 3 minutes, until creamy. Add the sifted confectioners’ sugar in several additions, mixing on low. Add the vanilla, salt, and 75 ml of the milk or cream. Beat until smooth and spreadable, adding more dairy a little at a time if needed.
- STEP 9). Stack and fill cake Place the yellow layer on a cake board or serving plate. Spread about ½ cup buttercream evenly over it. Add the pink layer, another ½ cup buttercream, the blue layer, another ½ cup buttercream, and the final pink layer. I press each layer gently into place, then chill the stack for 20 minutes to help it stay steady while I decorate.
- STEP 10). Apply crumb coat Spread a thin layer of buttercream over the entire cake to catch loose crumbs. Smooth it with a bench scraper and chill the cake for 20 minutes. This first coat doesn’t need to look perfect. It gives the final frosting a cleaner surface.
- STEP 11). Create sprinkle fault line Spread an even buttercream band about 2 to 2½ inches wide around the middle of the cake. While the icing is still soft, press the rainbow sprinkles firmly into it, rotating the cake as you go. I work around the cake a little at a time so the sprinkles stick before the buttercream sets.
- STEP 12). Finish top and bottom edges Once the sprinkle band is set, use more buttercream to cover the top and the cake above and below the band. Slightly overlap the sprinkle band in a few places to create the jagged fault-line edge. Smooth with a bench scraper, wiping it clean between passes for a crisp contrast.
- STEP 13). Final decoration and chill Pipe extra buttercream swirls or a border if you like. Finish with gold leaf or edible luster dust for a little party sparkle. Chill the assembled cake for at least 45 minutes before slicing so the layers and frosting have time to set.
Storage and Freezing
- Refrigerate assembled cake well-wrapped for up to 4 days; let slices stand at room temperature 30-40 minutes before serving for best texture.
- Freeze un-iced cake layers tightly wrapped for up to 2 months; thaw overnight in the fridge before frosting.
- Once cut, press plastic wrap against exposed cake to prevent drying.
Frequently Asked Questions
How do I get the brightest colors in a sprinkle fault line birthday cake?
For vibrant results, use gel food coloring in the batter, it provides concentrated color without making the cake watery. Add a drop at a time and mix gently so you don’t overwork the batter or dull the color.
Baking the layers separately helps preserve the bold hue in every slice, rather than blending into muddy pastels. After baking, store cakes covered to avoid fading from air or light exposure until ready to assemble.
What causes the fault line effect to look clean and dramatic?
A crisp fault line comes from chilling your sprinkle band after application before finishing the upper and lower buttercream edges. This allows you to layer and sculpt the contrasting icings cleanly without smearing the sprinkles or dragging loose crumbs.
Use a flexible offset spatula or a bench scraper for your final smoothing stroke. If you want that signature jagged edge, overlap the top and bottom but keep your motions gentle and deliberate.
Why did my layers dome or bake unevenly?
Doming often results from overfilled pans, too-hot oven settings, or overmixed batter. Always weigh batter for even layers and check your oven temperature with an oven thermometer if layers aren't flat.
Trimming domes after cooling is standard practice, so don’t worry, it’s the easiest way to get stackable, bakery-style cakes. Tucking domed trimmings away for snacking is highly recommended!
Is it possible to make sprinkle fault line birthday cake in advance?
Both cake layers and buttercream can be made ahead. Bake the colored layers, cool completely, wrap tightly, and refrigerate overnight or freeze for longer storage.
Make buttercream a day ahead, then re-whip before using for the silkiest spread. Wait to decorate with sprinkles and final buttercream until assembly day; this keeps the fault line crisp and the textures exciting rather than softened from fridge condensation.
What are the best sprinkles to use for the fault line technique?
Jimmies (long, cylinder sprinkles) and confetti dots both work beautifully for building a fault line. They stick easily to soft buttercream without bleeding color or losing their crunch.
Avoid nonpareils, which can roll off the cake or bleed color after chilling. Press your chosen sprinkles firmly into the thick buttercream band as soon as it is applied for the best hold and a satisfying crunch with each bite.
How do I keep the buttercream edges sharp and professional looking?
Achieve crisp buttercream edges by chilling the cake at each major stage, after crumb coating, after adding the sprinkle band, and before the final edge smoothing. Use a clean bench scraper in long, steady sweeps for the sharpest lines around the fault line.
Wipe your scraper clean between passes to prevent dragging stray sprinkles or crumbs into your fresh buttercream. Warm hands help maneuver tools lightly, but keep your workspace cool if possible.
More Ridiculously Delicious Cakes
- Bakery-Style Salted Caramel Birthday Cake Recipe
- Chocolate Fudge Birthday Cake With Whipped Ganache
- Ombre Vanilla Birthday Cake with Graduated Frosting
- Raspberry Pistachio Birthday Cake Recipe
- Bakery-Style Peanut Butter Cup Birthday Cake
Sprinkle Fault Line Birthday Cake with Colorful Layers
Ingredients
Equipment
Method
- Preheat the oven to 350°F (175°C). Grease four 8-inch round cake pans and line the bases with parchment. Have all four pans ready before mixing, so the batter is ready to go as soon as it’s colored.
- In a large bowl, whisk together the flour, cornstarch, baking powder, baking soda, and salt. Whisk thoroughly to distribute the leaveners evenly.
- In the bowl of a stand mixer fitted with a paddle, mix the sugar and oil on medium speed for 1 minute, until evenly combined. Oil won’t turn pale and fluffy like creamed butter, so look for evenly moistened sugar instead. Add the measured whole egg gradually, mixing well after each addition. Scrape down the bowl, then mix in the vanilla.
- With the mixer on low, add the dry mixture in three additions, alternating with the buttermilk and whole milk together in two additions. Begin and end with the dry mixture. Mix just until the flour disappears, scraping the bowl as needed.
- Divide the batter evenly by weight among four bowls. Tint two portions pink, one blue, and one yellow, folding each gently until the color is even. Transfer each portion to a prepared pan and smooth the top.
- Arrange two pans on each oven rack, leaving space around them so air can circulate. Bake for 24 to 28 minutes, switching the pans between racks and rotating them front to back halfway through. The layers are ready when the centers spring back lightly and a toothpick inserted near the center comes out clean or with a few moist crumbs. If the oven cannot fit all four pans comfortably, bake in batches and get the remaining batter into the oven promptly.
- Let the cakes cool in their pans for 10 to 15 minutes. Loosen the edges, then turn them onto racks and cool completely. Wait until the layers are fully cool before trimming or stacking.
- Beat the softened butter with a paddle on medium speed for 2 to 3 minutes, until creamy. Add the sifted confectioners’ sugar in several additions, mixing on low. Add the vanilla, salt, and 75 ml of the milk or cream. Beat until smooth and spreadable, adding more dairy a little at a time if needed.
- Place the yellow layer on a cake board or serving plate. Spread about ½ cup buttercream evenly over it. Add the pink layer, another ½ cup buttercream, the blue layer, another ½ cup buttercream, and the final pink layer. Press each layer gently into place, then chill the stack for 20 minutes.
- Spread a thin layer of buttercream over the entire cake to catch loose crumbs. Smooth it with a bench scraper and chill the cake for 20 minutes.
- Spread an even buttercream band about 2 to 2½ inches wide around the middle of the cake. While the icing is still soft, press the rainbow sprinkles firmly into it, rotating the cake as you go. Work around the cake a little at a time so the sprinkles stick before the buttercream sets.
- Once the sprinkle band is set, use more buttercream to cover the top and the cake above and below the band. Slightly overlap the sprinkle band in a few places to create the jagged fault-line edge. Smooth with a bench scraper, wiping it clean between passes.
- Pipe extra buttercream swirls or a border if desired. Finish with gold leaf or edible luster dust. Chill the assembled cake for at least 45 minutes before slicing.
Notes
- Embrace cold cake layers: Chill your layers before stacking for way less shifting and a sturdier cake during assembly, don’t skip this.
- Color boldly: Use gel food color for vibrant, even cake hues. Liquid dyes can throw off batter texture and mute your rainbow effect.
- Work in cool conditions: Warm kitchens make buttercream soft and tricky to smooth, so chill your cake between every major step.
- Sprinkle with confidence: Press sprinkles on while buttercream is fresh. If it sets, spritz with a touch of water before adding more for best adhesion.
- Don’t stress perfection: The signature jagged buttercream edges are meant to look a bit rugged, focus more on contrast and coverage than exact lines.



