

Table of Contents
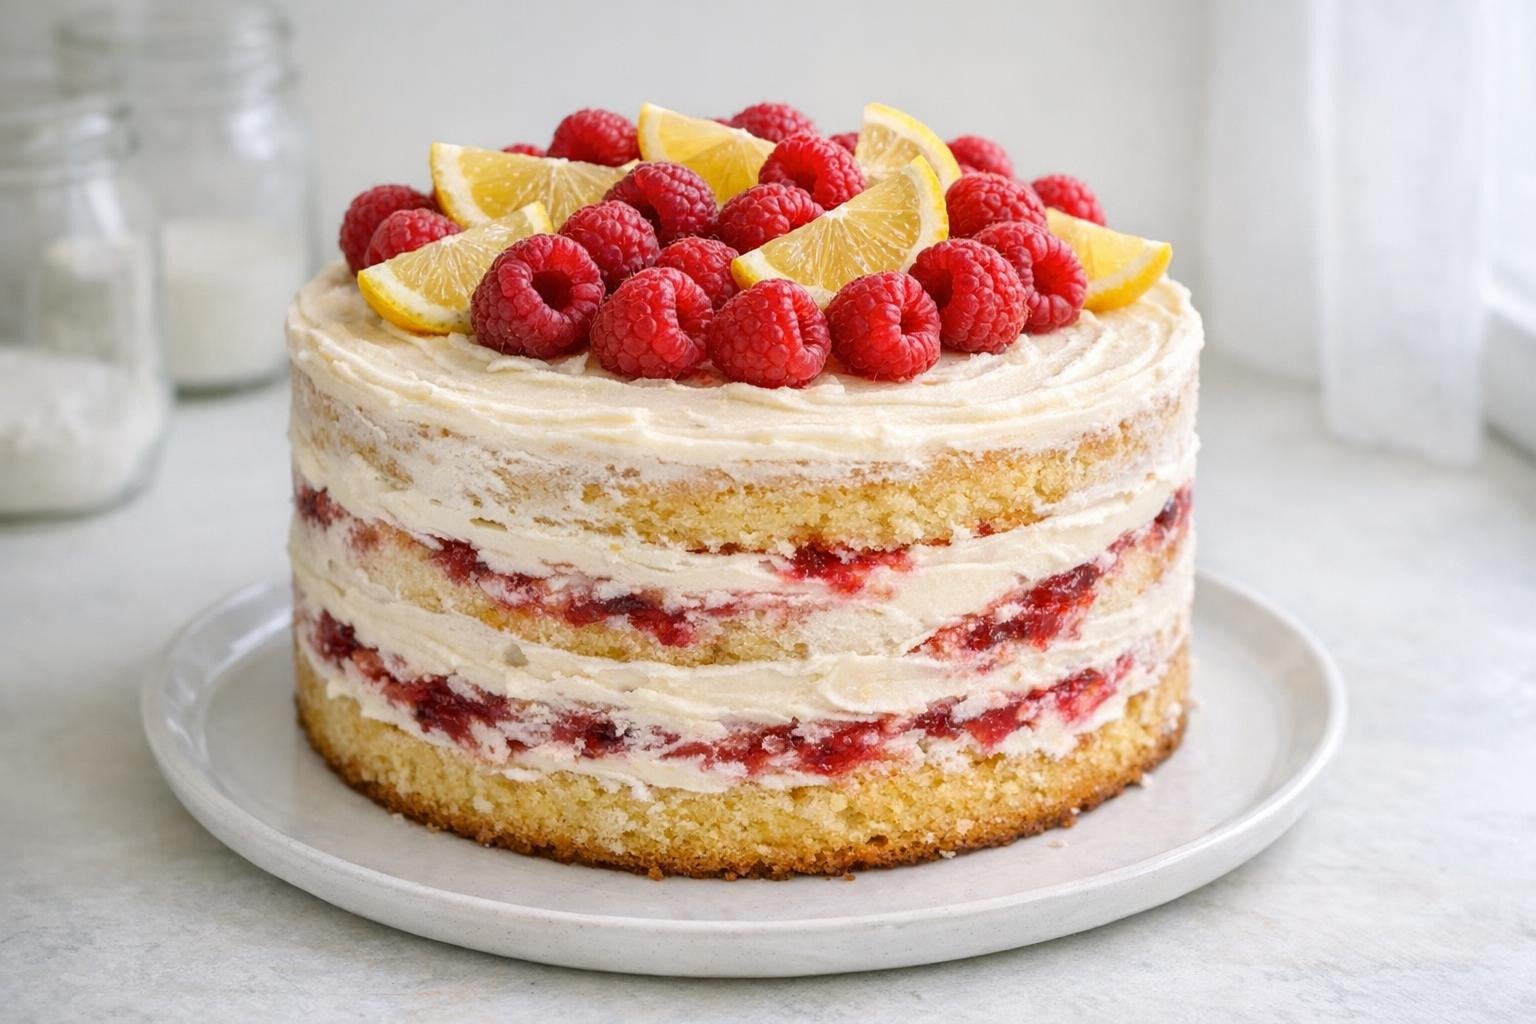
If a sunbeam could turn into dessert, I swear it would taste a lot like this semi-naked lemon raspberry cake recipe. The first thing you’ll notice is the bright, citrusy punch from fresh lemon zest all throughout the tender cake layers. I love how raspberries bring a little tangy chaos in every bite, in the filling and softened right into the crumb. Each layer gets swirled with homemade quick jam and then barely cloaked with a thin sweep of airy vanilla buttercream, just enough to let the fruit and golden cake peek through. I use sour cream for extra moisture and structure, which means these layers bake up plush and sturdy enough to stack and slice without crumbling. The semi-naked finish is my kitchen’s version of stylishly unbothered: rustic, effortless, and always a crowd favorite. It’s a must-bake when you want classic flavors and modern presentation in one slice.
Why You’ll Love this Raspberry Cake
- Fresh lemon zest and juice bring zing: Using both zest and juice means the flavor stays sharp and aromatic instead of fading after baking, a real wake-up call for your taste buds.
- Sour cream makes sturdy, tender layers: I love how sour cream keeps these cakes soft and moist, but with enough structure to hold up to filling and easy stacking, even when sliced thin.
- Homemade raspberry jam for real flavor: Cooking a quick, slightly tart raspberry jam keeps the filling juicy but not runny, so there’s fresh fruit taste in every mouthful without soggy layers.
- Semi-naked finish prevents sugar overload: The thin swath of buttercream on the outside keeps the decorating low-stress and lets the lemon and raspberry shine, not just a wall of frosting.
- Creaming method for an airy, even crumb: Beating butter and sugar together until fluffy builds the cake’s lift, so every slice comes out light, with a beautiful, even crumb.
Ingredient Notes for Semi-Naked Lemon Raspberry Cake
- All-purpose flour: Provides structure; measure by spoon-and-level so layers stay light and not dense.
- Lemon zest and juice: Fresh zest carries more oils and aromatic flavor than bottled juice alone, zest first, then juice your lemons right after for maximum fragrance.
- Sour cream: Adds richness and moisture while keeping the cake spongy with a tender crumb. Plain full-fat yogurt works similarly in baked goods if needed.
- Fresh raspberries: Used for the jammy swirl between layers; cooking them down with sugar keeps the fruit vibrant but prevents a runny mess in the cake.
- Unsalted butter: Creaming butter with sugar aerates the batter, giving the sponge its airy, soft crumb, make sure it’s room temperature for even mixing.
- Eggs: Bind and set structure so the cake slices cleanly; bring to room temperature for the fluffiest cake and best volume.
- Baking powder and baking soda: Both help the cake rise high and set with a fine crumb. Lemon’s acid helps activate the baking soda, while baking powder gives a backup lift.
- Powdered sugar: Sweetens the buttercream while keeping it soft and fluffy, perfect for a semi-naked finish that won’t crust.
A Few Golden Rules for Semi-Naked Lemon Raspberry Cake Recipe
- Measure flour by weight for best results: Too much flour can make these layers dry or heavy; a kitchen scale gives you the accuracy you need for tender cake.
- Don’t overmix once eggs and flour go in: Overbeating after dry ingredients are added can build excess gluten, leading to a dense, tough crumb. Mix just until incorporated for the finest texture.
- Let cake layers cool completely before stacking: Even slight warmth can cause buttercream to melt or layers to slip. Fully cooled, level layers make for a professional, sturdy stack every time.
- Chill to set buttercream for easier decorating: Fifteen to twenty minutes in the fridge helps your crumb coat and layers firm up, making it much easier to spread a controlled semi-naked finish.
- Use a turntable if you have one: It’s not required, but spinning the cake as you sweep off frosting makes the finish faster and more even, plus, you get that satisfying bakery rhythm going.
My Best Tips for Stacking and Decorating a Semi-Naked Lemon Raspberry Cake
Stacking and finishing a semi-naked cake is all about structure and a light hand with frosting. Here’s how I keep things looking crisp and intentionally rustic every time:
- Level cake layers after cooling: Use a long serrated knife to even out tops before assembly, flat layers make the stack sturdy and attractive.
- Pipe a thin buttercream ring on each layer: This helps prevent raspberry jam from squishing out the sides, especially if your jam is thick but spreadable.
- Press layers gently, don't squish: Use the palm of your hand to nestle each cake layer over filling, aim for even pressure to avoid air gaps or shifting.
- Apply a crumb coat first: Spread a super-thin layer of buttercream all over to trap cake crumbs, then chill briefly so the final coat goes on smoothly.
- Use an offset spatula for naked finish: Run your spatula around the sides while turning the cake gently to remove excess frosting, let plenty of cake show through for that signature look.
Keep it relaxed: The beauty of a semi-naked cake is its imperfection, so don’t stress about getting it flawless. Those little swirls and exposed layers make every cake unique.
Ingredients for Semi-Naked Lemon Raspberry Cake
- 325 g all-purpose flour (about 2 3/4 cups, spooned and leveled)
- 2 tsp baking powder
- 1/2 tsp baking soda
- 3/4 tsp fine sea salt
- 200 g unsalted butter (room temperature, about 7 oz or 3/4 cup + 2 tbsp)
- 340 g granulated sugar (about 1 2/3 cups)
- 3 large eggs (room temperature)
- 1 tbsp lemon zest (from 2-3 fresh lemons)
- 80 ml fresh lemon juice (about 1/3 cup)
- 200 g sour cream (full fat, at room temperature, about 3/4 cup + 1 tbsp)
- 120 ml whole milk (room temperature, about 1/2 cup)
- 2 tsp pure vanilla extract
- 290 g fresh raspberries (about 2 1/3 cups)
- 60 g granulated sugar (for raspberry jam filling, about 1/4 cup)
- 2 tsp lemon juice (for raspberry jam)
- 225 g unsalted butter (for buttercream, room temperature, about 1 cup)
- 360 g powdered sugar (for buttercream, about 3 cups)
- 2 tbsp whole milk or cream (for buttercream)
- 1 tsp pure vanilla extract (for buttercream)
- 1/8 tsp fine sea salt (for buttercream, optional)
How to Make Semi-Naked Lemon Raspberry Cake
- STEP 1). Line pans, preheat oven and prep ingredients Preheat the oven to 350°F (175°C). Grease two 8-inch (20 cm) round cake pans, line bottoms with parchment, and lightly flour the sides. Set out all ingredients to come to room temperature before you start mixing.
- STEP 2). Make the lemon raspberry jam filling In a medium saucepan, combine raspberries, 60g sugar, and 2 tsp lemon juice. Cook over medium heat, stirring and mashing berries until the mixture thickens, about 10-12 minutes. Press through a mesh sieve to remove seeds. Cool to room temperature before using.
- STEP 3). Combine dry ingredients In a medium bowl, whisk together flour, baking powder, baking soda and salt until fully combined. Set aside, uniformly blended dry ingredients ensure even leavening and a consistent crumb in your layers.
- STEP 4). Cream butter, sugar, and lemon zest In a stand mixer with paddle attachment, beat 200g butter, 340g sugar, and lemon zest on medium speed for 3-4 minutes, until very pale and fluffy. Scrape bowl, well-creamed butter and sugar aerate the batter for a tender, light cake.
- STEP 5). Beat in eggs, one at a time Add eggs one at a time to the creamed butter mixture, mixing fully between each addition. Beat in vanilla and 80ml lemon juice just until incorporated. The batter may look slightly curdled after adding the juice; this is normal and will smooth out after adding dry ingredients.
- STEP 6). Alternate dry ingredients with sour cream and milk Reduce mixer to low. Add half of the flour mixture, blend just until combined. Add all of the sour cream and the milk, mixing gently. Finish with remaining flour blend, mixing just until you see no dry streaks. Do not overmix; stop as soon as batter looks smooth.
- STEP 7). Divide batter and swirl raspberry jam Divide cake batter evenly between the two prepared pans. Dollop spoonfuls of cooled raspberry jam over each, using about one-third of the jam total and swirling gently into the surface with a skewer or butter knife. Reserve remaining jam for assembly.
- STEP 8). Bake and cool cake layers Bake both pans for 28-32 minutes, rotating pans halfway, until cakes are golden and the centers spring back when lightly pressed. A toothpick inserted near the center should come out clean or with a few moist crumbs. Cool in pans on racks for 10 minutes, then turn out and peel away parchment.
- STEP 9). Completely cool, then level cakes if needed Let cakes cool fully on wire racks (about 1 hour). If domed, use a long serrated knife to level tops for even stacking, this helps the layers stay stable and look professional once filled and frosted.
- STEP 10). Make the light buttercream frosting In a clean stand mixer, beat 225g softened butter on medium for 2 minutes. Gradually add powdered sugar, mixing on low. Beat in vanilla and 1-2 tbsp milk, then add salt if using. Whip on medium-high until fluffy and pale, about 2 minutes more, scraping bowl once for consistency.
- STEP 11). Assemble and fill the cake Set the first cake layer on a serving plate. Pipe or spread a thin ring of buttercream to create a border, then spread half of the remaining raspberry jam inside the ring. Top with a thin, even layer of frosting, then place second cake layer on top.
- STEP 12). Crumb coat and finish with a semi-naked buttercream sweep Spread a super-thin layer of buttercream over top and sides to trap crumbs. Chill cake for 20 minutes to set. For the semi-naked look, add more frosting sparingly and use an offset spatula to sweep off almost all excess, letting cake and fruit show through the buttercream.
Storage and Freezing
- Store cake covered and refrigerated for up to 3 days; bring to room temperature before serving for the best texture.
- Cake layers (unfilled/frosted) may be wrapped well and frozen up to one month; thaw layers wrapped at room temperature, then assemble.
- Leftover assembled cake slices keep best in an airtight container, chilled, for up to 3 days; the jam and buttercream prevent dryness.
- Do not freeze assembled cake for best texture; the exposed layers become gummy when thawed.
Frequently Asked Questions
How do you keep a semi-naked lemon raspberry cake from becoming soggy?
Sogginess usually comes from runny jam that seeps into the cake. I cook my raspberry jam until thickened and cool it fully before using.
Piping a buttercream border before adding the jam filling helps keep moisture in its place. If the layers are fully cool and your jam is not too liquid, the cake will stay plush, not wet. Always chill the stacked cake briefly between crumb coating and final frosting for neatness and stability.
What’s the best way to spread frosting for a semi-naked cake effect?
After crumb coating and chilling the cake, use an offset spatula to apply a scant amount of buttercream all over. Apply more pressure as you rotate the cake to remove nearly all of the buttercream from the sides, stopping when you can see layers peeking through.
The goal is an intentionally rustic, breezy coverage, not fully iced, not bare. Clean the spatula between sweeps to keep the finish from getting streaky.
Why does my lemon raspberry cake sometimes bake up dense instead of tender?
A dense cake can result from overmixing the batter once the flour goes in, or using too much flour.
Make sure to measure flour by weight, mix only until just combined after dry ingredients are added, and always use room temperature ingredients for best results. The sour cream and the creaming method are included in my recipe specifically for a tight, yet soft and airy crumb.
Can I make the lemon raspberry cake and frosting ahead of time?
Cake layers can be baked, cooled, wrapped tightly, and frozen for up to a month if needed. Raspberry jam can be made and refrigerated up to 5 days ahead.
Buttercream can be prepared a day in advance and stored in the fridge, brought back to room temperature and whipped briefly before using. That way, assembly on the big day is much faster and more relaxed.
How thick should I make the jam layer between cake layers?
Aim for a thin, even spread, about 2-3 tablespoons per layer is usually just enough to give a punch of fruit flavor without overwhelming the cake structure.
If the jam is too thick, it can cause the layers to slip. Using a buttercream border around the edge is my best tip for keeping everything contained and picture-perfect.
More Ridiculously Delicious Cakes
- Bakery-Style Chocolate Raspberry Anniversary Cake with a Moist, Tender Crumb
- Vintage Heart Cake with Raspberry Buttercream
- Vanilla Rosewater Raspberry Cake with Berry Filling
- Lemon Lavender Celebration Cake Recipe
- Vintage Lemon Heart Cake
Semi-Naked Lemon Raspberry Cake with Light Frosting
Ingredients
Equipment
Method
- Preheat the oven to 350°F (175°C). Grease two 8-inch (20 cm) round cake pans, line bottoms with parchment, and lightly flour the sides. Set out all ingredients to come to room temperature before you start mixing.
- In a medium saucepan, combine raspberries, 60g sugar, and 2 tsp lemon juice. Cook over medium heat, stirring and mashing berries until the mixture thickens, about 10-12 minutes. Press through a mesh sieve to remove seeds. Cool to room temperature before using.
- In a medium bowl, whisk together flour, baking powder, baking soda and salt until fully combined. Set aside, uniformly blended dry ingredients ensure even leavening and a consistent crumb in your layers.
- In a stand mixer with paddle attachment, beat 200g butter, 340g sugar, and lemon zest on medium speed for 3-4 minutes, until very pale and fluffy. Scrape bowl, well-creamed butter and sugar aerate the batter for a tender, light cake.
- Add eggs one at a time to the creamed butter mixture, mixing fully between each addition. Beat in vanilla and 80ml lemon juice just until incorporated. The batter may look slightly curdled after adding the juice; this is normal and will smooth out after adding dry ingredients.
- Reduce mixer to low. Add half of the flour mixture, blend just until combined. Add all of the sour cream and the milk, mixing gently. Finish with remaining flour blend, mixing just until you see no dry streaks. Do not overmix; stop as soon as batter looks smooth.
- Divide cake batter evenly between the two prepared pans. Dollop spoonfuls of cooled raspberry jam over each, using about one-third of the jam total and swirling gently into the surface with a skewer or butter knife. Reserve remaining jam for assembly.
- Bake both pans for 28-32 minutes, rotating pans halfway, until cakes are golden and the centers spring back when lightly pressed. A toothpick inserted near the center should come out clean or with a few moist crumbs. Cool in pans on racks for 10 minutes, then turn out and peel away parchment.
- Let cakes cool fully on wire racks (about 1 hour). If domed, use a long serrated knife to level tops for even stacking, this helps the layers stay stable and look professional once filled and frosted.
- In a clean stand mixer, beat 225g softened butter on medium for 2 minutes. Gradually add powdered sugar, mixing on low. Beat in vanilla and 1-2 tbsp milk, then add salt if using. Whip on medium-high until fluffy and pale, about 2 minutes more, scraping bowl once for consistency.
- Set the first cake layer on a serving plate. Pipe or spread a thin ring of buttercream to create a border, then spread half of the remaining raspberry jam inside the ring. Top with a thin, even layer of frosting, then place second cake layer on top.
- Spread a super-thin layer of buttercream over top and sides to trap crumbs. Chill cake for 20 minutes to set. For the semi-naked look, add more frosting sparingly and use an offset spatula to sweep off almost all excess, letting cake and fruit show through the buttercream.
Notes
- Measure flour by weight for best results: Too much flour can make these layers dry or heavy; a kitchen scale gives you the accuracy you need for tender cake.
- Don’t overmix once eggs and flour go in: Overbeating after dry ingredients are added can build excess gluten, leading to a dense, tough crumb. Mix just until incorporated for the finest texture.
- Let cake layers cool completely before stacking: Even slight warmth can cause buttercream to melt or layers to slip. Fully cooled, level layers make for a professional, sturdy stack every time.
- Chill to set buttercream for easier decorating: Fifteen to twenty minutes in the fridge helps your crumb coat and layers firm up, making it much easier to spread a controlled semi-naked finish.
- Use a turntable if you have one: It’s not required, but spinning the cake as you sweep off frosting makes the finish faster and more even, plus, you get that satisfying bakery rhythm going.



