

Table of Contents
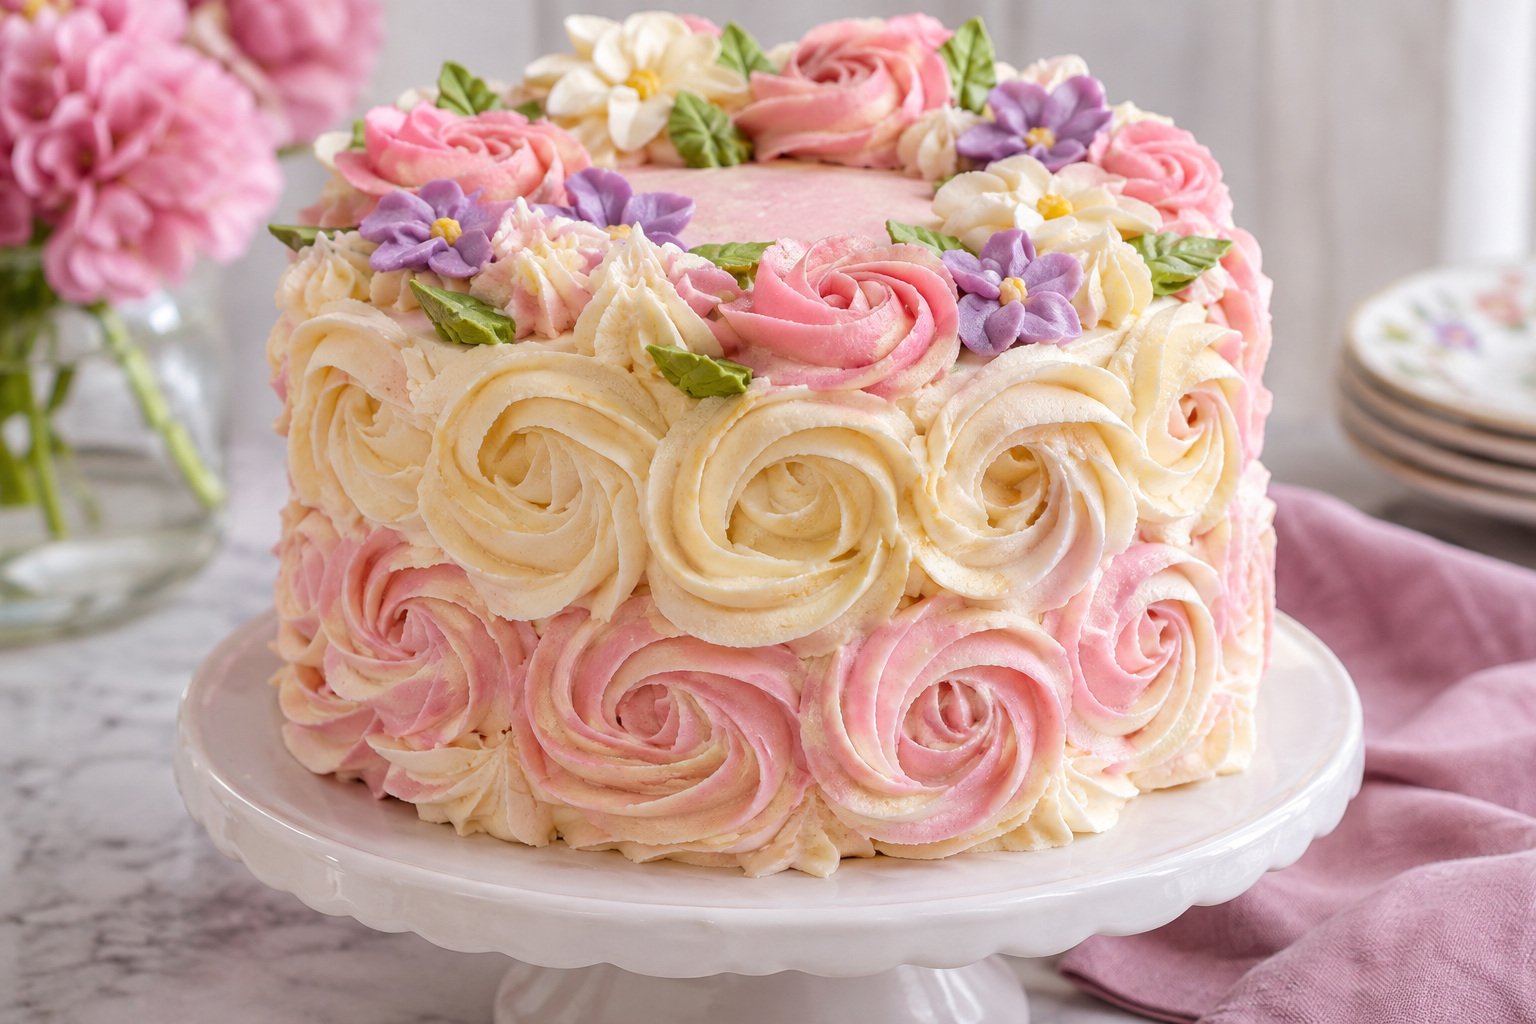
I love how this rosette birthday layer cake recipe turns three tender vanilla layers into a birthday centerpiece, with buttercream flowers piled high and just begging to be sliced. Underneath the party-ready swirls, you’ll find three layers of plush vanilla cake, as soft and tender as any bakery slice but sturdy enough to stack with confidence. Each layer sandwiches a thick spread of classic vanilla buttercream, rich, creamy, and not too sweet, while the outside gets a rosette treatment that feels as fun to pipe as it is to serve. I always use a combination of butter and oil in the cake itself because it gives you that nostalgic birthday flavor plus reliable moisture, which is exactly what you want beneath decorations. Whether you’re celebrating big or small, this is the kind of cake people hover around, fork in hand. Let’s get a little fancy and make your next birthday unforgettable!
Why This Cake Turns Out So Good
- Tender crumb AND sturdy layers: Using both unsalted butter and a splash of oil in the cake creates layers that are soft enough to eat with a fork but resilient enough for stacking and decorating.
- Bright, classic vanilla flavor: A solid dose of pure vanilla extract in both the cake and buttercream ensures every bite hits that warm, nostalgic birthday note without tasting artificial.
- Smooth, pipeable buttercream: Creaming the butter thoroughly and incorporating confectioners’ sugar in stages makes a luscious, airy frosting that holds piped shapes beautifully, so your rosettes bloom and stay put.
- Moisture that lasts for days: Buttermilk brings gentle acidity, which helps keep the crumb moist and tender, no dry day-old cake worries here, even after chilling for assembly or decorating.
- Easy, dramatic decorating: Rosettes use a single large star tip and simple swirling motions to create a swoon-worthy finish, turning a homemade cake into a true showpiece without complicated techniques.
Ingredient Notes for Rosette Birthday Layer Cake
- All-purpose flour: Provides structure while keeping the crumb soft and tender. Sift before using for the fluffiest cake.
- Unsalted butter: The base for both the cake and buttercream, lending rich flavor and a fluffy, stable texture. Always use room temperature butter for creaming.
- Neutral vegetable oil: Adds extra moisture for a cake that stays soft for days. Canola or sunflower oil work best here.
- Buttermilk: Supplies moisture and acidity to lock in tenderness. Whole buttermilk is ideal, or make a quick substitute if needed (see tips section).
- Eggs: Bind and leaven, enriching the cake. Room temperature eggs blend most evenly into the batter.
- Granulated sugar: Sweetens and helps with structure by creaming into the butter.
- Pure vanilla extract: Brings the classic birthday cake flavor to both the layers and the frosting. Skip artificial flavor for best results.
- Confectioners’ sugar: The ideal sugar for billowy, smooth buttercream with a melt-in-your-mouth feel.
- Heavy cream: Gives the buttercream a creamy boost and makes the frosting easier to pipe without becoming too stiff.
- Gel food coloring: Lets you tint your buttercream to your desired palette for vibrant, non-runny rosettes. Use sparingly and build color gradually.
My Frosting and Filling Tips
- Take your time with mixing: Creaming the butter, oil, and sugar until truly pale makes a huge difference in creating a soft and even cake crumb.
- Temperature matters: Use room temperature ingredients, especially eggs, butter, and buttermilk, to avoid dense batter and help everything blend together smoothly.
- Don’t skip the crumb coat: Trapping crumbs with the first thin buttercream layer makes for a flawless, smooth surface before piping your final decorations.
- Chill for stability: Briefly chilling the filled and crumb-coated cake lets the structure firm up, which prevents layers from shifting while you pipe your rosettes.
- Use gel food colors: Never liquid food coloring. Gel delivers vibrant color without watering down your buttercream or changing its piping texture.
My Best Tips for Stacking and Decorating a Rosette Birthday Layer Cake
Whenever I build a celebration layer cake with piped decorations, I rely on a few tried-and-true strategies to keep things sturdy, even, and beautiful every time.
- Level those cakes: Use a long serrated knife or cake leveler to square off any domed tops before stacking, so your finished cake sits flat and tall.
- Chill for clean stacking: Briefly chill your filled cake layers after stacking and before the final coat of buttercream. Cold layers stay put and won’t squish under the weight or when you pipe decorations.
- Crumb coat is essential: Always spread a thin, even layer of buttercream around the cake to trap crumbs. It acts as edible primer and gives your rosettes a smooth base to stick to.
- Use a turntable: Decorating goes much faster and stays more even if you use a cake turntable, spin as you pipe rosettes for consistent spacing and swirling.
- Piping tip matters: I get the best rosettes with a large open star tip, like Wilton 1M. Practice rosettes on parchment first to get your swirl down before moving to the cake.
Master these steps, and your cake will look as fantastic as it tastes, showstopping swirls with layers that stay perfectly stacked.
Ingredients for Rosette Birthday Layer Cake
- 375 g all-purpose flour (sifted (3 cups))
- 2 1/2 tsp baking powder
- 1/2 tsp fine sea salt
- 170 g unsalted butter (room temperature (3/4 cup))
- 80 ml neutral oil (such as canola (1/3 cup))
- 400 g granulated sugar ((2 cups))
- 4 large eggs (room temperature)
- 2 tsp pure vanilla extract (for cake)
- 300 ml buttermilk (room temperature (1 1/4 cups))
- 340 g unsalted butter (room temperature, for buttercream (1 1/2 cups))
- 660 g confectioners’ sugar (sifted (6 cups))
- 55 ml heavy cream ((1/4 cup, more as needed))
- 2 tsp pure vanilla extract (for buttercream)
- 1/4 tsp fine sea salt (for buttercream)
- gel food coloring (your choice of birthday colors)
How to Make Rosette Birthday Layer Cake
- STEP 1). Prepare pans and oven Preheat your oven to 350°F (175°C). Line three 8-inch round cake pans with parchment circles and lightly grease the sides and bottom. This prevents sticking and ensures easy release after baking.
- STEP 2). Whisk dry ingredients In a large bowl, whisk the sifted flour, baking powder, and salt until evenly combined. Move the whisk around the bottom and sides of the bowl to break up any remaining clumps and distribute the leavening thoroughly. The mixture should look uniform in color and texture, with no visible pockets of baking powder or salt.
- STEP 3). Cream butter, sugar, and oil In the bowl of a stand mixer fitted with the paddle attachment, cream the butter, oil, and granulated sugar on medium speed for 3-4 minutes, until pale and fluffy. Pause to scrape down the bowl, ensuring everything is well combined, this promotes a delicate, even crumb.
- STEP 4). Add eggs and vanilla Add eggs one at a time, mixing well after each addition and scraping down as needed. Add the vanilla extract. Continue mixing until smooth and slightly thickened; your batter should be lightened with volume.
- STEP 5). Alternate dry ingredients and buttermilk On low speed, add one-third of the flour mixture, then half the buttermilk, alternating and ending with flour. Scrape down the bowl and mix until just combined. Batter should look smooth with no streaks of flour, but do not overmix.
- STEP 6). Divide and bake cake layers Evenly divide the batter among the prepared pans, smoothing the tops with an offset spatula. Bake for 24-28 minutes, rotating pans halfway through, until a toothpick inserted in the center comes out clean with a few moist crumbs.
- STEP 7). Cool cakes completely Cool cakes in their pans on a rack for 10 minutes, then run an offset spatula around edges and turn out onto racks. Peel off parchment and cool completely before filling or frosting, stacking warm cakes will ruin your buttercream!
- STEP 8). Make buttercream frosting In a clean stand mixer bowl, beat the butter with the paddle attachment on medium-high for 3 minutes, scraping as needed, until very pale and fluffy. Gradually add sifted confectioners’ sugar, then cream, vanilla, and salt. Beat another 2-3 minutes until billowy and smooth. Adjust cream for softer consistency if desired.
- STEP 9). Tint buttercream and prep for piping Portion out bowls of buttercream and tint each with gel food coloring as desired, mixing thoroughly to your desired shades. Transfer each color to a piping bag fitted with a large star tip. Always cover bowls and bags with plastic wrap when not piping to prevent crusting.
- STEP 10). Level and stack cake layers Use a serrated knife to level cooled cakes. Place the first cake layer on a cake board or stand. Spread a layer of buttercream using an offset spatula. Repeat with remaining layers, stacking carefully, and finish with the final layer on top.
- STEP 11). Crumb coat and chill Apply a thin crumb coat of buttercream around the cake and on top, smoothing as evenly as possible. Chill the assembled cake for 30-45 minutes to set the layers and frosting before final decorating, cold cake makes piping easier and keeps rosettes neat.
- STEP 12). Pipe rosettes to finish With a turntable, starting at the base, pipe large rosettes up and around the sides and then over the top of the cake, alternating colored buttercreams as you go. If needed, fill gaps with small stars or leaves. Refrigerate the finished cake for at least 30 minutes to help the decorations hold their shape before serving.
Storage and Freezing
- Cover leftover cake and refrigerate for up to 4 days. Bring slices to room temperature for the best flavor and buttercream texture before serving.
- To freeze, wrap individual cake slices tightly in two layers of plastic wrap and a layer of foil. Store in an airtight container up to 2 months.
- Thaw slices at room temperature (unwrapped) for about an hour before enjoying.
- Keep decorated cakes chilled if the room is warm to maintain the stability of the buttercream decorations.
Frequently Asked Questions
What’s the secret to getting rosettes to look crisp and professional?
The biggest factor is buttercream consistency: it should be soft enough to pipe smoothly but stiff enough to hold peaks.
Give your piping bags a little test swirl on parchment first, if rosettes slump or the edges look ragged, try chilling the frosting for a few minutes before piping. Working on a slightly chilled, crumb-coated cake also gives your decorations something to grip so nothing slides or droops.
How do I make sure my cake layers don’t dry out while decorating?
Moisture retention starts with the right mixing and baking technique, but after baking, always cool layers completely before wrapping tightly in plastic or assembly.
I don’t recommend refrigerating baked cakes uncovered since that can pull moisture out. If you’re breaking up the process over multiple days, keep cake layers wrapped at room temperature and only refrigerate once the cake is stacked and crumb-coated.
Can I color the buttercream with natural food dyes instead of gel?
Natural food coloring can tint the buttercream, but the shades will usually be softer and less vibrant than those made with gel coloring. Choose a concentrated natural coloring and add it gradually so you can monitor both the color and consistency.
Too much liquid coloring can loosen the buttercream and make the rosettes less defined. Stop adding color once the frosting begins to soften, then mix thoroughly and check that it still holds a firm peak before transferring it to the piping bag.
Do I need a stand mixer, or can I use a hand mixer for this recipe?
A stand mixer gives you the quickest, most consistent results for both cake batter and buttercream, especially when creaming large quantities of butter and sugar.
That said, a powerful hand mixer will also do the job. Just be prepared for longer mixing times, and be patient with the creaming step, look for the same light, fluffy texture before moving on.
What if I don’t have buttermilk for the cake?
A buttermilk substitute works in a pinch. For 1 1/4 cups buttermilk, mix 1 1/4 cups whole milk with 1 tablespoon lemon juice or white vinegar, stir, and let stand for 5 minutes.
The acidity will help tenderize the crumb just like classic buttermilk, though the flavor is a touch subtler than the real deal.
How far ahead can I assemble and decorate this birthday cake?
Once assembled and decorated, the rosette birthday layer cake holds beautifully for 1-2 days in the fridge.
In fact, chilling overnight lets the flavors meld and the buttercream set, making slicing even cleaner. Bring to room temperature about 1-2 hours before serving so the cake and buttercream are lush and soft, not cold or firm straight from the fridge.
More Ridiculously Delicious Cakes
- Bakery-Style Chocolate Hazelnut Birthday Cake
- Buttercream Floral Birthday Cake with Piped Flowers
- Chocolate Mint Ganache Birthday Cake Recipe
- Bakery-Style Peanut Butter Cup Birthday Cake
- Soft Earl Grey Honey Layer Cake with Tea Frosting
Rosette Birthday Layer Cake with Buttercream Flowers
Ingredients
Equipment
Method
- Preheat your oven to 350°F (175°C). Line three 8-inch round cake pans with parchment circles and lightly grease the sides and bottom. This prevents sticking and ensures easy release after baking.
- In a large bowl, whisk the sifted flour, baking powder, and salt until evenly combined. Move the whisk around the bottom and sides of the bowl to break up any remaining clumps and distribute the leavening thoroughly. The mixture should look uniform in color and texture, with no visible pockets of baking powder or salt.
- In the bowl of a stand mixer fitted with the paddle attachment, cream the butter, oil, and granulated sugar on medium speed for 3-4 minutes, until pale and fluffy. Pause to scrape down the bowl, ensuring everything is well combined, this promotes a delicate, even crumb.
- Add eggs one at a time, mixing well after each addition and scraping down as needed. Add the vanilla extract. Continue mixing until smooth and slightly thickened; your batter should be lightened with volume.
- On low speed, add one-third of the flour mixture, then half the buttermilk, alternating and ending with flour. Scrape down the bowl and mix until just combined. Batter should look smooth with no streaks of flour, but do not overmix.
- Evenly divide the batter among the prepared pans, smoothing the tops with an offset spatula. Bake for 24-28 minutes, rotating pans halfway through, until a toothpick inserted in the center comes out clean with a few moist crumbs.
- Cool cakes in their pans on a rack for 10 minutes, then run an offset spatula around edges and turn out onto racks. Peel off parchment and cool completely before filling or frosting, stacking warm cakes will ruin your buttercream!
- In a clean stand mixer bowl, beat the butter with the paddle attachment on medium-high for 3 minutes, scraping as needed, until very pale and fluffy. Gradually add sifted confectioners’ sugar, then cream, vanilla, and salt. Beat another 2-3 minutes until billowy and smooth. Adjust cream for softer consistency if desired.
- Portion out bowls of buttercream and tint each with gel food coloring as desired, mixing thoroughly to your desired shades. Transfer each color to a piping bag fitted with a large star tip. Always cover bowls and bags with plastic wrap when not piping to prevent crusting.
- Use a serrated knife to level cooled cakes. Place the first cake layer on a cake board or stand. Spread a layer of buttercream using an offset spatula. Repeat with remaining layers, stacking carefully, and finish with the final layer on top.
- Apply a thin crumb coat of buttercream around the cake and on top, smoothing as evenly as possible. Chill the assembled cake for 30-45 minutes to set the layers and frosting before final decorating, cold cake makes piping easier and keeps rosettes neat.
- With a turntable, starting at the base, pipe large rosettes up and around the sides and then over the top of the cake, alternating colored buttercreams as you go. If needed, fill gaps with small stars or leaves. Refrigerate the finished cake for at least 30 minutes to help the decorations hold their shape before serving.
Notes
- Take your time with mixing: Creaming the butter, oil, and sugar until truly pale makes a huge difference in creating a soft and even cake crumb.
- Temperature matters: Use room temperature ingredients, especially eggs, butter, and buttermilk, to avoid dense batter and help everything blend together smoothly.
- Don’t skip the crumb coat: Trapping crumbs with the first thin buttercream layer makes for a flawless, smooth surface before piping your final decorations.
- Chill for stability: Briefly chilling the filled and crumb-coated cake lets the structure firm up, which prevents layers from shifting while you pipe your rosettes.
- Use gel food colors: Never liquid food coloring. Gel delivers vibrant color without watering down your buttercream or changing its piping texture.



