

Table of Contents
Chocolate shard celebration cake recipes always call to my inner maximalist. Picture a bakery-style chocolate cake: three deep layers, ultra-moist crumb, and every slice crowned with a swoosh of luscious chocolate buttercream, and then I go full drama with a cascade of glossy chocolate shards standing tall on top. The flavor here is exactly what a real celebration cake should deliver: pure, nuanced chocolate, a hint of espresso to deepen things, and a swirl of texture from the soft crumb to the snap of hand-crafted shards. It’s not just about looks, using both cocoa powder and melted bittersweet chocolate means the layers stay rich and perfectly chocolatey, no matter how you slice it. If you want your next special occasion centerpiece to taste as incredible as it looks, get ready to make this cake and let your creativity run wild with those edible chocolate decorations.
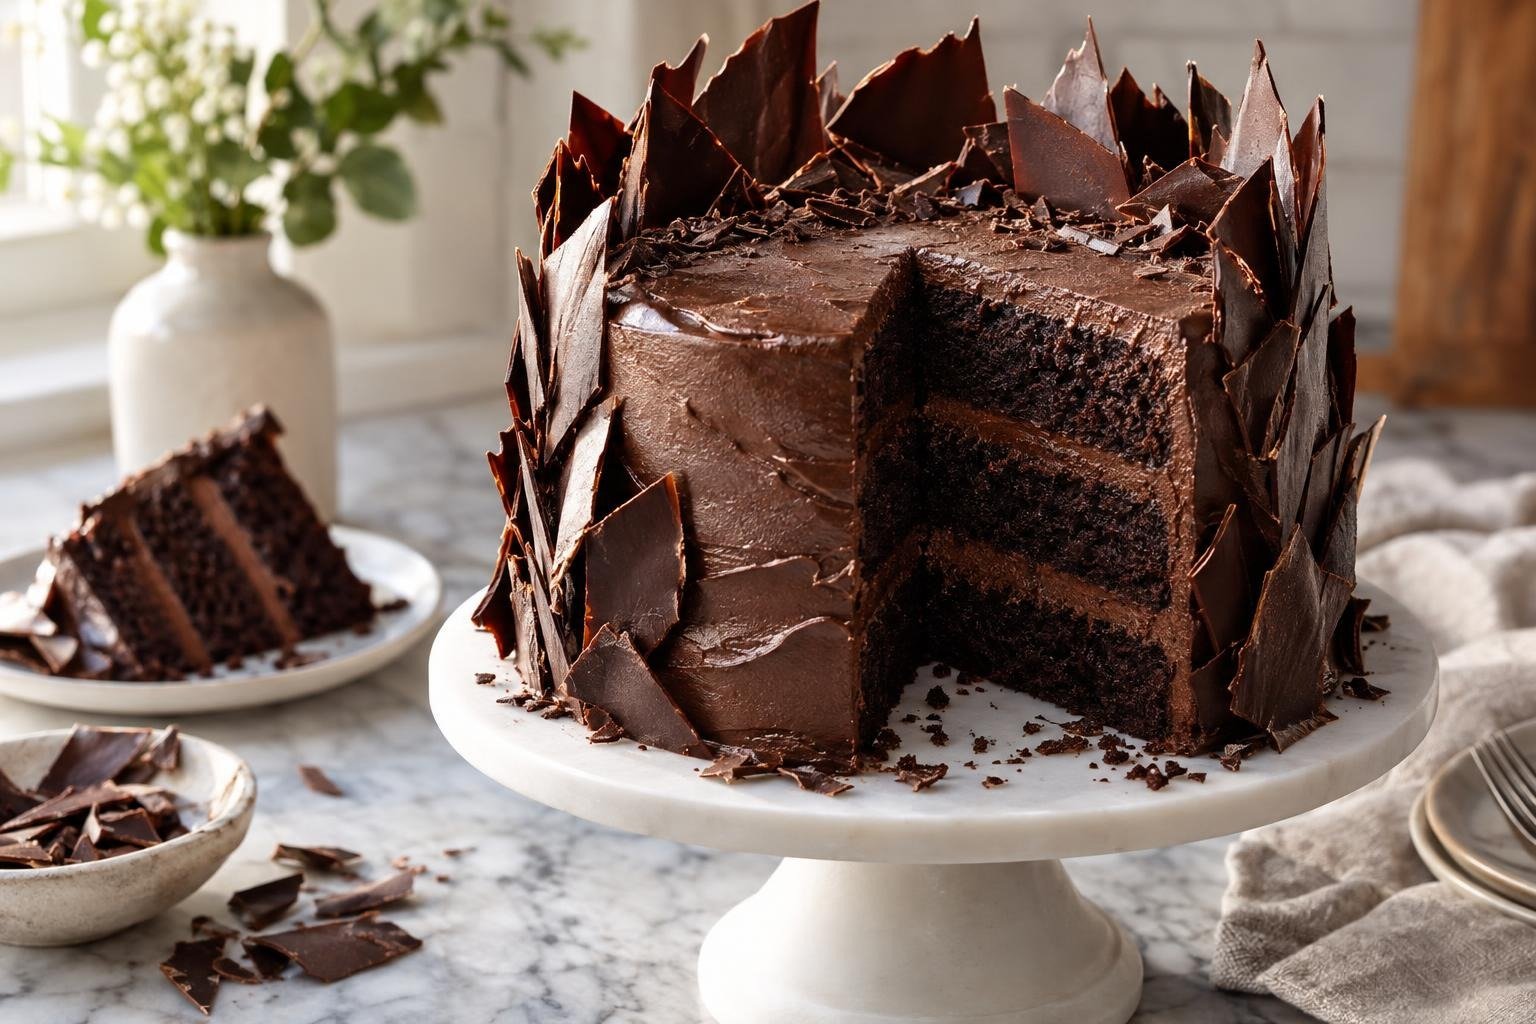
Why This Bakery-Style Chocolate Cake Turns Out So Good
- Intensely chocolatey flavor: Both Dutch-process cocoa and real melted chocolate layer in depth for a cake that's deeply fudgy and genuinely intense, not just sweet.
- Structured yet moist crumb: Oil partners with sour cream for a tender, plush interior that stands up to stacking without falling apart, sturdy enough for those tall shards.
- Stabilized chocolate buttercream: European-style unsalted butter, real chocolate, and cocoa whip up into a buttercream that's smooth, pipes well, and never goes grainy at room temperature.
- Homemade chocolate shards for drama: Hand-poured tempered chocolate gives you crisp, shiny shards that make the cake look like a showstopper, no candy-making degree required.
- Celebration cake with make-ahead magic: The cake layers, buttercream, and shards can all be prepared ahead, making party-day assembly calm and totally doable.
Ingredient Notes for Chocolate Shard Celebration Cake
- All-purpose flour: Provides the right structural balance, measure carefully and don’t overmix if you want a plush, sturdy crumb.
- Dutch-process cocoa powder: Delivers deep color and smooth chocolate flavor without bitterness, don’t substitute natural cocoa here.
- Bittersweet chocolate: Use a quality bar (not chips) for melting into both cake and buttercream; it brings real chocolate punch.
- Sour cream: Adds tang and lasting moisture, helping the cake stay soft and rich even a day or two after assembly.
- Baking soda and baking powder: Both are required here, the soda reacts with sour cream while the powder lifts for tall, fluffy layers.
- Neutral oil: Prevents the cake from drying out, a must for celebration-worthy layers that stay fresh.
- Espresso powder: Intensifies chocolate flavor (you won’t taste the coffee); totally optional but highly recommended for chocolate depth.
- European-style unsalted butter: Higher butterfat equals silkier buttercream with no greasy feel; make sure it’s truly room temperature before beating.
- Heavy cream: Cuts the sweetness in the frosting and makes it easy to adjust to your ideal spreading consistency.
- Semi- or bittersweet chocolate for shards: Choose one with at least 60% cocoa for crisp, dramatic shards that break cleanly and taste fantastic.
A Few Golden Rules for Chocolate Shard Celebration Cake Recipe
- Keep those layers even: Weigh your batter into the pans for uniform cakes that stack straight and bake at the same rate.
- Don’t rush cooling: Frosting a cake that’s even a little warm will melt your buttercream and make assembly messy and frustrating.
- Buttercream texture: For the smoothest frosting, beat your butter extra light before adding sugar and melt the chocolate until silky but not hot.
- Make-ahead bonus: Bake your layers, wrap tightly, and chill (or freeze) before decorating. The cake stays moist and sturdy for easy make-ahead assembly.
- Shards go on last minute: Add chocolate shards just before serving (or within a couple hours). Humidity or fridge time can dull their shine if left overnight.
My Best Tips for Stacking and Decorating a Chocolate Shard Celebration Cake
Stacking and decorating a layered chocolate shard cake can feel intimidating, but these pro tricks make a dramatic, bakery-style finish accessible at home.
- Level your layers: Use a long serrated knife or a cake leveler to trim domed tops so each tier stacks without wobble, you want a clean, straight foundation.
- Crumb coat for flawless sides: Spread a thin, even layer of buttercream to seal crumbs. Chill before the final coat so your outer finish stays silky and smooth.
- Firm up your shards: Let tempered chocolate shards fully set before decorating, and handle them by the base so fingerprints don’t mark their glossy shine.
- Vary shard heights: Cut or break some pieces taller than others for visual interest, cluster a few tallest at the center, tapering outward for a dynamic effect.
- Press shards into chilled buttercream: After frosting, chill the cake briefly just until the surface is set but tacky, then press each chocolate shard in gently so they stay upright.
Once you’ve placed the shards, step back and admire, your cake now looks absolutely worthy of a bakery window (but with way better chocolate).
Ingredients for Chocolate Shard Celebration Cake
- 280 g all-purpose flour (2 cups, spooned and leveled)
- 80 g Dutch-process cocoa powder (3/4 cup, sifted)
- 400 g granulated sugar (2 cups)
- 2 tsp baking powder
- 1 tsp baking soda
- 1.5 tsp fine sea salt
- 1 tbsp instant espresso powder (optional, but recommended)
- 120 ml neutral oil (1/2 cup, such as canola or grapeseed)
- 220 g sour cream (1 cup, full-fat)
- 120 ml whole milk (1/2 cup, room temperature)
- 4 large eggs (room temperature)
- 2 tsp vanilla extract
- 115 g bittersweet chocolate (4 oz, melted and cooled to lukewarm)
- 340 g European-style unsalted butter (1 1/2 cups, room temp, for frosting)
- 40 g Dutch-process cocoa powder (1/3 cup, sifted, for frosting)
- 330 g powdered sugar (2 3/4 cups, sifted, for frosting)
- 60 ml heavy cream (1/4 cup, plus more as needed, for frosting)
- 1 tsp vanilla extract (for frosting)
- 170 g bittersweet chocolate (6 oz, melted and slightly cooled, for frosting)
- 300 g bittersweet or semisweet chocolate (10.5 oz, for chocolate shards)
How to Make Chocolate Shard Celebration Cake
- STEP 1). Prep the cake pans and oven Grease three 8-inch (20cm) round cake pans, lining each with a circle of parchment on the bottom. Lightly grease the sides and dust with cocoa powder, knocking out any excess. Preheat your oven to 350°F (175°C) so it's fully heated before your batter is ready.
- STEP 2). Sift and combine dry ingredients Sift together the flour, cocoa powder, sugar, baking powder, baking soda, salt, and espresso powder (if using) into a large mixing bowl. Whisk briefly to ensure everything is evenly distributed and lump-free. Set aside while you prepare the wet ingredients.
- STEP 3). Mix wet ingredients and combine with dry In a separate bowl, whisk together the oil, sour cream, whole milk, eggs, and vanilla until fully blended. Pour this mixture into the dry ingredients and whisk until just combined and you see no pockets of flour, avoid overmixing for a soft crumb.
- STEP 4). Incorporate melted chocolate Whisk the melted and cooled bittersweet chocolate into the batter until the color is uniform and glossy. Scrape the bowl well to ensure all chocolate is distributed, and the batter looks smooth without streaks or lumps. Finish by scraping the sides with a flexible spatula.
- STEP 5). Divide and bake the cake layers Evenly divide the chocolate batter among your prepared pans (use a digital scale or measuring cup for accuracy). Smooth the tops, then bake on the center rack for 24 to 28 minutes, rotating the pans halfway through. Cakes are done when a toothpick comes out with moist, not wet, crumbs.
- STEP 6). Cool and unmold the cakes Let the cakes cool in their pans on a rack for 10 minutes; then run a thin knife around the edges and invert onto racks. Carefully peel off the parchment and let layers cool completely to room temperature before stacking. Don’t frost warm cakes, they’ll melt your buttercream.
- STEP 7). Make chocolate buttercream frosting Beat butter with a stand mixer and paddle attachment on medium-high for 3 minutes, until fluffy and pale. Sift in cocoa powder and powdered sugar; add vanilla and salt, beating on low until combined. Pour in the melted chocolate and heavy cream, then whip on high for 2 more minutes. Adjust texture with extra cream if needed.
- STEP 8). Assemble and fill the cake Level cake layers if needed. Place the first layer on your serving board and pipe or spread about 3/4 cup of buttercream evenly over the surface. Repeat with the second layer, then top with the final cake round. Press gently to set the stack before coating with a thin crumb coat.
- STEP 9). Crumb coat and final buttercream finish Spread a thin layer of buttercream over the top and sides of the stacked cake, sealing in crumbs. Chill for 20 minutes to set, then use an offset spatula and bench scraper to apply a final, thick layer of frosting. Aim for smooth, straight sides and a level top.
- STEP 10). Make dramatic chocolate shards Line a baking sheet with parchment. Melt the chocolate for shards gently over a double boiler or in the microwave (30-second bursts, stirring between), then temper if desired for a shinier snap. Pour onto the sheet and spread to about 1/8-inch thick. Chill until set, then break or slice into long, jagged shards of varying widths and heights.
- STEP 11). Decorate the cake with chocolate shards Make sure the frosted cake is chilled but the buttercream is still slightly tacky, not hard. Press chocolate shards vertically around the cake’s edges and cluster some atop the center. Vary direction and height for a spiky, celebratory finish. Chill 10 minutes to set the decorations before serving.
Storage and Freezing
- Keep cake refrigerated, covered, for up to 3 days. Bring to room temperature before serving for best texture and flavor.
- Freeze undecorated cake layers tightly wrapped for up to 2 months.
- Buttercream can be made ahead and refrigerated for 3 days or frozen for 1 month; re-whip before assembling.
- Chocolate shards keep at cool room temperature in an airtight container for up to 1 week.
Frequently Asked Questions
How do I get chocolate shards to stay upright on the cake?
To make chocolate shards stand up, make sure the buttercream is freshly applied and still slightly tacky when you insert the shards. Chill the frosted cake for about 10-15 minutes before decorating, so it’s firm enough to support weight but not so cold that the shards won’t adhere.
Gently press each shard into the frosting by the base, staggering height and angle for best stability. If your room is warm, work quickly and keep the cake chilled until ready to serve.
What kind of chocolate is best for making shards?
For dramatic, snappy shards, use good-quality bittersweet or semisweet chocolate with at least 60% cocoa.
Avoid chocolate chips, which have added stabilizers and do not melt or set smoothly for shards. If you want a super glossy finish, temper the chocolate, this keeps the shards shiny and crisp even at room temperature.
Can I make the cake layers or buttercream ahead?
Chocolate cake layers hold up beautifully when made ahead. Once completely cool, wrap each layer tightly in plastic wrap and refrigerate for up to 2 days or freeze for up to 2 months.
The buttercream also keeps well for 2-3 days in the fridge or can be frozen for up to a month. Allow to come to room temperature, then re-whip briefly until smooth before assembling the cake for best texture.
How do I keep my buttercream from splitting or becoming grainy?
Butter temperature is key, make sure your butter is softened but still cool to the touch. Always beat the butter until it is light and fluffy before adding any sugar.
Incorporate melted chocolate when it is just slightly warm, not hot, to prevent seizing. If your frosting looks split or curdled, continue beating on medium speed until it comes back together; adding a spoonful or two of cream can help smooth it out.
Is milk chocolate suitable for the shards or frosting?
Bittersweet or semisweet chocolate is the best choice for the shards because it sets firmly and gives you the bold color and clean, jagged finish this cake is known for. Milk chocolate is softer, so the shards may be more delicate at room temperature.
For the frosting, stick with the listed bittersweet chocolate. Swapping in milk chocolate would make the buttercream sweeter and could alter its texture and balance.
What’s the secret to perfectly moist chocolate cake layers?
Emulsifying oil and sour cream into the batter helps the cake retain moisture and tenderness for days. Avoid overbaking, start checking before the minimum time and stop as soon as a toothpick shows moist crumbs.
As always, measure your flour carefully and don’t skip the rest period after baking before unmolding and cooling. These steps ensure the cake stays soft yet sturdy enough for stacking.
More Ridiculously Delicious Cakes
- Two-Tier Chocolate Vanilla Celebration Cake
- Moist Chocolate Drip Cake with Buttercream and Glossy Ganache
- Bakery-Style Chocolate Hazelnut Birthday Cake
- Bakery-Style Chocolate Malt Birthday Cake
- Chocolate Mint Ganache Birthday Cake Recipe
Chocolate Shard Celebration Cake with Dramatic Finish
Ingredients
Equipment
Method
- Grease three 8-inch (20cm) round cake pans, lining each with a circle of parchment on the bottom. Lightly grease the sides and dust with cocoa powder, knocking out any excess. Preheat your oven to 350°F (175°C) so it's fully heated before your batter is ready.
- Sift together the flour, cocoa powder, sugar, baking powder, baking soda, salt, and espresso powder (if using) into a large mixing bowl. Whisk briefly to ensure everything is evenly distributed and lump-free. Set aside while you prepare the wet ingredients.
- In a separate bowl, whisk together the oil, sour cream, whole milk, eggs, and vanilla until fully blended. Pour this mixture into the dry ingredients and whisk until just combined and you see no pockets of flour, avoid overmixing for a soft crumb.
- Whisk the melted and cooled bittersweet chocolate into the batter until the color is uniform and glossy. Scrape the bowl well to ensure all chocolate is distributed, and the batter looks smooth without streaks or lumps. Finish by scraping the sides with a flexible spatula.
- Evenly divide the chocolate batter among your prepared pans (use a digital scale or measuring cup for accuracy). Smooth the tops, then bake on the center rack for 24 to 28 minutes, rotating the pans halfway through. Cakes are done when a toothpick comes out with moist, not wet, crumbs.
- Let the cakes cool in their pans on a rack for 10 minutes; then run a thin knife around the edges and invert onto racks. Carefully peel off the parchment and let layers cool completely to room temperature before stacking. Don’t frost warm cakes, they’ll melt your buttercream.
- Beat butter with a stand mixer and paddle attachment on medium-high for 3 minutes, until fluffy and pale. Sift in cocoa powder and powdered sugar; add vanilla and salt, beating on low until combined. Pour in the melted chocolate and heavy cream, then whip on high for 2 more minutes. Adjust texture with extra cream if needed.
- Level cake layers if needed. Place the first layer on your serving board and pipe or spread about 3/4 cup of buttercream evenly over the surface. Repeat with the second layer, then top with the final cake round. Press gently to set the stack before coating with a thin crumb coat.
- Spread a thin layer of buttercream over the top and sides of the stacked cake, sealing in crumbs. Chill for 20 minutes to set, then use an offset spatula and bench scraper to apply a final, thick layer of frosting. Aim for smooth, straight sides and a level top.
- Line a baking sheet with parchment. Melt the chocolate for shards gently over a double boiler or in the microwave (30-second bursts, stirring between), then temper if desired for a shinier snap. Pour onto the sheet and spread to about 1/8-inch thick. Chill until set, then break or slice into long, jagged shards of varying widths and heights.
- Make sure the frosted cake is chilled but the buttercream is still slightly tacky, not hard. Press chocolate shards vertically around the cake’s edges and cluster some atop the center. Vary direction and height for a spiky, celebratory finish. Chill 10 minutes to set the decorations before serving.
Notes
- Keep those layers even: Weigh your batter into the pans for uniform cakes that stack straight and bake at the same rate.
- Don’t rush cooling: Frosting a cake that’s even a little warm will melt your buttercream and make assembly messy and frustrating.
- Buttercream texture: For the smoothest frosting, beat your butter extra light before adding sugar and melt the chocolate until silky but not hot.
- Make-ahead bonus: Bake your layers, wrap tightly, and chill (or freeze) before decorating. The cake stays moist and sturdy for easy make-ahead assembly.
- Shards go on last minute: Add chocolate shards just before serving (or within a couple hours). Humidity or fridge time can dull their shine if left overnight.



