Table of Contents
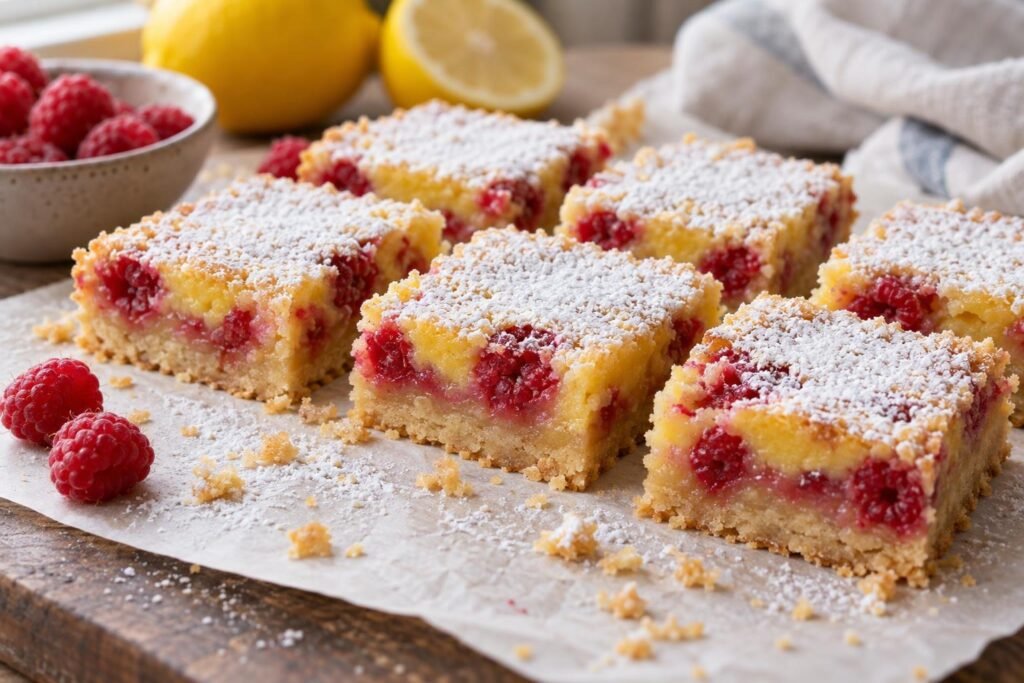
Raspberries and lemons are a pretty fantastic combination, especially when you tuck them into buttery shortbread bars! My raspberry lemon bars recipe has a golden, melt-in-your-mouth shortbread crust topped with a creamy, tangy lemon filling and juicy bursts of raspberry in every bite. I’ve made these bars enough times to know that the real magic happens when you get that lemon filling just right. The edges should be set, but the center should still have a gentle wobble when you take the pan out of the oven. That’s how you get a smooth, luscious filling instead of something firm and rubbery. And those raspberries? Their bright, slightly tart flavor cuts through the buttery richness, making each bite even better than the last. Once the bars are completely chilled, the filling firms up beautifully, and you can slice them into neat little squares with a gorgeous contrast of golden shortbread and raspberry-studded lemon filling. They’re sweet, tangy, buttery, and dangerously easy to keep eating. I dare you to stop at one!

Why You’ll Frickin’ Love These Raspberry Lemon Bars
- Buttery shortbread that’s delicious all on its own: I start with a thick, golden shortbread crust flavored with a little fresh lemon zest. It’s buttery, tender, and just firm enough to support that creamy lemon filling without falling apart when you pick up a square. I’d happily eat the shortbread by itself, but adding raspberries and lemon makes it even better!
- A tangy lemon filling bursting with raspberries: Fresh lemon juice and zest give the filling its bright citrus flavor, while juicy raspberries add little pockets of sweetness and tartness. I love how the berries break up the richness of the shortbread, so every bite has that beautiful balance of buttery, sweet, and tangy.
- A crisp base without a soggy bottom: Baking the shortbread before adding the lemon filling helps it develop structure and a lightly golden finish. Pouring the filling over the warm crust also helps the layers bake together without losing their distinct textures. The goal is buttery shortbread underneath and smooth, creamy lemon filling on top.
- Beautiful squares that actually hold their shape: These bars need time to cool, and I promise there’s a good reason for it! As the lemon filling cools and chills, it firms up enough to slice neatly without squishing into the shortbread. A sharp knife wiped between cuts gives you those gorgeous, bakery-style squares with little bursts of raspberry throughout.
- That creamy center is all about timing: Here’s the baking detail I pay the most attention to: the filling should look set around the edges but still have a slight wobble in the middle when the bars leave the oven. They’ll continue to firm as they cool, giving you a luscious lemon filling rather than a tough, overbaked layer. It’s a small detail that makes a delicious difference!
Ingredient Notes for Raspberry Lemon Bars
- Unsalted Butter: This forms the backbone of the shortbread. Using unsalted gives better control over the flavor and helps the crust stay rich and crumbly, not greasy.
- Granulated Sugar: Sweetens both the crust and filling. The amount in the crust keeps it crisp, while the filling’s sugar balances the lemon’s sharpness.
- All-Purpose Flour: Creates structure in the shortbread and lightly thickens the lemon curd, preventing sogginess even with juicy berries mixed in.
- Lemon Juice and Zest: Go for fresh lemons, the zest carries fantastic citrus oils, and fresh juice gives much livelier flavor than bottled. Adds the signature tang.
- Eggs: These set the curd layer into a sliceable custard. Mix gently for a silky filling and avoid adding air, which leads to a foamy, less creamy top.
- Fresh Raspberries: Frozen berries bleed more color and may weep. Use fresh, whole raspberries for the best texture and clean berry definition in every bite.
- Salt: A little brings the flavors forward, keeping the bars from tasting flat or cloying.
- Powdered Sugar (for dusting): Adds a bakery-style finish before serving, but only dust once the bars are fully cooled.
My Golden Rules for Perfect Raspberry Lemon Bars
- Keep the butter cold for that beautiful shortbread crust: I use chilled butter when making the crust because it helps create a tender, crumbly texture without making the dough greasy. Work it into the flour until the mixture resembles coarse crumbs, then press it evenly into the pan. You want a buttery shortbread base that holds together when sliced, not one that’s tough or hard as a rock!
- Watch the lemon filling, not just the timer: This is one of those recipes where a few extra minutes in the oven can change the texture. I look for edges that are set and a center that still has a gentle, unified wobble. The filling continues to firm as it cools, so don’t wait until the middle feels completely solid. That’s how you end up with creamy lemon bars instead of a firm, rubbery filling.
- Give the bars a proper chill before slicing: I know it’s tempting to cut into them while they’re still a little warm, but patience makes a huge difference here. Let the bars cool completely, then refrigerate them for at least two hours, or until thoroughly chilled. The filling becomes firm enough to hold its shape, and you’ll get those gorgeous, clean squares with distinct layers of shortbread and lemon.
- Spread those raspberries around: When adding the raspberries, distribute them evenly so every square gets a little burst of fruit. I avoid piling too many berries into one spot because they release moisture as they bake, which can leave softer pockets in the filling. A gentle, even arrangement gives you a much prettier slice and better flavor in every bite.
- Choose a metal pan for better baking control: I prefer a light-colored metal baking pan for lemon bars because it heats efficiently and gives the shortbread a more predictable bake. Glass heats differently and can hold heat longer, which may affect how the crust and filling set. Line the pan with parchment, leaving an overhang on two sides, so you can lift the chilled bars out without damaging those beautiful edges.
Ingredients for Raspberry Lemon Bars
- 135 grams unsalted butter (cold, cut into small cubes)
- 60 grams granulated sugar
- 1/4 teaspoon fine salt
- 180 grams all-purpose flour
- 1 tablespoon lemon zest (freshly grated (from about 1 large lemon))
- 3 large eggs (room temperature)
- 225 grams granulated sugar (for filling)
- 90 ml fresh lemon juice (from about 2 lemons)
- 25 grams all-purpose flour (for the filling, sifted)
- 1/4 teaspoon fine salt (for the filling)
- 120 grams fresh raspberries (rinsed and patted dry)
- for dusting powdered sugar (optional, for serving)
How to Make Raspberry Lemon Bars
- STEP 1). Line and prepare the pan Preheat the oven to 350°F (175°C). Grease an 8-inch square metal baking pan and line it with parchment paper, leaving extra overhang on two sides for easy lifting. This ensures your raspberry lemon bars come out cleanly after cooling, plus, it makes cutting neat squares a breeze.
- STEP 2). Mix and press the shortbread crust In a mixing bowl, combine the cold cubed butter, 60g sugar, 1/4 teaspoon salt, 180g flour, and lemon zest. Use your fingertips or a pastry blender to cut the butter in until the mixture looks sandy and holds a clump when pinched. Press firmly and evenly into the bottom of the prepared pan. Aim for a level layer with no thin spots.
- STEP 3). Bake the shortbread base Bake the crust for 21-24 minutes, until just set and pale golden around the edges. Rotate the pan halfway through for even baking. When ready, the crust should look dry on top and pale with faint golden edges. Remove and keep oven on for the next step.
- STEP 4). Mix the lemon filling While the crust bakes, whisk together the eggs, 225g sugar, fresh lemon juice, 25g flour, and 1/4 teaspoon salt in a clean bowl until smooth and glossy. Avoid whisking too vigorously, minimal air means a silkier set. Gently fold in the raspberries last, being careful not to crush them.
- STEP 5). Pour filling onto hot crust and bake Immediately pour the lemon-raspberry filling over the hot crust and gently tilt or spread so the raspberries are evenly distributed. Return to the oven and bake for 22-27 minutes. The center should jiggle just slightly when the pan is gently shaken; overbaking leads to a rubbery set.
- STEP 6). Cool completely before slicing Transfer the pan to a wire rack and cool to room temperature, about 90 minutes. Then cover and chill in the fridge for at least 2 hours before slicing. Chilling is crucial: the lemon layer finishes setting and allows for razor-sharp, bakery-style bars once cut.
- STEP 7). Lift, dust, and slice Lift the whole bar slab from the pan using the parchment. Dust with powdered sugar if desired. Use a large sharp knife, rinsing and drying between cuts for the cleanest edges. Serve chilled or at cool room temperature to keep the layers intact and bright.
Storage and Freezing
- Refrigerate bars in an airtight container for up to 4 days. Separate layers with parchment to prevent sticking.
- Freeze for up to 2 months once fully cooled and sliced. Wrap each bar in plastic and store in a freezer bag or container.
- Thaw bars in the fridge overnight, don’t rush at room temperature to avoid weeping or mushy layers.
- Serve bars chilled or allow to stand at cool room temperature for 20-30 minutes before plating for best flavor and structure.
Frequently Asked Questions
How do I know when my raspberry lemon bars are baked perfectly?
The bars are ready when the edges look set and the center still gives a very slight jiggle if you gently shake the pan. If the center sloshes or seems liquid, give it a few more minutes, but don’t wait until completely firm or the curd will overcook.
Cooling completely in the pan will finish setting them to a creamy, yet sliceable, texture. Aim for slightly less jiggle than you would for cheesecake or custard, but more than a brownie.
What’s the best way to slice raspberry lemon bars cleanly?
For sharp bakery-style squares, chill the bars completely so the layers are firm. Use the parchment overhang to lift the whole block from the pan.
Wipe your sharp chef’s knife between every slice to avoid dragging crumbs or berries through the filling. If the bars are sticky, a gentle wipe with a hot wet towel between cuts helps keep edges neat.
Can I make raspberry lemon bars ahead of time?
Raspberry lemon bars are actually better after a night in the fridge: the flavors meld and the texture holds up for clean slicing.
Bake and cool the bars a day in advance, then cover and refrigerate them whole or pre-sliced. Dust with powdered sugar right before serving for the freshest look.
Why does my lemon layer sometimes separate from the crust?
If the filling is poured onto a cooled or barely-warm base, it can seep between the crust and the pan, creating separation.
Pour the lemon curd filling onto the hot crust as soon as it comes out of the oven. This minor timing detail is the secret to bars with tightly layered, unbroken slices.
Are frozen raspberries suitable for these bars?
Frozen raspberries release considerable moisture as they bake, often resulting in streaked curd or damp, mushy sections.
For the cleanest flavor, appearance, and structure, I always recommend fresh, dry raspberries. If you must use frozen, do not thaw, toss them in flour, but expect some color bleeding and softer texture in the finished bars.
More Ridiculously Delicious Brownies & Bars
- Blueberry Lemon Bars with a Bright Berry Layer
- Classic Lemon Bars with a Buttery Shortbread Crust
- Raspberry Swirl Brownies with Fudgy Chocolate Centers
- My Best Homemade Chewy Raspberry Brownies Recipe
- White Chocolate Raspberry Blondies with Homemade Texture
Raspberry Lemon Bars
Ingredients
Equipment
Method
- Preheat the oven to 350°F (175°C). Grease an 8-inch square metal baking pan and line it with parchment paper, leaving extra overhang on two sides for easy lifting. This ensures your raspberry lemon bars come out cleanly after cooling, plus, it makes cutting neat squares a breeze.
- In a mixing bowl, combine the cold cubed butter, 60g sugar, 1/4 teaspoon salt, 180g flour, and lemon zest. Use your fingertips or a pastry blender to cut the butter in until the mixture looks sandy and holds a clump when pinched. Press firmly and evenly into the bottom of the prepared pan. Aim for a level layer with no thin spots.
- Bake the crust for 21-24 minutes, until just set and pale golden around the edges. Rotate the pan halfway through for even baking. When ready, the crust should look dry on top and pale with faint golden edges. Remove and keep oven on for the next step.
- While the crust bakes, whisk together the eggs, 225g sugar, fresh lemon juice, 25g flour, and 1/4 teaspoon salt in a clean bowl until smooth and glossy. Avoid whisking too vigorously, minimal air means a silkier set. Gently fold in the raspberries last, being careful not to crush them.
- Immediately pour the lemon-raspberry filling over the hot crust and gently tilt or spread so the raspberries are evenly distributed. Return to the oven and bake for 22-27 minutes. The center should jiggle just slightly when the pan is gently shaken; overbaking leads to a rubbery set.
- Transfer the pan to a wire rack and cool to room temperature, about 90 minutes. Then cover and chill in the fridge for at least 2 hours before slicing. Chilling is crucial: the lemon layer finishes setting and allows for razor-sharp, bakery-style bars once cut.
- Lift the whole bar slab from the pan using the parchment. Dust with powdered sugar if desired. Use a large sharp knife, rinsing and drying between cuts for the cleanest edges. Serve chilled or at cool room temperature to keep the layers intact and bright.
Notes
- Cold butter makes the best crust: Work quickly and keep the butter chilled until it’s mixed in. This prevents a greasy bottom and guarantees that irresistible shortbread texture with layered flakes.
- Don’t let the filling overbake: Pull the pan from the oven when the center jiggles slightly, like set gelatin, since it will continue to firm up as it cools. Overbaking means a grainy, rubbery lemon layer.
- Always cool, then chill before cutting: Room temperature is not enough, the bars need a couple of hours in the fridge for clean, straight slices and bars that hold their layers perfectly.
- Raspberry placement matters: Try to scatter raspberries evenly in the filling so every piece gets fruit. Crowding berries in one area may lead to soggy lines or damp spots.
- Use a metal pan, not glass: Metal conducts heat more evenly for these bars, promoting a base that cooks through without browning too much before the curd is set.