
Table of Contents
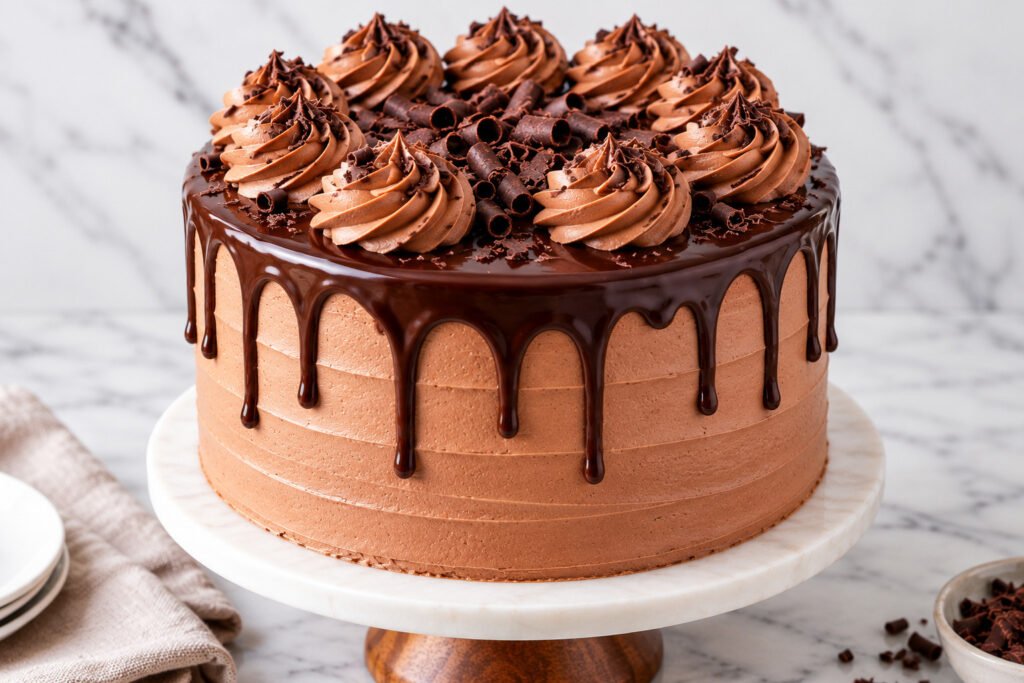
Chocolate dripping down the sides of a tall, beautifully frosted cake? Now that’s my kind of birthday cake! This chocolate drip cake with buttercream recipe has everything I want in a proper chocolate celebration cake: rich, soft cocoa layers, creamy vanilla buttercream, and glossy chocolate ganache that makes the whole thing look straight out of a bakery display. I use sour cream and neutral oil in the batter to keep the crumb wonderfully moist and tender, even after the cake has been chilled. But the part I really enjoy is getting those chocolate drips just right. I’ve learned that a well-chilled buttercream finish and ganache at the right temperature make all the difference between beautiful, controlled drips and chocolate running all the way to the cake board! Once you cut into it, you get that delicious contrast of deep chocolate cake, smooth vanilla frosting, and rich ganache in every forkful. It’s a little dramatic, wonderfully chocolatey, and absolutely worth making a fuss over.

What Makes This Chocolate Drip Cake So Frickin’ Good
- Deep chocolate flavor without the bitter bite: Dutch-process cocoa gives these cake layers their gorgeous dark color and rich chocolate flavor. I like how its smoother, mellow cocoa notes let the chocolate take center stage without making every bite taste overly bitter. And with a chocolate drip cake, the chocolate had better deliver!
- Soft, moist layers that stay that way: Sour cream and neutral oil work together to give the cake a tender, plush crumb. The sour cream adds richness and a subtle tang, while the oil helps keep the layers soft even after refrigeration. No one wants a gorgeous cake that turns dry the moment you slice it.
- Buttercream that’s made for decorating: I beat the softened butter until it’s light and creamy before gradually adding sifted confectioners’ sugar and a little cream. The result is smooth, spreadable frosting that makes it easier to coat the cake neatly and pipe those finishing touches. Getting the consistency right makes all the difference!
- Chocolate ganache with beautiful, controlled drips: This is where the cake really gets its personality! Warm cream melts the chopped chocolate into a glossy ganache, but I always let it cool to the right consistency before decorating. Too warm, and those drips race straight to the cake board. Too cool, and they barely move. You want those gorgeous trails of chocolate stopping naturally along the sides.
- Tall, beautiful layers that slice like a dream: I cool the cake layers completely and chill them before stacking because firmer layers are much easier to level, position, and frost. A short chill after the crumb coat also helps keep everything steady when the ganache goes on. The reward is a polished chocolate cake with distinct layers and beautiful slices that show off all that work.
Ingredient Notes for Chocolate Drip Cake With Buttercream
- All-purpose flour: Gives the cake enough structure to stand in tall layers without becoming dense; measure with a scale or fluff then scoop and level.
- Dutch-process cocoa powder: The Dutch process creates a rich, bittersweet flavor and deep chocolatey color, perfect for dramatic cake crumbs and smooth blending.
- Sour cream: Adds tangy richness and reliable moisture, keeping the cake soft for days and balancing the cocoa’s intensity.
- Neutral oil: I use canola or grapeseed for a delicate crumb. Oil stays liquid at room temperature, helping keep slices plush instead of stiff.
- Unsalted butter: Essential for both the cake and the buttercream, enabling you to control the salt levels; bring it fully to room temperature for smooth mixing.
- Powdered sugar: Sifted for the buttercream to eliminate lumps and create an airy, spreadable texture. Don’t skip the sifting, a little extra time, huge payoff.
- Heavy cream: For both the buttercream and ganache, supplying richness and helping the frosting whip and the drip flow smoothly.
- Bittersweet chocolate: Use good-quality chocolate for the ganache, ideally 60-70% cacao for best flavor and shine.
- Pure vanilla extract: Added to both cake and buttercream for subtle warmth and to round out the chocolate’s intensity.
- Fine sea salt: Accentuates every flavor and balances the sweetness, never skip the salt in either cake or buttercream.
Small Details That Matter
- Room temp is key: Make sure all dairy and eggs are completely at room temperature before mixing, cold ingredients prevent emulsification and can lead to a dense crumb or split batter.
- Don’t overmix: Once you add the flour to the wet ingredients, stir just until you no longer see dry streaks for a tender crumb and even rise.
- Level, then chill layers: For the cleanest stacking and sharpest appearance, chill cake layers after leveling. Stiff, cold cake is much easier to assemble and crumb-coat cleanly.
- Temperature controls the drip: Test your ganache on the back of a spoon before dripping, it should flow slowly, not run-off. Cool ganache another minute if it drips too quickly.
- Clean after each swipe: Wipe your offset spatula or scraper often when smoothing buttercream, this prevents crumbs and gives ultra-smooth sides worthy of a bakery window.
My Best Tips for Stacking and Decorating a Chocolate Drip Cake
Assembling a drip cake feels intimidating, but a few professional habits make all the difference for clean layers and gorgeous drips every time.
- Level all cake layers: Use a long serrated knife or cake leveler for even, flat layers, this is essential so the cake stands straight and doesn’t tilt under the buttercream.
- Crumb coat and chill: Spread a thin layer of buttercream over the stacked cake to lock in crumbs, then refrigerate for at least 30 minutes. This creates a smooth, stable base before you add the final coat.
- Smooth with a bench scraper: Spin the cake on a turntable and run a bench scraper around the sides, scraping lightly and frequently. Clean as you go for razor-sharp edges.
- Chill before dripping: Fully chill the frosted cake so the ganache sets quickly on contact, that’s how you get controlled drips, not streaks.
- Test the drip: Spoon a small amount of ganache down the side to gauge the temperature. If it runs all the way down, let it cool another minute before continuing.
Take your time through each step, and you’ll get that showstopping bakery finish, even if you’re just baking for yourself!
Ingredients for Chocolate Drip Cake With Buttercream
- 360 grams all-purpose flour (about 3 cups, sifted before measuring)
- 90 grams Dutch-process cocoa powder (about 1 cup)
- 3 teaspoons baking powder
- 1 teaspoon fine sea salt
- 360 grams granulated sugar (about 1 3/4 cups)
- 180 ml neutral oil (canola or grapeseed)
- 4 large eggs (room temperature)
- 2 teaspoons pure vanilla extract
- 340 ml sour cream (about 1 1/3 cups, room temperature)
- 240 ml hot water
- 340 grams unsalted butter (about 1 1/2 cups, room temperature (divided: 170g for cake, 170g for buttercream))
- 640 grams powdered sugar (about 5 1/3 cups, sifted)
- 60 ml heavy cream (about 1/4 cup, for buttercream (plus 180ml for ganache))
- 180 ml heavy cream (about 3/4 cup, for ganache)
- 230 grams bittersweet chocolate (finely chopped (about 8 oz, for ganache))
- 1/4 teaspoon fine sea salt (for buttercream)
How to Make Chocolate Drip Cake With Buttercream
- STEP 1). Prep cake pans and preheat oven Grease three 8-inch round cake pans, line bottoms with parchment, and grease again. Position a rack in the lower third of the oven and preheat to 350°F (175°C). Set aside while you prepare the cake batter.
- STEP 2). Mix dry ingredients In a large mixing bowl, sift together the flour, Dutch-process cocoa powder, baking powder, and fine sea salt. Whisk thoroughly to combine and aerate, ensuring the cocoa is completely distributed for an even crumb.
- STEP 3). Prepare wet ingredients In a separate bowl, whisk together granulated sugar, neutral oil, eggs, vanilla extract, and sour cream until smooth and glossy, with no streaks of egg or lumps of cream. This mixture should look thick and cohesive.
- STEP 4). Combine wet and dry ingredients Add the wet mixture to the sifted dry ingredients and mix with a paddle or large spatula until just combined, do not overmix. Pour in the hot water last, stirring gently until the batter is fully smooth and glossy.
- STEP 5). Divide and bake the cake Divide the batter evenly among the three prepared pans. Tap each pan gently to release large air bubbles, then bake for 25-29 minutes or until a toothpick inserted at the center comes out with a few moist crumbs, not wet batter.
- STEP 6). Cool and level layers Let cakes cool in their pans on racks for 10-12 minutes. Run a thin offset spatula around the edges, invert onto racks, and peel off the parchment. Once completely cool, use a long serrated knife to level each layer if necessary.
- STEP 7). Make the buttercream Beat 170g unsalted butter with a stand mixer until very light and fluffy, 3-4 minutes. Gradually add sifted powdered sugar and 1/4 teaspoon sea salt, mixing slowly at first to avoid a sugar cloud, then increase speed. Add vanilla and 60ml cream, beating on medium-high until thick, creamy and smooth.
- STEP 8). Stack and crumb coat the cake Place the first cake layer on a turntable, spread about 3/4 cup of buttercream over the surface, then repeat with the second layer. Top with the third layer. Spread a thin crumb coat over the entire cake, scraping excess back into the bowl. Chill for at least 30 minutes.
- STEP 9). Frost the cake Apply the remaining buttercream evenly over the chilled cake. Use an offset spatula and bench scraper to smooth the sides and top, spinning the cake turntable for clean lines and sharp edges. Chill again for at least 45 minutes before dripping.
- STEP 10). Make the ganache drip Place chopped bittersweet chocolate in a heatproof bowl. In a small saucepan, heat 180ml heavy cream until steaming (not boiling), then pour over the chocolate. Let sit 2 minutes, then whisk until shiny and completely smooth. Cool to room temperature; ganache should be thick but pourable.
- STEP 11). Decorate with the chocolate drip Transfer ganache to a squeeze bottle or use a spoon to carefully drip the ganache along the edges of the chilled cake, allowing it to run down naturally. Fill the center with more ganache and spread gently for a glossy finish. Let set 20 minutes before slicing or adding further decorations.
Storage and Freezing
- Store assembled cake loosely covered in the refrigerator for up to 4 days; bring to room temperature before serving for best texture.
- Freeze uncut, fully frosted cake by chilling until firm, then wrap in several layers of plastic and freeze up to 2 months.
- Thaw frozen cake in the fridge overnight, then uncover and let stand at room temperature for 1-2 hours before slicing.
- Add ganache drip no more than 1 day ahead for optimal shine and texture.
Frequently Asked Questions
What makes the ganache drip look so shiny and neat?
Achieving that glossy, controlled ganache drip is all about the right chocolate-to-cream ratio, finely chopped chocolate, and timing. Fully chill the cake before adding the ganache, if the cake is too warm, the drip can slide off or pool unevenly.
For clean drips, the ganache should be pourable but not hot, typically around body temperature. Always test your first drip to see how fast it travels; patience here pays off with photogenic results.
How do I keep my chocolate cake layers moist when making ahead?
Cake layers stay beautifully moist thanks to the oil and sour cream, but you can maximize freshness by wrapping the completely cooled, leveled cakes tightly in plastic and refrigerating up to 2 days, or freezing for up to 2 months.
Let thaw in the fridge overnight if frozen. Don’t stack layers for assembly until they’re close to room temperature to prevent condensation in the frosting.
Is it possible to use a different cocoa powder than Dutch-process?
Dutch-process cocoa gives a mellower, darker flavor and color with this formula, especially when combined with baking powder.
While you could use natural cocoa in a pinch, expect a lighter crumb and a subtle tang from the acidity. I recommend sticking with Dutch-process for the intended flavor and to ensure the cake rises evenly and develops its signature rich appearance.
What causes buttercream to look gritty or split?
Buttercream turns gritty if the powdered sugar isn’t thoroughly sifted or if butter is too cold, preventing proper emulsion. To avoid splitting, use butter at true room temperature, not greasy, not firm, and add cream only after your base is smooth.
If your buttercream ever splits, try beating it on low with a splash more cream until it comes together. Watch the texture as you go.
Can I assemble and decorate the entire cake a day in advance?
You can assemble and frost the cake a day ahead, chilling overnight actually helps the layers stabilize, making slicing easier.
For the glossiest and cleanest ganache drip, I recommend drizzling it on the day you plan to serve, as refrigeration can cause some dulling. If needed, garnish or add extra decorations after the drip has set for the sharpest look at showtime.
More Ridiculously Delicious Cakes
- Chocolate Caramel Drip Birthday Cake Recipe
- Chocolate Espresso Celebration Cake Recipe
- Bakery-Style Chocolate Hazelnut Birthday Cake
- Chocolate Fudge Birthday Cake With Whipped Ganache
- Chocolate Toffee Crunch Layer Cake Recipe with Moist Layers and Homemade Butter Toffee
Chocolate Drip Cake with Buttercream and Glossy Ganache
Ingredients
Equipment
Method
- Grease three 8-inch round cake pans, line bottoms with parchment, and grease again. Position a rack in the lower third of the oven and preheat to 350°F (175°C). Set aside while you prepare the cake batter.
- In a large mixing bowl, sift together the flour, Dutch-process cocoa powder, baking powder, and fine sea salt. Whisk thoroughly to combine and aerate, ensuring the cocoa is completely distributed for an even crumb.
- In a separate bowl, whisk together granulated sugar, neutral oil, eggs, vanilla extract, and sour cream until smooth and glossy, with no streaks of egg or lumps of cream. This mixture should look thick and cohesive.
- Add the wet mixture to the sifted dry ingredients and mix with a paddle or large spatula until just combined, do not overmix. Pour in the hot water last, stirring gently until the batter is fully smooth and glossy.
- Divide the batter evenly among the three prepared pans. Tap each pan gently to release large air bubbles, then bake for 25-29 minutes or until a toothpick inserted at the center comes out with a few moist crumbs, not wet batter.
- Let cakes cool in their pans on racks for 10-12 minutes. Run a thin offset spatula around the edges, invert onto racks, and peel off the parchment. Once completely cool, use a long serrated knife to level each layer if necessary.
- Beat 170g unsalted butter with a stand mixer until very light and fluffy, 3-4 minutes. Gradually add sifted powdered sugar and 1/4 teaspoon sea salt, mixing slowly at first to avoid a sugar cloud, then increase speed. Add vanilla and 60ml cream, beating on medium-high until thick, creamy and smooth.
- Place the first cake layer on a turntable, spread about 3/4 cup of buttercream over the surface, then repeat with the second layer. Top with the third layer. Spread a thin crumb coat over the entire cake, scraping excess back into the bowl. Chill for at least 30 minutes.
- Apply the remaining buttercream evenly over the chilled cake. Use an offset spatula and bench scraper to smooth the sides and top, spinning the cake turntable for clean lines and sharp edges. Chill again for at least 45 minutes before dripping.
- Place chopped bittersweet chocolate in a heatproof bowl. In a small saucepan, heat 180ml heavy cream until steaming (not boiling), then pour over the chocolate. Let sit 2 minutes, then whisk until shiny and completely smooth. Cool to room temperature; ganache should be thick but pourable.
- Transfer ganache to a squeeze bottle or use a spoon to carefully drip the ganache along the edges of the chilled cake, allowing it to run down naturally. Fill the center with more ganache and spread gently for a glossy finish. Let set 20 minutes before slicing or adding further decorations.
Notes
- Room temp is key: Make sure all dairy and eggs are completely at room temperature before mixing, cold ingredients prevent emulsification and can lead to a dense crumb or split batter.
- Don’t overmix: Once you add the flour to the wet ingredients, stir just until you no longer see dry streaks for a tender crumb and even rise.
- Level, then chill layers: For the cleanest stacking and sharpest appearance, chill cake layers after leveling. Stiff, cold cake is much easier to assemble and crumb-coat cleanly.
- Temperature controls the drip: Test your ganache on the back of a spoon before dripping, it should flow slowly, not run-off. Cool ganache another minute if it drips too quickly.
- Clean after each swipe: Wipe your offset spatula or scraper often when smoothing buttercream, this prevents crumbs and gives ultra-smooth sides worthy of a bakery window.



