
Table of Contents
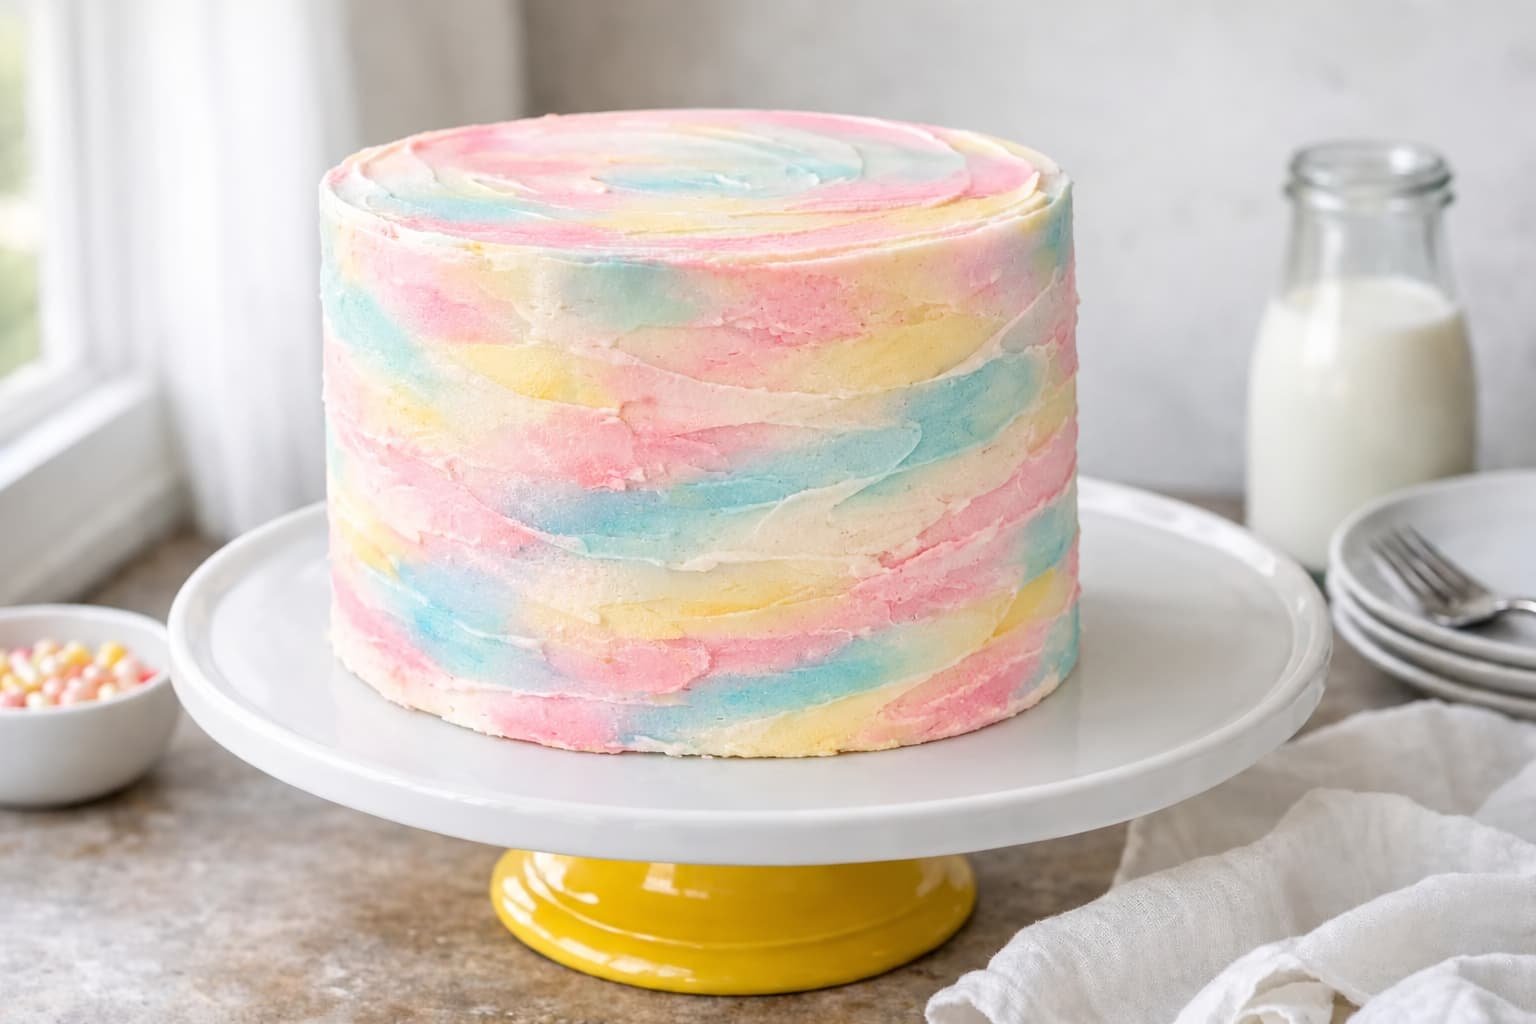
I’m never bored decorating a watercolor buttercream celebration cake recipe, the creamy swirls and brushstrokes practically invite you to play. You start with plush, bakery-style vanilla cake: supremely moist from a combination of oil and butter and just sturdy enough to stack tall. Here’s my favorite part, the Italian meringue buttercream. It’s far silkier and less sweet than the usual American kind, which means those colored swoops taste genuinely rich rather than tooth-aching. I love how the light, stable buttercream takes on color without losing its gloss. For a truly dreamy finish, I use a palette knife to blend soft pastel streaks around the cake, working quickly before the buttercream sets. Every side is a little different, and every party guest wants the slice with the prettiest swipe. If you’ve been eager to try a colorful celebration cake from scratch, this one makes the decorating almost as joyful as the eating.

What Makes this Cake So Ridiculously Good
- Bakery-style vanilla cake layers stay plush and stack-friendly: A blend of oil for long-lasting moisture and butter for flavor ensures your cake comes out soft, tall, and is solid enough to support beautiful tall sides and generous frosting.
- Italian meringue buttercream is ultra-smooth and stable: This style of buttercream beats a hot sugar syrup into whipped egg whites for a gorgeous, barely-sweet finish. It pipes and spreads easily, and won’t melt or sag when you start swirling on color.
- Pastel gel colors blend seamlessly: Gel food coloring lets you reach vivid or subtle watercolor effects in buttercream without messing up the butterfat texture. It won’t thin the frosting or cause separation, even when you want to layer multiple hues.
- Palette knife decorating creates beautiful, unique finishes: Spreading color in overlapping sweeps means every cake gets a one-of-a-kind appearance. You can layer, blend, or feather until the watercolor look is exactly how you imagined.
- The buttercream crumb coat locks in every last crumb: A quick chilling step after the first layer of buttercream ensures smooth, clean color application and keeps bits of cake from sneaking into those soft painted edges.
Ingredient Notes for Watercolor Buttercream Celebration Cake
- All-purpose flour: Provides sturdy structure and a moist, tender crumb, supporting the tall, layered format of the cake. Sift for extra lightness.
- Granulated sugar: Adds sweetness and helps aerate the batter when creamed with butter for an even rise.
- Unsalted butter: Gives rich flavor and a tender crumb. Let it fully soften for the creaming stage, but don’t allow it to become oily.
- Neutral oil (canola or sunflower): Locks in moisture and keeps cake soft for days, essential for plush layers that are still stackable.
- Eggs: Bind the mixture, provide lift, and contribute to the golden hue of the crumb. Room temperature eggs blend best.
- Whole milk: Keeps the cake batter fluid and adds richness and tenderness.
- Pure vanilla extract: The heart of the cake’s simple but inviting flavor.
- Baking powder and baking soda: Work together to give reliable lift and fluffy, well-aerated cake.
- Fine salt: Balances sweetness and sharpens the vanilla flavor.
- Egg whites (for buttercream): Provide the foundation for stable, fluffy Italian meringue.
- Granulated sugar (for syrup): Whipped hot into egg whites for the Italian meringue buttercream, this prevents grittiness and lends smooth, stable structure.
- Unsalted butter (for buttercream): Room temperature and cubed for faster mixing; gives the buttercream its signature silkiness.
- Powdered sugar: Adds finesse to the final buttercream smoothing and helps with the watercolor finish. Sift if lumpy.
- Gel food coloring: Use quality, concentrated gel colors for distinct watercolor effects without thinning out your buttercream.
Small Details That Matter
- Chill for clean stacks: Chilled, leveled cake layers stack more securely and are less likely to shed crumbs into your final finish.
- Check syrup for Italian meringue: Use a candy thermometer and do not walk away from your boiling sugar; bring it just to 240°F for a stable, glossy meringue.
- Mix buttercream thoroughly: If your meringue buttercream looks curdled after adding butter, keep beating, it will smooth out as the ingredients fully emulsify.
- Color buttercream last: Always tint smaller bowls of buttercream just before decorating to keep the pastel colors vibrant for your watercolor swirls.
- Wipe your palette knife: Clean your knife often when blending colors so your finished cake has distinct, soft transitions rather than muddy streaks.
My Best Tips for Stacking and Decorating a Watercolor Buttercream Cake
When I assemble and decorate a watercolor buttercream celebration cake, a little prep and the right technique keep things structural and stunning. Here’s how I get those bakery-worthy layers and a dreamy watercolor finish:
- Level and chill cake layers before stacking: Always trim domes and wrap layers in plastic while just slightly warm, then chill. Cold cake is less crumbly and stacks with sharp edges.
- Anchor with a dab of buttercream: Spread a small blob on your cake board before adding the first layer to prevent sliding mid-decorating.
- Crumb coat, then chill: A thin buttercream layer to trap crumbs makes your exterior smooth and flawless, the quick chill before painting is non-negotiable.
- Tint buttercream just before decorating: Divide buttercream into bowls and tint with gel color right before you start, so shades stay soft and lively. Keep your palette knife clean to avoid muddy colors.
- Work quickly while buttercream is slightly soft: Smooth the top and sides, then add colored swoops and blend while the frosting is creamy. If buttercream firms up, briefly warm your palette knife.
Embrace a little imperfection, those spontaneous, feathery edges are exactly what makes watercolor cakes so captivating on any celebration table.
Ingredients for Watercolor Buttercream Celebration Cake
- 2 1/2 cups all-purpose flour (sifted, 312g)
- 1 3/4 cups granulated sugar (350g, for cake)
- 1 tbsp baking powder
- 1/2 tsp baking soda
- 1/2 tsp fine salt
- 3/4 cup unsalted butter (softened, 170g)
- 1/3 cup neutral oil (canola or sunflower, 80ml)
- 4 large eggs (room temperature)
- 1 tbsp pure vanilla extract
- 1 cup whole milk (room temperature, 240ml)
- 1 cup unsalted butter (softened, 227g, for buttercream)
- 5 large egg whites (from about 5 eggs, for buttercream)
- 1 1/4 cups granulated sugar (250g, for Italian meringue)
- 1/4 cup water (60ml, for sugar syrup)
- 1 cup powdered sugar (120g, sifted)
- Gel food coloring (desired assorted soft colors)
How to Make Watercolor Buttercream Celebration Cake
- STEP 1). Preheat oven and prep cake pans Preheat your oven to 350°F (177°C). Grease and line three 8-inch round cake pans with parchment paper to ensure easy release. Greasing the sides and lining the bottoms helps cakes come out evenly without sticking or tearing the edges.
- STEP 2). Mix dry ingredients In a large bowl, sift together all-purpose flour, baking powder, baking soda and salt. Whisk in the sugar. Sifting and blending ensures even leavening and prevents any stubborn flour lumps in the finished crumb.
- STEP 3). Cream butter, oil, and sugar In the bowl of a stand mixer fitted with the paddle, beat the softened butter and oil together on medium speed for 2 minutes until fully blended and fluffy. Gradually add granulated sugar and mix for another 2 minutes until pale and slightly aerated.
- STEP 4). Add eggs and vanilla With the mixer on low, add eggs one at a time, waiting until each is fully blended before adding the next. Mix in vanilla extract. Scrape down the bowl and beat until the mixture looks creamy and slightly thickened, about 1 minute on medium.
- STEP 5). Incorporate dry and wet ingredients alternately With the mixer on low, alternately add the flour mixture in three additions and the milk in two additions, beginning and ending with flour. Blend until just combined, overmixing here makes cake layers tough. Scrape bowl to catch any dry pockets.
- STEP 6). Divide batter and bake Transfer batter evenly among the three pans, smoothing tops with an offset spatula. Bake on the center rack for 25-28 minutes until cakes spring back and a toothpick inserted in the center comes out clean or with just a few moist crumbs.
- STEP 7). Cool and level cake layers Let cakes cool in their pans on a rack for 10 minutes, then invert onto racks and peel away paper. Once at room temperature, use a large serrated knife to level each layer so they are flat and stackable. Wrap and chill for at least 30 minutes to minimize crumbs.
- STEP 8). Make Italian meringue buttercream In a clean stand mixer bowl, begin whipping egg whites on medium speed until they hold soft peaks. Meanwhile, cook sugar and water in a saucepan over medium-high heat to 240°F (115°C), brushing down crystals as needed. With mixer running, slowly stream in hot syrup. Beat on high until bowl is cool and meringue is glossy and stiff, about 7-10 minutes.
- STEP 9). Finish buttercream and tint colors Switch to the paddle and add softened butter, a few tablespoons at a time, mixing on medium until thickened and creamy. Beat in powdered sugar. If separating, keep mixing until smooth. Divide buttercream into bowls and tint each with gel coloring for watercolor decorating.
- STEP 10). Assemble and crumb coat cake On a cake board or serving plate, anchor the first cake layer with a dab of buttercream. Spread a thin, even layer of buttercream between each cake. Stack remaining layers, then apply a thin crumb coat around cake, smoothing with an offset spatula. Chill the stacked cake for 20 minutes to set.
- STEP 11). Apply watercolor buttercream finish Working with slightly softened tinted buttercream, use a clean palette knife or offset spatula to dollop soft streaks and sweeps of colored buttercream around the sides and top of the cake. Gently blend and feather the colors for a watercolor effect. Wipe knife between colors for crisp transitions.
- STEP 12). Final smoothing and serving Refrigerate cake just until the buttercream sets, 15-30 minutes. If desired, finish with more color blending or piped details. Let the finished cake stand at room temperature for 45 minutes before slicing. Use a hot, dry knife for clean, neat portions.
Storage and Freezing
- Store cake tightly covered in the refrigerator for up to 4 days.
- Freeze slices or whole cake (well wrapped) for up to 2 months.
- Thaw overnight in the fridge, then bring to room temperature for 45-60 minutes before serving to restore buttercream texture.
- Best served slightly cool or at room temp for silkiest frosting.
Frequently Asked Questions
How do I get the watercolor effect on buttercream without making the colors muddy?
To avoid muddy colors, use separate bowls and palette knives for each color and wipe your tool between swipes.
Work with slightly softened buttercream so the colors blend smoothly but keep their definition. Applying small dabs and gently feathering them around the cake, rather than heavy smearing, helps achieve a delicate watercolor finish and prevents over-mixing.
What’s the difference between Italian meringue buttercream and American buttercream in this cake?
Italian meringue buttercream is much silkier and less sweet than American buttercream because it’s made by whipping a hot sugar syrup into meringue and then blending in butter.
The result is smoother, more stable and ideal for watercolor finishes, as it holds color and structure better without crusting or becoming overly sweet. American buttercream, made from just butter and powdered sugar, is quicker but less refined in texture.
Why do you alternate dry and wet ingredients when mixing cake batter?
Alternating dry and wet ingredients ensures the flour becomes evenly moistened, preventing lumps and minimizing gluten development.
This keeps the cake crumb soft and prevents toughness. By starting and ending with dry ingredients, you stabilize the emulsion of fats and liquids for a tender and even bake, especially important in layered cakes where structure matters.
Can I make and freeze the cake layers ahead for a special event?
Cake layers freeze exceptionally well when wrapped tightly in plastic wrap and stored in a zip-top bag or airtight container.
Cool and level the layers first. To use, simply thaw in the fridge overnight, then bring to room temperature, this not only saves time but makes assembly smoother and reduces crumbs, making it perfect for party prep.
How do I prevent air bubbles in the buttercream when smoothing the sides?
Work with buttercream that is creamy but not overly soft; too cold and it traps bubbles, too warm and it slides.
Apply buttercream in generous swipes, then smooth with a long offset spatula or bench scraper. If bubbles form, gently tap or swirl them out with a palette knife at the end for a glassy, elegant finish.
Is it necessary to use a stand mixer for this watercolor buttercream celebration cake recipe?
A stand mixer is not strictly necessary, but it is the best choice for the Italian meringue buttercream. The whisk attachment can whip the egg whites while the hot syrup is added, then keep beating until the meringue is glossy, stiff, and the bowl has cooled.
A sturdy handheld mixer can work, though you will need patience and careful control while streaming in the syrup. Whipping by hand is not practical here because the meringue requires sustained mixing before the softened butter is added.
More Ridiculously Delicious Cakes
- Elegant Raspberry Elderflower Celebration Cake
- Two-Tier Chocolate Vanilla Celebration Cake
- Peach Melba Celebration Cake
- Lemon Lavender Celebration Cake Recipe
- Bakery-Style Vintage Blue Buttercream Birthday Cake
Watercolor Buttercream Celebration Cake with Soft Color
Ingredients
Equipment
Method
- Preheat your oven to 350°F (177°C). Grease and line three 8-inch round cake pans with parchment paper to ensure easy release. Greasing the sides and lining the bottoms helps cakes come out evenly without sticking or tearing the edges.
- In a large bowl, sift together all-purpose flour, baking powder, baking soda and salt. Whisk in the sugar. Sifting and blending ensures even leavening and prevents any stubborn flour lumps in the finished crumb.
- In the bowl of a stand mixer fitted with the paddle, beat the softened butter and oil together on medium speed for 2 minutes until fully blended and fluffy. Gradually add granulated sugar and mix for another 2 minutes until pale and slightly aerated.
- With the mixer on low, add eggs one at a time, waiting until each is fully blended before adding the next. Mix in vanilla extract. Scrape down the bowl and beat until the mixture looks creamy and slightly thickened, about 1 minute on medium.
- With the mixer on low, alternately add the flour mixture in three additions and the milk in two additions, beginning and ending with flour. Blend until just combined, overmixing here makes cake layers tough. Scrape bowl to catch any dry pockets.
- Transfer batter evenly among the three pans, smoothing tops with an offset spatula. Bake on the center rack for 25-28 minutes until cakes spring back and a toothpick inserted in the center comes out clean or with just a few moist crumbs.
- Let cakes cool in their pans on a rack for 10 minutes, then invert onto racks and peel away paper. Once at room temperature, use a large serrated knife to level each layer so they are flat and stackable. Wrap and chill for at least 30 minutes to minimize crumbs.
- In a clean stand mixer bowl, begin whipping egg whites on medium speed until they hold soft peaks. Meanwhile, cook sugar and water in a saucepan over medium-high heat to 240°F (115°C), brushing down crystals as needed. With mixer running, slowly stream in hot syrup. Beat on high until bowl is cool and meringue is glossy and stiff, about 7-10 minutes.
- Switch to the paddle and add softened butter, a few tablespoons at a time, mixing on medium until thickened and creamy. Beat in powdered sugar. If separating, keep mixing until smooth. Divide buttercream into bowls and tint each with gel coloring for watercolor decorating.
- On a cake board or serving plate, anchor the first cake layer with a dab of buttercream. Spread a thin, even layer of buttercream between each cake. Stack remaining layers, then apply a thin crumb coat around cake, smoothing with an offset spatula. Chill the stacked cake for 20 minutes to set.
- Working with slightly softened tinted buttercream, use a clean palette knife or offset spatula to dollop soft streaks and sweeps of colored buttercream around the sides and top of the cake. Gently blend and feather the colors for a watercolor effect. Wipe knife between colors for crisp transitions.
- Refrigerate cake just until the buttercream sets, 15-30 minutes. If desired, finish with more color blending or piped details. Let the finished cake stand at room temperature for 45 minutes before slicing. Use a hot, dry knife for clean, neat portions.
Notes
- Chill for clean stacks: Chilled, leveled cake layers stack more securely and are less likely to shed crumbs into your final finish.
- Check syrup for Italian meringue: Use a candy thermometer and do not walk away from your boiling sugar; bring it just to 240°F for a stable, glossy meringue.
- Mix buttercream thoroughly: If your meringue buttercream looks curdled after adding butter, keep beating, it will smooth out as the ingredients fully emulsify.
- Color buttercream last: Always tint smaller bowls of buttercream just before decorating to keep the pastel colors vibrant for your watercolor swirls.
- Wipe your palette knife: Clean your knife often when blending colors so your finished cake has distinct, soft transitions rather than muddy streaks.



