
Table of Contents
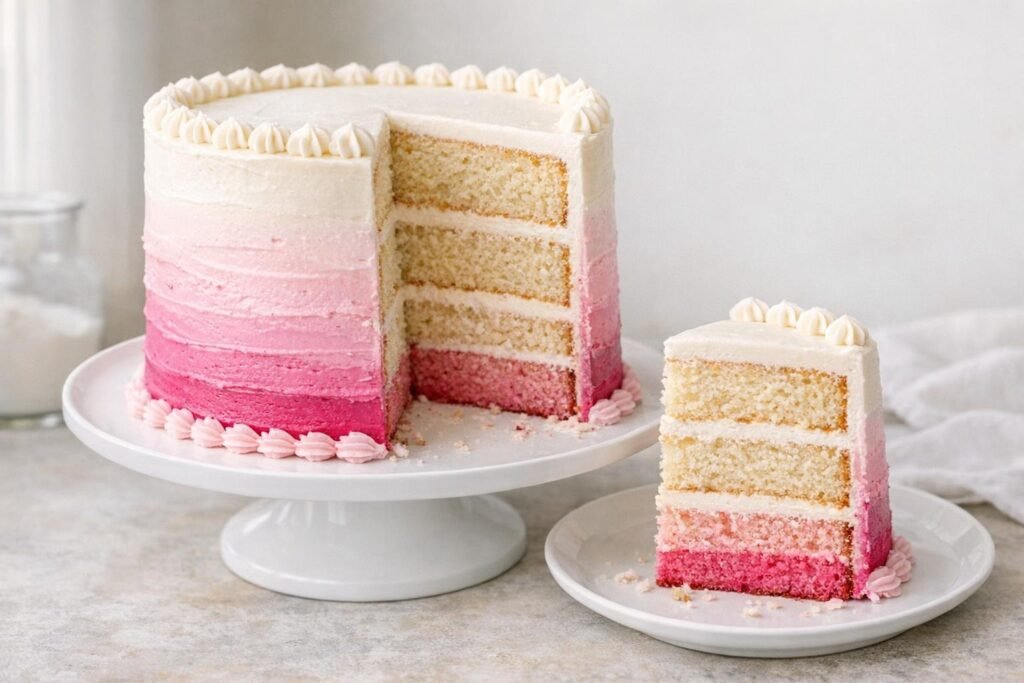
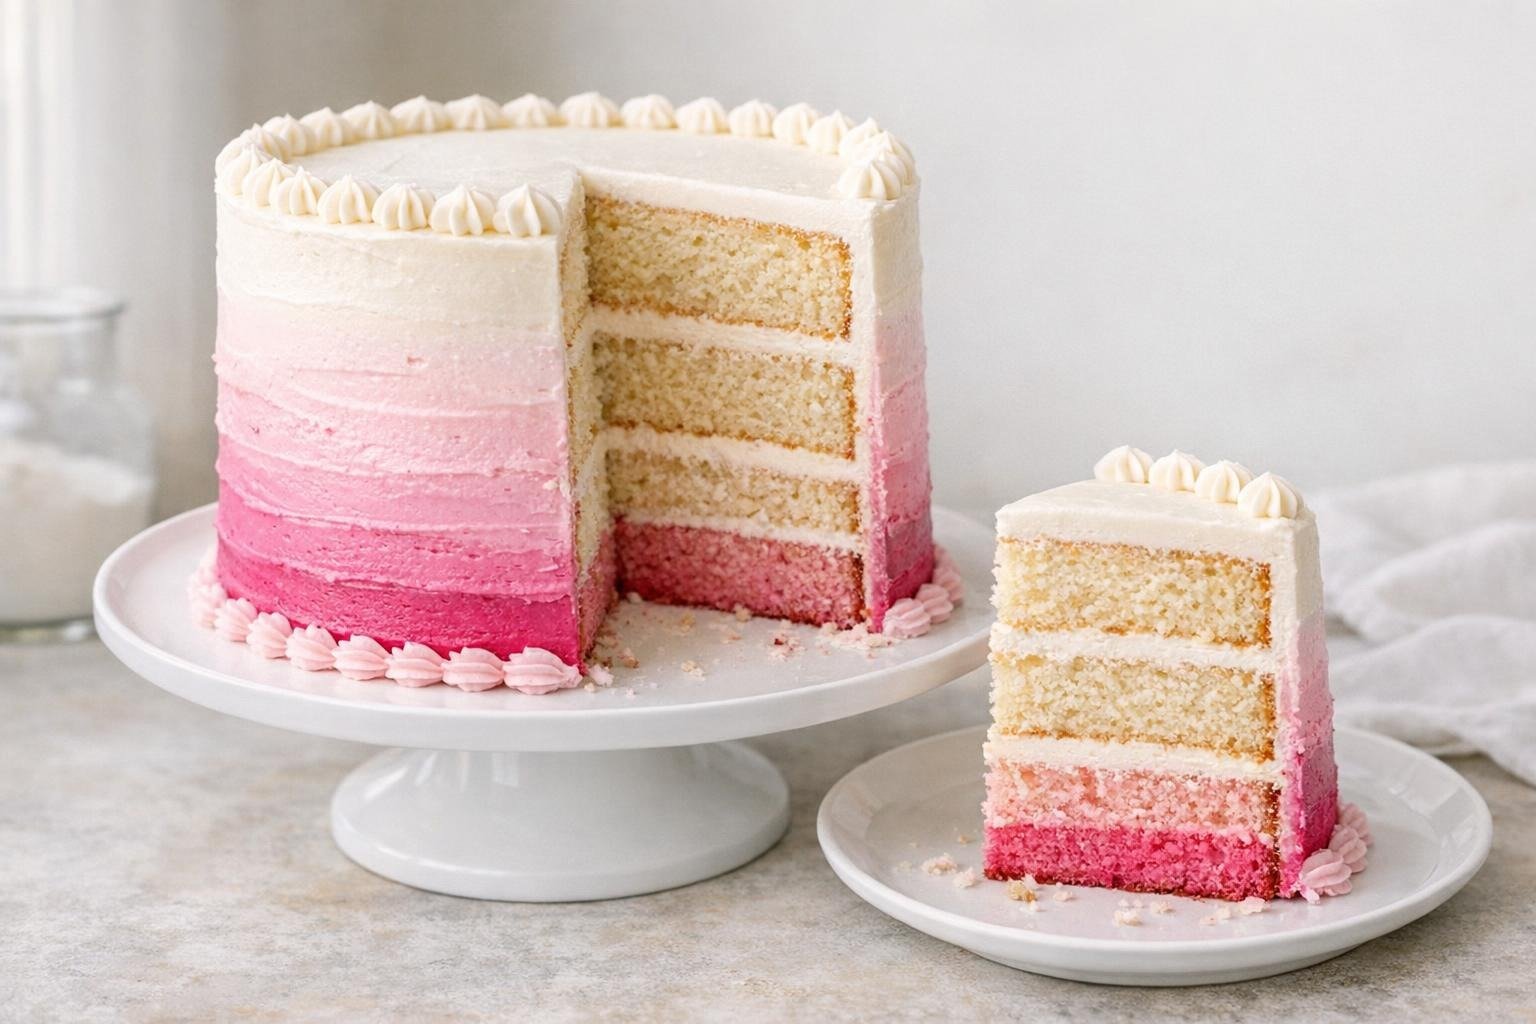
Few things say "celebration" more than an ombre vanilla birthday cake recipe, and this one delivers both stunning looks and bakery-quality flavor. Picture pillowy-soft vanilla cake layers, each holding just the right balance of sweetness, stacked high under swaths of the silkiest buttercream. What I love about this cake is how it gently transitions from white through dreamy pinks to a bolder fuchsia, all in one show-stopping slice. My secret is using all egg whites for an extra-light crumb, while buttermilk keeps the layers plush and tender. The buttercream blends up creamy and spreadable, making those ombre streaks a breeze, no need for fancy equipment or nerves of steel. It’s perfect for birthdays or any day you want something a little extra magical. Every bite delivers pure vanilla delight and a little color-fueled joy.
What Makes this Vanilla Cake So Ridiculously Good
- All egg whites for maximum lightness: Using only egg whites in the batter yields a cake that’s delicate in texture and brilliantly white, so your ombre colors pop even more.
- Buttermilk ensures softness and lift: The acidity in buttermilk reacts with the leaveners, producing a velvety, moist crumb that stays tender even after chilling or stacking.
- American buttercream pipes and blends perfectly: Butter and powdered sugar whip up into a stable, smooth frosting that takes color well and holds crisp edges, or softly blended gradients, without melting away.
- Easy bowl-to-pan mixing minimizes overworking: After creaming the butter and sugar, the alternating addition of wet and dry ingredients helps prevent overmixing for tender cake layers every time.
- Gel color is more vibrant and stable: Using concentrated gel food coloring makes blending the ombre effect in the frosting easy, and you only need a tiny amount for impactful color without thinning the texture.
Ingredient Notes for Ombre Vanilla Birthday Cake
- Cake flour: Delivers a soft, fine crumb that stays extra light. Sift before using for maximum aeration.
- Unsalted butter: Creamed properly, it adds richness and structure without overwhelming vanilla flavors.
- Granulated sugar: Not just for sweetness, proper creaming aerates the butter, building volume into your cake layers.
- Egg whites: Make the crumb especially white and airy, and support a vibrant ombre presentation.
- Buttermilk: Its acidity tenderizes the crumb and balances the overall sweetness.
- Vanilla extract: I use a full tablespoon for unmistakable vanilla flavor in every bite, both in the cake and buttercream.
- Baking powder and baking soda: Both ensure the cake rises evenly and each slice is fluffy and light.
- Powdered sugar: Essential for a smooth, pipeable buttercream that sets nicely and doesn’t get gritty.
- Whole milk (in buttercream): Just a splash keeps the frosting creamy and spreadable for smooth transitions.
- Gel food coloring: Vibrant and highly concentrated so you can create striking ombre gradients without thinning the frosting.
My Frosting and Filling Tips
- Chill your layers before stacking: Cold cake layers are much sturdier and make it easier to apply the crumb coat and final frosting without crumbs everywhere.
- Start ombre shades light and build up: Add gel color gradually to control intensity, you can always go darker, but never lighter. Tints deepen as they sit.
- Scrape between color bands: Clean your spatula after spreading each shade to prevent muddy colors and achieve a sharp, clean ombre effect.
- Rotate as you frost: Turn the cake stand or plate while you work, so you don’t overwork one section and get a smoother, more even gradient.
- Let the cake set before slicing: Chilling the finished cake for at least 30 minutes makes for neater slices and sharper, more distinct color bands.
My Best Tips for Stacking and Decorating an Ombre Vanilla Birthday Cake
This cake is all about those dreamy sunset layers. I’ve collected my best ombre and stacking advice here so your cake looks as spectacular on the platter as it tastes.
- Chill before you stack: Let your cake layers cool completely, then chill them for at least 30 minutes to make handling and frosting much easier.
- Level for drama: Use a long serrated knife to trim domed tops so your layers sit perfectly flat for that pro-stacked look.
- Crumb coat is your friend: Spread a thin layer of buttercream over the entire cake, then chill it for 20 minutes to lock in crumbs before applying the final ombre.
- Use small angled spatulas: These let you blend the color bands gently together, go in small circles or swoops for that signature graduated finish.
- Work from light to dark: Start with the palest color at the top and add more coloring as you work your way down, scraping your spatula between shades to keep gradients clean.
Ombre decorating seems intimidating, but with these steps, it’s pure bakery magic in your own kitchen.
Ingredients for Ombre Vanilla Birthday Cake
- 375 grams cake flour (sifted (about 3 cups))
- 2 teaspoons baking powder
- 1/2 teaspoon baking soda
- 1 teaspoon fine salt
- 227 grams unsalted butter (room temperature (1 cup))
- 400 grams granulated sugar ((2 cups))
- 6 large egg whites (room temperature)
- 1 tablespoon vanilla extract
- 360 ml buttermilk (room temperature (1 1/2 cups))
- 600 grams unsalted butter (room temperature (for buttercream, about 2 2/3 cups))
- 800 grams powdered sugar (sifted (about 6 1/3 cups))
- 1/2 teaspoon fine salt (for buttercream)
- 2 teaspoons vanilla extract (for buttercream)
- 2-4 tablespoons whole milk (for buttercream, as needed)
- as needed gel food coloring (pink, fuchsia, or desired shades) (for ombre effect)
How to Make Ombre Vanilla Birthday Cake
- STEP 1). Prep pans and ingredients Preheat oven to 350°F (175°C). Grease three 8-inch round cake pans, line bottoms with parchment paper, and lightly flour sides. Sift cake flour, baking powder, baking soda, and salt together in a medium bowl and set aside. Have all ingredients at room temperature for best incorporation.
- STEP 2). Cream butter and sugar thoroughly In a stand mixer fitted with the paddle, beat unsalted butter and granulated sugar on medium speed until pale, fluffy, and increased in volume, about 3-5 minutes. Scrape bowl as needed. You’re looking for a very light mixture, the foundation for even crumb.
- STEP 3). Add egg whites and vanilla gradually With mixer on low, add egg whites one at a time, beating well after each addition so the mixture stays smooth and cohesive. Mix in vanilla extract. Scrape the bowl and beat until fully blended, don’t rush this step, or the batter may look curdled.
- STEP 4). Alternate dry ingredients and buttermilk With mixer on low speed, add sifted dry ingredients in three parts, alternating with buttermilk in two parts. Begin and end with flour. Mix just until each addition is incorporated, do not overmix. Stop as soon as no dry pockets remain and the batter looks silky.
- STEP 5). Divide and bake the cake layers Evenly divide the batter among the three prepared pans (about 550g per pan). Smooth tops gently with a spatula. Bake at 350°F for 23-27 minutes, or until the tops spring back and a toothpick comes out clean with a few moist crumbs. Rotate pans halfway for even baking.
- STEP 6). Cool and level the cakes Let cakes cool in pans for 10 minutes, then turn out onto wire racks. Peel away parchment, cool completely, and refrigerate for 30-60 minutes. For perfectly stacked layers, trim domed tops with a serrated knife when completely cold.
- STEP 7). Prepare buttercream frosting In a large bowl, beat unsalted butter with hand mixer or stand mixer on medium-high until creamy and pale, 3 minutes. Gradually add sifted powdered sugar and salt, mixing on low after each addition. Add vanilla extract and 2 tablespoons milk, then whip on high for 2-3 minutes until light and spreadable. Add more milk if needed for consistency.
- STEP 8). Divide and tint buttercream for ombre Set aside about a third of buttercream for the palest (white or light pink) shade. Divide remaining buttercream equally among 2-3 bowls and tint each a deeper shade using gel food coloring. Start with a toothpick’s tip of color, gel is potent, and blend well.
- STEP 9). Assemble stacked cake layers Place first cake layer on a serving board. Spread a generous layer of plain buttercream. Add second cake, cover with more buttercream, and finish with third layer. Use about half the untinted or palest buttercream for the crumb coat. Smooth thinly over cake, then chill for 20 minutes.
- STEP 10). Frost with ombre gradient Working from top down, spread your lightest buttercream over the top and upper third of cake, then the mid-shade around the middle, and the deepest shade toward the bottom. Use a small offset spatula or bench scraper to gently blend the edges where the colors meet for a seamless gradient. Chill 30 minutes before slicing.
Storage and Freezing
- Cake keeps best covered in the fridge for up to 4 days. Let rest at room temp 60 minutes before serving for ideal buttercream texture.
- Freeze cake layers (unfrosted, double-wrapped) up to 2 months.
- Freeze frosted cake slices airtight for 2 weeks.
- Thaw overnight in fridge and bring to room temp before enjoying.
- Keep out of direct sunlight to maintain vibrant ombre shades.
Frequently Asked Questions
How do I avoid overbaking or dry cake layers for this ombre vanilla birthday cake?
To keep your layers perfectly moist, start checking for doneness at the lower end of the bake window. Look for cakes that spring back gently when touched and release a tester with a few moist (not wet) crumbs.
Cooling in the pans for just 10 minutes is key to prevent steam from drying the edges. Chilling before assembling also locks in moisture while making the layers easier to handle.
What’s the best way to get seamless ombre frosting without harsh lines?
To create a smooth gradient, overlap your color bands slightly as you apply them along the sides of the cake.
Use a small offset spatula or bench scraper, holding it vertically, and blend just the edges where two colors meet with gentle back-and-forth swipes. Clean your spatula between color changes for crisp results, and work in natural light so you can judge the blending effectively.
Can you use liquid food coloring instead of gel for ombre gradients?
You can use liquid food coloring, but it is less concentrated than gel, so you may need more to create vivid ombre shades. The extra liquid can loosen the buttercream and make the color bands harder to control.
Gel food coloring is the better choice because a small amount produces deeper color without noticeably changing the frosting’s consistency. If using liquid coloring, add it gradually and blend thoroughly before deciding whether the shade needs more.
How far in advance can I make this ombre vanilla birthday cake?
You can bake the cake layers up to 2 days ahead, just wrap and refrigerate them.
The buttercream can be made a day ahead and kept covered at room temperature if your kitchen is cool or refrigerated if warm. Assemble and frost the cake the day of your event for best color freshness and softest crumb, chilling it briefly to set the ombre before slicing.
What should I do if my buttercream turns too soft while frosting?
If your buttercream starts to lose structure or seems melty as you work, pause and pop the bowl (or even the whole cake) in the fridge for 15-20 minutes.
Chilled butter firms up quickly and makes spreading and blending far easier, especially when working with multiple colors or on a warm day. Resist adding more sugar, which can turn the frosting gritty.
How do I keep my cake layers looking white to maximize the ombre color contrast?
Using only egg whites rather than whole eggs keeps the crumb pale, and cake flour also helps.
Make sure your vanilla extract is clear or use only a little brown extract to avoid warm tinges. Avoid overbaking, which darkens the outside; trim any deeply browned edges after cooling for the cleanest interior once sliced.
More Ridiculously Delicious Cakes
- Bakery-Style Passion Fruit Vanilla Layer Cake Recipe
- Vanilla Rosewater Raspberry Cake with Berry Filling
- Vanilla Confetti Cake With Sprinkle Buttercream
- Vintage Vanilla Bow Cake
- Vanilla Bean Layer Cake with Soft, Tender Layers
Ombre Vanilla Birthday Cake with Graduated Frosting
Ingredients
Equipment
Method
- Preheat oven to 350°F (175°C). Grease three 8-inch round cake pans, line bottoms with parchment paper, and lightly flour sides. Sift cake flour, baking powder, baking soda, and salt together in a medium bowl and set aside. Have all ingredients at room temperature for best incorporation.
- In a stand mixer fitted with the paddle, beat unsalted butter and granulated sugar on medium speed until pale, fluffy, and increased in volume, about 3-5 minutes. Scrape bowl as needed. You’re looking for a very light mixture, the foundation for even crumb.
- With mixer on low, add egg whites one at a time, beating well after each addition so the mixture stays smooth and cohesive. Mix in vanilla extract. Scrape the bowl and beat until fully blended, don’t rush this step, or the batter may look curdled.
- With mixer on low speed, add sifted dry ingredients in three parts, alternating with buttermilk in two parts. Begin and end with flour. Mix just until each addition is incorporated, do not overmix. Stop as soon as no dry pockets remain and the batter looks silky.
- Evenly divide the batter among the three prepared pans (about 550g per pan). Smooth tops gently with a spatula. Bake at 350°F for 23-27 minutes, or until the tops spring back and a toothpick comes out clean with a few moist crumbs. Rotate pans halfway for even baking.
- Let cakes cool in pans for 10 minutes, then turn out onto wire racks. Peel away parchment, cool completely, and refrigerate for 30-60 minutes. For perfectly stacked layers, trim domed tops with a serrated knife when completely cold.
- In a large bowl, beat unsalted butter with hand mixer or stand mixer on medium-high until creamy and pale, 3 minutes. Gradually add sifted powdered sugar and salt, mixing on low after each addition. Add vanilla extract and 2 tablespoons milk, then whip on high for 2-3 minutes until light and spreadable. Add more milk if needed for consistency.
- Set aside about a third of buttercream for the palest (white or light pink) shade. Divide remaining buttercream equally among 2-3 bowls and tint each a deeper shade using gel food coloring. Start with a toothpick’s tip of color, gel is potent, and blend well.
- Place first cake layer on a serving board. Spread a generous layer of plain buttercream. Add second cake, cover with more buttercream, and finish with third layer. Use about half the untinted or palest buttercream for the crumb coat. Smooth thinly over cake, then chill for 20 minutes.
- Working from top down, spread your lightest buttercream over the top and upper third of cake, then the mid-shade around the middle, and the deepest shade toward the bottom. Use a small offset spatula or bench scraper to gently blend the edges where the colors meet for a seamless gradient. Chill 30 minutes before slicing.
Notes
- Chill your layers before stacking: Cold cake layers are much sturdier and make it easier to apply the crumb coat and final frosting without crumbs everywhere.
- Start ombre shades light and build up: Add gel color gradually to control intensity, you can always go darker, but never lighter. Tints deepen as they sit.
- Scrape between color bands: Clean your spatula after spreading each shade to prevent muddy colors and achieve a sharp, clean ombre effect.
- Rotate as you frost: Turn the cake stand or plate while you work, so you don’t overwork one section and get a smoother, more even gradient.
- Let the cake set before slicing: Chilling the finished cake for at least 30 minutes makes for neater slices and sharper, more distinct color bands.



