Table of Contents
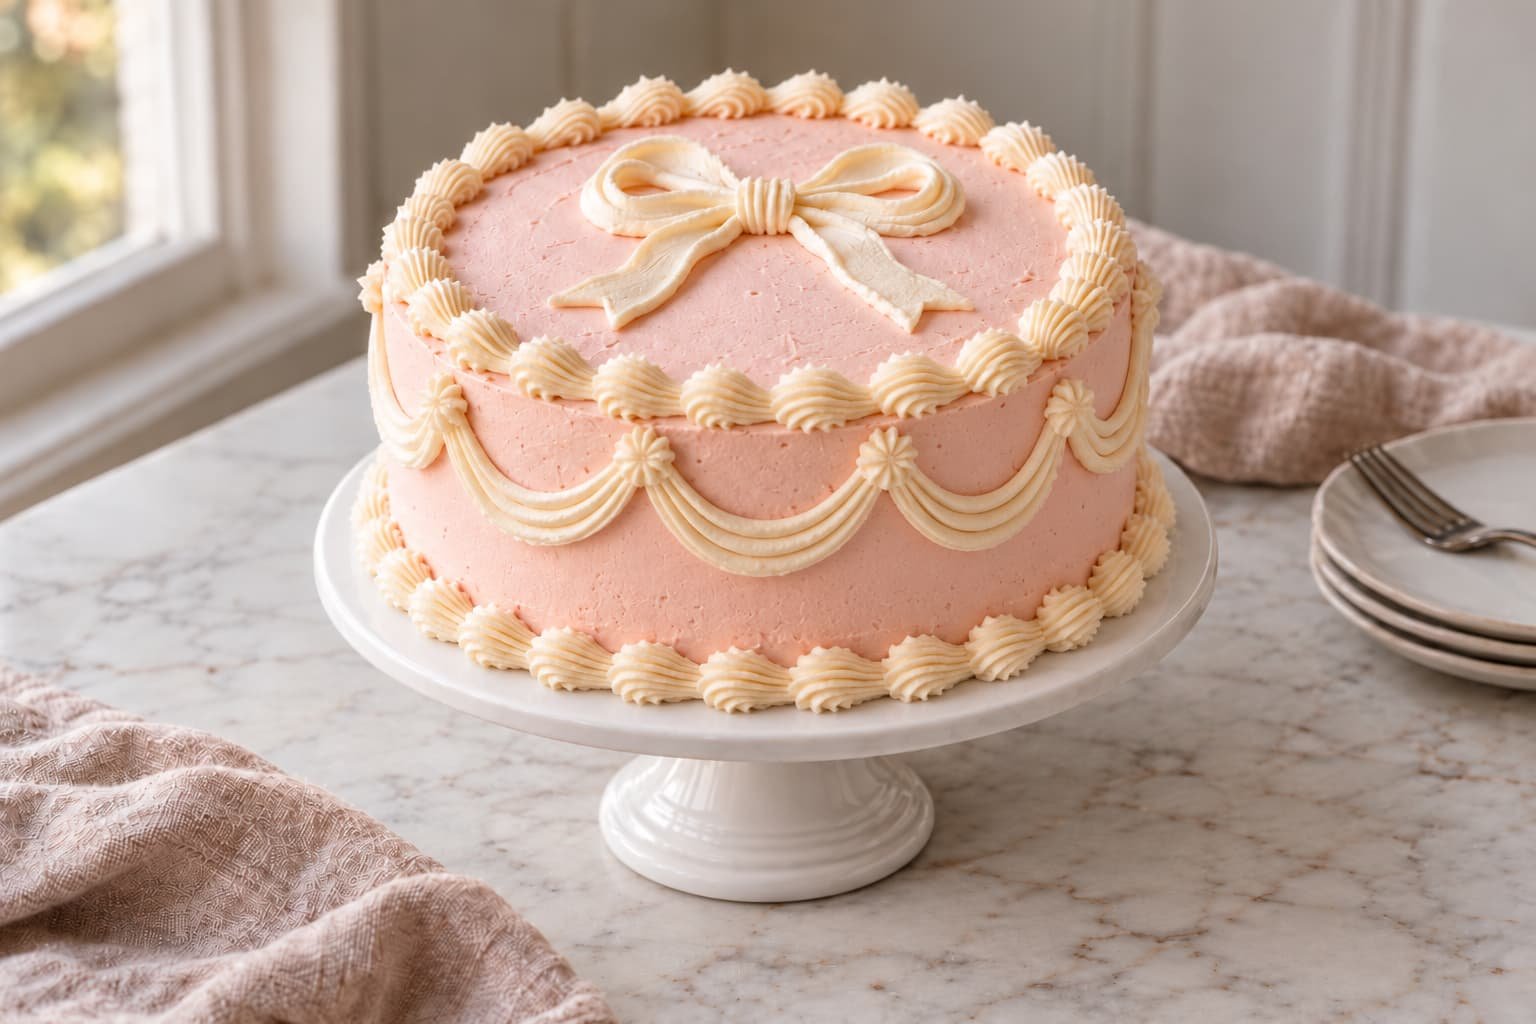
Vintage cakes have made quite a comeback, and I can see why. All those delicate buttercream swags, piped shell borders, and pretty bows make decorating almost as much fun as baking. But with this vintage vanilla bow cake recipe, I wanted the cake underneath to be just as special as the decorations. The vanilla layers are buttery and soft, with a fine, velvety crumb and a tart raspberry filling that keeps the sweetness in check. I use reverse creaming to give the layers a tender texture while keeping them sturdy enough for stacking and decorating. The pale blush buttercream and ivory bow give the finished cake that charming, old-fashioned look, and cutting into it reveals a beautiful contrast of vanilla cake and raspberry filling. It’s a celebration cake where the inside deserves just as much attention as the outside.

Why You’ll Love This Ridiculously Delicious Vanilla Cake
- A soft, velvety crumb that holds up to decorating: I use reverse creaming to give the vanilla cake a fine, tender texture that still holds together when stacked and sliced. It’s especially helpful for a vintage cake with several layers of filling and detailed buttercream decorations.
- Cake flour makes a difference: Cake flour keeps the layers delicate, while four whole eggs provide enough structure to support the raspberry filling and all that decorative piping without making the cake heavy.
- Moist, buttery layers with a little tang: Whole milk and sour cream work together to keep the cake soft and rich. The sour cream adds a subtle tang that complements the vanilla and raspberry without overpowering either flavor.
- Raspberry filling that stays where it belongs: Piping a border of buttercream around the raspberry preserves keeps the filling from escaping between the layers. It’s a simple step that makes stacking and frosting the cake much easier.
- Vintage piping with beautiful definition: I set aside some ivory buttercream before tinting the rest pale blush pink. The firm American buttercream holds the delicate shell borders, swags, and bow in place, giving the cake that charming, old-fashioned finish without losing the details.
Ingredient Notes for Vintage Vanilla Bow Cake
- Cake flour. Its lower protein content supports a delicate crumb, but it still provides enough starch for two stackable layers. Weigh it rather than packing it into measuring cups.
- Unsalted butter. Butter carries the vanilla flavor and coats the flour during reverse creaming. Use pliable butter that yields to gentle pressure but is neither shiny nor partially melted.
- Granulated sugar. Besides sweetness, sugar delays starch setting and helps the cake retain moisture. Fine granules dissolve more readily during the relatively short reverse-creaming process.
- Eggs. Whole eggs provide structure, richness, and emulsifiers that help the butter and liquid stay combined. Bring them to room temperature and weigh them without their shells when possible.
- Sour cream and whole milk. Sour cream adds fat, acidity, and viscosity, while milk hydrates the starches and adjusts batter consistency. Room-temperature dairy incorporates with less risk of curdling.
- Raspberry preserves. Use thick, seedless preserves rather than a loose sauce. Their acidity cuts through the sweet buttercream, and their concentrated consistency stays inside the piped dam.
- Pink gel color. Concentrated gel adds color without thinning the buttercream. Introduce it sparingly because the shade deepens slightly as the frosting rests.
Expert Baking Tips
- Control ingredient temperature rather than relying only on the clock. Butter should bend without looking greasy, while cold eggs or milk can tighten the butter and leave the batter curdled.
- Divide the batter by weight for layers that finish baking together. Uneven layers force extra trimming and make the raspberry filling more likely to sit on a slope.
- Keep preserves below the top of the buttercream dam. Overfilling creates hydraulic pressure when the upper layer is added, which can push jam through the outer coating.
- If the buttercream looks bubbly, mix it on the lowest speed and press it against the bowl with a flexible spatula. Vigorous whipping makes smooth sides and crisp piping harder to achieve.
- Practice the bow once on parchment before piping the cake. Scrape that buttercream back into the bag, then keep the broad end of the petal tip near the surface for opaque, defined ribbon loops.
Ingredients for Vintage Vanilla Bow Cake
- 300 g cake flour (Sifted after weighing)
- 10 g baking powder (About 2 1/2 teaspoons)
- 3 g fine sea salt (About 1/2 teaspoon)
- 300 g granulated sugar (Fine granulated sugar incorporates most evenly)
- 170 g unsalted butter (Softened to 18 to 20°C and cut into tablespoons)
- 240 g whole milk (Room temperature, divided)
- 60 g full-fat sour cream (Room temperature)
- 4 large eggs (Room temperature, 200 g without shells)
- 15 g pure vanilla extract (About 1 tablespoon)
- 450 g unsalted butter (For the frosting, softened to 18 to 20°C)
- 720 g confectioners’ sugar (For the frosting, sifted)
- 90 g heavy cream (Room temperature)
- 10 g pure vanilla extract (For the frosting, about 2 teaspoons)
- 2 g fine sea salt (For the frosting, about 1/3 teaspoon)
- 0.3 mL pink gel food coloring (About 1/16 teaspoon, or enough for a pale blush shade)
- 170 g seedless raspberry preserves (Stirred until spreadable but not warmed)
How to Make Vintage Vanilla Bow Cake
- STEP 1). Prepare the pans and preheat the oven Set an oven rack in the center and preheat to 175°C. Lightly grease two 8 x 2 inch round aluminum pans, line the bottoms with parchment, and grease the parchment without heavily coating the sides. Weigh the empty mixer bowl if you plan to divide the batter precisely. Confirm that the cake butter is pliable, the eggs and dairy are at room temperature, and both pans sit level so the fine batter bakes into even layers.
- STEP 2). Measure the dry and liquid mixtures Sift the cake flour, baking powder, salt, and granulated sugar into the bowl of a stand mixer fitted with the paddle. Whisk the eggs, vanilla, and 120 g of the milk in a medium bowl until no streaks of egg white remain. In a separate cup, stir the remaining 120 g milk with the sour cream until smooth. Keeping these mixtures uniform allows the liquid to enter the butter-coated flour gradually instead of breaking the emulsion.
- STEP 3). Reverse cream the flour and butter Mix the dry ingredients on low speed for 20 seconds. Add the softened cake butter and the milk-sour cream mixture, then mix on low until the flour is evenly moistened, about 30 seconds. Increase to medium speed and beat for 90 seconds, stopping once to scrape the bowl and paddle. The mixture should resemble a thick, smooth paste with no dry pockets. This mixing period builds enough structure after the butter has limited excessive gluten formation.
- STEP 4). Emulsify the batter with the egg mixture With the mixer on medium-low, add the egg mixture in three equal additions, mixing for 20 seconds after each one. Scrape the bottom and sides thoroughly between additions because dense batter often hides beneath the paddle. After the final addition, mix on medium for 20 to 30 seconds, just until the batter is smooth, satiny, and falls from the paddle in a thick ribbon. Stop before it becomes highly aerated or develops a curdled, grainy appearance.
- STEP 5). Divide and bake the cake layers Divide the batter evenly between the prepared pans, approximately 650 g per pan, and smooth the surfaces with a small offset spatula. Tap each pan once on the counter to release large air pockets. Bake for 28 to 33 minutes, rotating only if the oven browns unevenly. The cakes are done when the centers spring back, the edges barely pull from the pans, and a tester returns with moist crumbs but no wet batter. An instant-read thermometer should register about 96 to 99°C.
- STEP 6). Cool and prepare the layers for stacking Cool the cakes in their pans on wire racks for 15 minutes. Run a thin offset spatula around each edge, invert onto the racks, remove the parchment, and turn the layers upright. Let them cool completely for at least 90 minutes before leveling or frosting; residual warmth will melt the buttercream. If either top is noticeably domed, trim it level with a long serrated knife using shallow sawing motions. Brush away loose crumbs before transferring one layer to a cardboard cake round.
- STEP 7). Mix and portion the vanilla buttercream Beat the frosting butter with the clean paddle on medium speed for 3 minutes, scraping twice, until creamy and lighter in color. Add the sifted confectioners’ sugar in four additions on low speed, alternating with the heavy cream to control dust and maintain a smooth emulsion. Add the vanilla and salt, then beat on medium-low for 2 minutes. Mix on low for another minute to reduce air bubbles. Reserve 420 g ivory buttercream, then tint the remainder pale blush with the pink gel.
- STEP 8). Fill, stack, and crumb coat the cake Secure the first layer to the cake board with a dab of blush buttercream. Pipe a 1.5 cm high ring of ivory buttercream around the outer edge, then spread the raspberry preserves inside the dam, leaving the frosting ring exposed. Center the second layer cut-side down and press lightly until level. Apply a thin blush crumb coat over the top and sides, trapping rather than chasing loose crumbs. Chill the cake uncovered for 30 minutes, until the coating feels firm but not frozen.
- STEP 9). Finish the coating and pipe the vintage bow Spread the remaining blush buttercream over the chilled cake, then refine the sides with a bench scraper and the top with an offset spatula. Pipe ivory shell borders with the 4B tip and small swags with the 21 tip. Using the 104 petal tip, pipe two broad loops, a small center knot, and two tapered ribbon tails flat on the top so the bow remains stable. Let the finished cake stand for 20 minutes, then slice with a warm, dry knife, cleaning it between cuts.
Storage and Freezing
- Storage: Keep the assembled cake covered at cool room temperature for up to 1 day, provided the room remains below 22°C.
- Refrigerate for up to 4 days in a cake carrier or loosely covered box to protect the piping.
- Freezing: Freeze unfrosted, fully cooled layers wrapped twice in plastic and once in foil for up to 2 months. The completed cake may be frozen for up to 1 month, but condensation can soften the piped details.
- Thawing: Thaw wrapped cake layers overnight in the refrigerator before unwrapping.
- Thaw a decorated cake in its closed container in the refrigerator overnight so moisture collects on the container rather than the frosting.
- Serving: Bring a refrigerated cake to cool room temperature for 60 to 90 minutes before slicing. Buttercream that is still cold will taste firm and mute the vanilla flavor.
Frequently Asked Questions
What makes this a vintage vanilla bow cake?
The vintage character comes from the ornate buttercream finish: stacked shell borders, evenly spaced swags, soft pastel color, and a prominent piped bow. These elements echo the decorative abundance associated with classic celebration and Lambeth-inspired cakes.
The cake itself is a modern, balanced vanilla layer formula rather than a historical reconstruction. Its close crumb and stable American-style buttercream are deliberately suited to clean stacking and sharply defined piping.
Why did my vanilla cake layers turn out dense?
Dense layers usually point to butter that was too cold, inaccurate flour measurement, expired baking powder, or insufficient mixing during the initial reverse-creaming stage. The butter and milk mixture should become a smooth paste before the eggs are introduced.
Add the egg mixture gradually and scrape beneath the paddle after every addition. Stop when the batter is satiny and cohesive; prolonged beating after the eggs are incorporated can create tunneling or a coarser crumb.
How do you stop raspberry filling from leaking out of a layer cake?
A firm buttercream dam is the main defense against leaking preserves. Pipe an unbroken ring around the layer, then keep the raspberry filling slightly below the top of that ring so it has room to spread when the second layer is added.
Use thick preserves at room temperature, not warm jam or pourable sauce. If the upper layer shifts when gently pressed, lift it off, remove some filling, and rebuild the dam before crumb coating.
Can I decorate the cake before the layers are completely cool?
Fully cooled layers are essential because even slight residual warmth softens butter and causes the crumb coat to slide or absorb into the cake. The centers often stay warm after the surfaces feel cool, so allow at least 90 minutes on wire racks.
For the cleanest assembly, the layers may be wrapped after cooling and refrigerated briefly. Avoid frosting them frozen solid because condensation can form as they warm and make the buttercream lose its grip.
How far in advance should a vintage bow cake be assembled?
Assembling the cake one day before serving gives the filling time to settle and keeps the decorating schedule manageable. Store it covered in the refrigerator once the piping is complete so the buttercream does not absorb odors or develop a dry surface.
Bring the cake out 60 to 90 minutes before serving. The buttercream should yield gently to a fingertip, and the cake crumb will taste softer and more aromatic once the butter is no longer refrigerator-firm.
More Ridiculously Delicious Cakes
- Vanilla Bean Layer Cake with Soft, Tender Layers
- Bakery-Style Passion Fruit Vanilla Layer Cake Recipe
- Bakery-Style Vintage Blue Buttercream Birthday Cake
- Bakery-Style Peanut Butter Cup Birthday Cake
- Bakery-Style Strawberry Milkshake Birthday Cake
Vintage Vanilla Bow Cake Recipe
Ingredients
Equipment
Method
- Set an oven rack in the center and preheat to 175°C. Lightly grease two 8 x 2 inch round aluminum pans, line the bottoms with parchment, and grease the parchment without heavily coating the sides. Weigh the empty mixer bowl if you plan to divide the batter precisely. Confirm that the cake butter is pliable, the eggs and dairy are at room temperature, and both pans sit level so the fine batter bakes into even layers.
- Sift the cake flour, baking powder, salt, and granulated sugar into the bowl of a stand mixer fitted with the paddle. Whisk the eggs, vanilla, and 120 g of the milk in a medium bowl until no streaks of egg white remain. In a separate cup, stir the remaining 120 g milk with the sour cream until smooth. Keeping these mixtures uniform allows the liquid to enter the butter-coated flour gradually instead of breaking the emulsion.
- Mix the dry ingredients on low speed for 20 seconds. Add the softened cake butter and the milk-sour cream mixture, then mix on low until the flour is evenly moistened, about 30 seconds. Increase to medium speed and beat for 90 seconds, stopping once to scrape the bowl and paddle. The mixture should resemble a thick, smooth paste with no dry pockets. This mixing period builds enough structure after the butter has limited excessive gluten formation.
- With the mixer on medium-low, add the egg mixture in three equal additions, mixing for 20 seconds after each one. Scrape the bottom and sides thoroughly between additions because dense batter often hides beneath the paddle. After the final addition, mix on medium for 20 to 30 seconds, just until the batter is smooth, satiny, and falls from the paddle in a thick ribbon. Stop before it becomes highly aerated or develops a curdled, grainy appearance.
- Divide the batter evenly between the prepared pans, approximately 650 g per pan, and smooth the surfaces with a small offset spatula. Tap each pan once on the counter to release large air pockets. Bake for 28 to 33 minutes, rotating only if the oven browns unevenly. The cakes are done when the centers spring back, the edges barely pull from the pans, and a tester returns with moist crumbs but no wet batter. An instant-read thermometer should register about 96 to 99°C.
- Cool the cakes in their pans on wire racks for 15 minutes. Run a thin offset spatula around each edge, invert onto the racks, remove the parchment, and turn the layers upright. Let them cool completely for at least 90 minutes before leveling or frosting; residual warmth will melt the buttercream. If either top is noticeably domed, trim it level with a long serrated knife using shallow sawing motions. Brush away loose crumbs before transferring one layer to a cardboard cake round.
- Beat the frosting butter with the clean paddle on medium speed for 3 minutes, scraping twice, until creamy and lighter in color. Add the sifted confectioners' sugar in four additions on low speed, alternating with the heavy cream to control dust and maintain a smooth emulsion. Add the vanilla and salt, then beat on medium-low for 2 minutes. Mix on low for another minute to reduce air bubbles. Reserve 420 g ivory buttercream, then tint the remainder pale blush with the pink gel.
- Secure the first layer to the cake board with a dab of blush buttercream. Pipe a 1.5 cm high ring of ivory buttercream around the outer edge, then spread the raspberry preserves inside the dam, leaving the frosting ring exposed. Center the second layer cut-side down and press lightly until level. Apply a thin blush crumb coat over the top and sides, trapping rather than chasing loose crumbs. Chill the cake uncovered for 30 minutes, until the coating feels firm but not frozen.
- Spread the remaining blush buttercream over the chilled cake, then refine the sides with a bench scraper and the top with an offset spatula. Pipe ivory shell borders with the 4B tip and small swags with the 21 tip. Using the 104 petal tip, pipe two broad loops, a small center knot, and two tapered ribbon tails flat on the top so the bow remains stable. Let the finished cake stand for 20 minutes, then slice with a warm, dry knife, cleaning it between cuts.
Notes
- Control ingredient temperature rather than relying only on the clock. Butter should bend without looking greasy, while cold eggs or milk can tighten the butter and leave the batter curdled.
- Divide the batter by weight for layers that finish baking together. Uneven layers force extra trimming and make the raspberry filling more likely to sit on a slope.
- Keep preserves below the top of the buttercream dam. Overfilling creates hydraulic pressure when the upper layer is added, which can push jam through the outer coating.
- If the buttercream looks bubbly, mix it on the lowest speed and press it against the bowl with a flexible spatula. Vigorous whipping makes smooth sides and crisp piping harder to achieve.
- Practice the bow once on parchment before piping the cake. Scrape that buttercream back into the bag, then keep the broad end of the petal tip near the surface for opaque, defined ribbon loops.