

Table of Contents
There’s something undeniably irresistible about mini cakes, and this mini chocolate caramel drip cake recipe delivers all the drama and decadence of a bakery showpiece sized just for you, or a very lucky friend. Each petite layer is packed with intense cocoa flavor, perfectly tender thanks to oil and buttermilk, and sandwiched with a frosting that gives you caramel richness in every bite. I love using my own flexible caramel sauce in both the buttercream and the glossy drip, it makes every slice a true chocolate-caramel experience. The glossy drip is seriously easy to master and forgiving, so you don’t need a custom cake kit to get bakery-style shine. The sprinkle of flaky salt on the finished cake is my favorite finishing move: it brightens both flavors and makes the caramel pop. This mini layer cake feels like a celebration in every bite, you gotta try it!
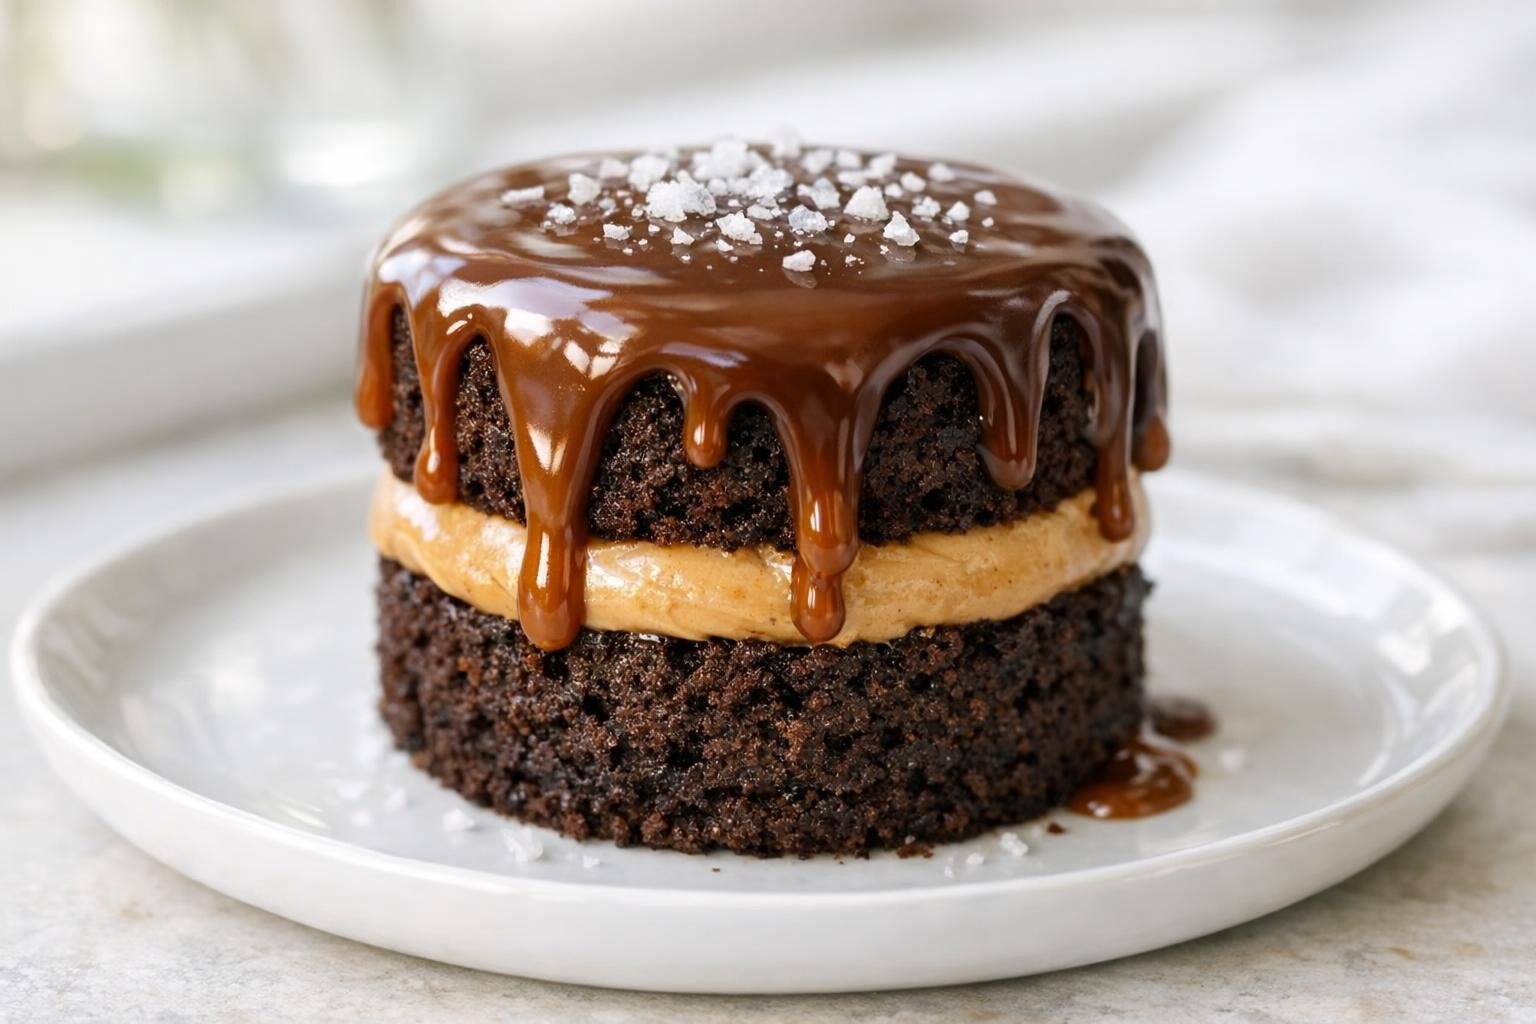
Why This Chocolate Cake Frickin’ Works
- Oil and buttermilk for super-moist cake: I use oil instead of butter here to keep the chocolate layers extra soft and tender, even after chilling. Buttermilk gives just enough tang and structure for confident stacking.
- Flexible caramel sauce, two ways: Homemade caramel does double duty in this recipe, flavoring both the buttercream and the shiny drip. This means the caramel flavor really comes through instead of fading into the background.
- Rich cocoa for deep chocolate flavor: I call for Dutch-processed cocoa, which brings bold chocolate flavor and a deep color that stands up to the caramel without being too sweet or overpowering.
- Glossy, forgiving drip technique: Mixing caramel and chocolate makes for a glossy drip that’s easier to work with, so it clings and flows without running wild. You get bakery-style drama without technical stress.
- Mini size for big impact, less fuss: Baking in two 4-inch pans gives you just enough height for drama but keeps the project approachable. It’s perfect for small celebrations or when you want a showstopping treat without leftovers.
Ingredient Notes for Mini Chocolate Caramel Drip Cake
- Dutch-process cocoa powder: Delivers rich, smooth chocolate flavor without harsh bitterness, ensuring the cake layers stand out against the caramel.
- Neutral oil (canola or vegetable): Oil keeps the crumb soft and moist, essential for cakes that stay tender after chilling.
- Buttermilk: Adds tang and structure, helping the cake hold height and slice cleanly while giving a subtle complexity.
- Homemade caramel sauce: Used in both buttercream and in the drip for rich caramel flavor that doesn’t get lost. Use a caramel with medium flow, not too stiff for spreading or dripping.
- Unsalted butter: Forms the base of the buttercream, allowing the caramel to shine without excess saltiness.
- Powdered sugar: Smooths out the buttercream and balances the richness of caramel.
- Heavy cream: Loosens both buttercream and drip to the right consistency, making the cake easy to assemble and decorate.
- Dark chocolate: Gives the drip its beautiful glossy finish and a hint of bittersweet flavor to balance the caramel.
- Flaky sea salt: A finishing sprinkle sharpens and intensifies both the chocolate and caramel for maximum impact.
My Tips for the Best Results
- Bring ingredients to room temp: This helps the cake batter and buttercream blend quickly and smoothly, giving you maximum volume and a lighter, tender crumb.
- Chill before stacking: Cold cake layers won’t shed crumbs into your frosting and they’re much easier to level and stack tall for bakery-style height.
- Check drip consistency before decorating: The chocolate-caramel drip should be fluid but not hot. Test on a chilled glass, if it slowly runs, you’re good.
- Always use a crumb coat: A thin buttercream base layer locks in crumbs, keeps the outside smooth, and makes your final coat look sharp and professional.
- Use a small offset spatula for control: For such a petite cake, a mini spatula gives you better accuracy on the sides and for swirling buttercream or drip edges.
My Best Tips for Stacking and Decorating a Mini Chocolate Caramel Drip Cake
Stacking and decorating a mini chocolate caramel drip cake is as satisfying as it is fun. Here are my best structural and decorative tips to keep things clean, tall, and shockingly glossy.
- Level and chill your cake layers: Use a serrated knife to trim domed tops and briefly chill the layers so they’re easy to handle for stacking, no sliding or wobbly towers.
- Use a crumb coat for clean edges: Apply a thin buttercream layer over the whole cake to trap crumbs. Chill before the final thick coat for a neat, bakery-level finish.
- Keep your caramel drip at a pourable temperature: Pour just-warm (not hot) caramel-chocolate drip so it flows slightly over chilled buttercream without melting it or pooling messily at the base.
- Start drip at the edge, then cover the top: Use a spoon or squeeze bottle to tease drips over the top edge first, then fill in the center for that dramatic dome of shine.
- Sprinkle salt after the drip sets: Wait until the drip is just barely set, then add a pinch of flaky sea salt so it stays put and won’t dissolve into the chocolate.
Take a little extra care with chilling and you can build a mini masterpiece, no special tools or crazy skills required.
Ingredients for Mini Chocolate Caramel Drip Cake
- 70 grams all-purpose flour (Spoon and level for accuracy)
- 35 grams Dutch-process cocoa powder (Do not substitute natural cocoa)
- 110 grams granulated sugar
- 0.5 teaspoon baking soda
- 0.25 teaspoon fine sea salt
- 80 ml buttermilk (Room temperature)
- 45 ml neutral oil (Canola or vegetable)
- 1 large egg (Room temperature)
- 1 teaspoon vanilla extract
- 60 ml hot water
- 100 grams unsalted butter (For buttercream, room temperature)
- 120 grams powdered sugar (Sifted)
- 60 ml caramel sauce (Homemade or high-quality store-bought)
- 2 tablespoons heavy cream (plus more, as needed, for buttercream consistency)
- 40 grams dark chocolate (60-70% cocoa, chopped, for drip)
- 30 ml caramel sauce (for drip)
- 2 teaspoons heavy cream (for drip)
- 1 pinch flaky sea salt (to finish)
How to Make Mini Chocolate Caramel Drip Cake
- STEP 1). Prepare pans and preheat oven Preheat the oven to 350°F (175°C). Lightly grease two 4-inch round cake pans, line bottoms with parchment paper rounds, and grease the parchment. Set aside on a baking sheet for easier handling in and out of the oven.
- STEP 2). Mix dry ingredients In a medium mixing bowl, whisk together the flour, Dutch-process cocoa powder, granulated sugar, baking soda, and fine sea salt until thoroughly blended and no cocoa lumps remain. This ensures even leavening and smooth chocolate flavor in the finished layers.
- STEP 3). Combine wet ingredients In a separate small bowl or jug, whisk together buttermilk, oil, egg, and vanilla extract until fully emulsified and smooth. Stream in 60 ml hot water and whisk again, this helps bloom the cocoa and keeps the batter glossy and fluid.
- STEP 4). Make the cake batter Pour the wet ingredients over the dry mixture. Whisk gently until just combined; scrape bowl and fold with a spatula to ensure no flour pockets remain. Batter should appear shiny, pourable, and free of lumps but do not overmix.
- STEP 5). Divide and bake Divide the batter evenly between the prepared pans (about 170g per pan). Smooth tops with a spatula. Bake on the center rack for 22-26 minutes until a cake tester emerges with only moist crumbs, not wet batter. Avoid overbaking.
- STEP 6). Cool and unmold cakes Remove pans to a wire rack and cool for 10 minutes. Run a thin knife around edges and invert onto racks. Peel off parchment and cool completely. For neat stacking, wrap layers and refrigerate 45-60 minutes until chilled and firm.
- STEP 7). Make caramel buttercream In a medium bowl, beat unsalted butter with a hand mixer on medium-high until very pale and fluffy, about 2 minutes. Beat in powdered sugar, scraping once midway, until creamy. Add caramel sauce and 2 tablespoons heavy cream; beat until smooth and spreadable. Add a touch more cream if needed for silky consistency.
- STEP 8). Fill and frost the cake Place one cake layer on a serving board. Spread generously with caramel buttercream (about ⅓ of total). Stack the second layer and apply a thin crumb coat over the entire cake. Chill for 20 minutes. Apply remaining buttercream in a smooth, even layer, using an offset spatula to create tall, tidy sides.
- STEP 9). Make glossy caramel drip In a heatproof bowl, melt the chopped chocolate in 15-second intervals in the microwave, stirring between, until mostly smooth. Stir in caramel sauce and 2 teaspoons heavy cream. Mix until glossy and fluid but thick enough to mound lightly on a spoon. Let cool to just warm, about 95°F (35°C), before decorating.
- STEP 10). Decorate with drip and salt With the cake chilled, use a spoon or piping bag to gently nudge the glossy drip over the cake edge, allowing it to flow naturally. Cover the top with remaining drip for a domed look. Sprinkle flaky sea salt over the drip once it begins to set but is still slightly tacky to the touch.
Storage and Freezing
- Store assembled cake covered in the refrigerator for up to 3 days.
- Let slices come to room temperature for 30 minutes before serving for best texture.
- Freeze unfrosted cake layers, wrapped tightly, for up to 1 month.
- Thaw in the fridge overnight before assembling.
- Do not freeze fully frosted or decorated mini cakes, as the caramel drip may lose its shine.
Frequently Asked Questions
How do I get clean, tall slices from a mini chocolate caramel drip cake?
Chill your cake layers after baking and again after filling and frosting; this makes the cake sturdy for slicing.
Use a sharp, thin-bladed serrated knife and wipe it between cuts for neat edges. Let the assembled cake sit at room temperature for about 20 minutes before slicing so the buttercream softens slightly, this helps the knife slide through both the cake and caramel, giving you those picture-perfect tall mini slices.
What if my caramel drip runs too fast or pools at the bottom?
If your drip is running quickly and pooling, it may be too warm or too thin. Rather than starting over, chill the cake well and let the drip mixture cool until it feels just barely warm to the touch before applying.
You can also stir in a bit of extra melted chocolate to thicken the mix. Test a drip on the side of a bowl first; it should move slowly, not in a sheet. Always decorate on a cold cake for the cleanest drip effect.
Does this mini chocolate caramel drip cake recipe require special pans or tools?
Two 4-inch round pans are ideal for this recipe. If you only have one, bake the batter in two rounds, cooling and washing the pan between uses.
While a cake turntable and piping bag make stacking and dripping easier, they aren’t essential, an offset spatula and a small spoon work beautifully for a cake this size. The key is chilling layers and frosting for neat assembly, not fancy equipment.
Why is buttermilk important in this mini chocolate caramel drip cake from scratch?
Buttermilk contributes both acidity and subtle tang, which tenderizes the crumb and helps the cake layers hold their structure without getting tough.
It also emulsifies smoothly with oil and egg, giving a more cohesive, moist texture compared to milk alone. If you don’t have buttermilk, use a blend of milk and a splash of vinegar or lemon juice, letting it stand for 5 minutes before mixing, it closely mimics the acidity of regular buttermilk.
Can I make the caramel sauce in advance for this mini chocolate caramel drip cake?
Caramel sauce can be made ahead and stored in an airtight container in the refrigerator for up to 2 weeks.
Warm it just enough to pour or spoon, but never use it hot in frosting or drip applications, as heat will melt buttercream or slide off the chilled cake. Bringing caramel to room temperature and stirring before use helps maintain a silky, pourable consistency for both the buttercream and the glossy drip.
More Ridiculously Delicious Cakes
- Chocolate Mint Ganache Birthday Cake Recipe
- Chocolate Dulce de Leche Layer Cake Recipe
- Bakery-Style Caramel Popcorn Birthday Cake
- Two-Tier Chocolate Vanilla Celebration Cake
- Moist Chocolate Fudge Layer Cake with Silky Fudge Frosting
Mini Chocolate Caramel Drip Cake with Glossy Drip
Ingredients
Equipment
Method
- Preheat the oven to 350°F (175°C). Lightly grease two 4-inch round cake pans, line bottoms with parchment paper rounds, and grease the parchment. Set aside on a baking sheet for easier handling in and out of the oven.
- In a medium mixing bowl, whisk together the flour, Dutch-process cocoa powder, granulated sugar, baking soda, and fine sea salt until thoroughly blended and no cocoa lumps remain. This ensures even leavening and smooth chocolate flavor in the finished layers.
- In a separate small bowl or jug, whisk together buttermilk, oil, egg, and vanilla extract until fully emulsified and smooth. Stream in 60 ml hot water and whisk again, this helps bloom the cocoa and keeps the batter glossy and fluid.
- Pour the wet ingredients over the dry mixture. Whisk gently until just combined; scrape bowl and fold with a spatula to ensure no flour pockets remain. Batter should appear shiny, pourable, and free of lumps but do not overmix.
- Divide the batter evenly between the prepared pans (about 170g per pan). Smooth tops with a spatula. Bake on the center rack for 22-26 minutes until a cake tester emerges with only moist crumbs, not wet batter. Avoid overbaking.
- Remove pans to a wire rack and cool for 10 minutes. Run a thin knife around edges and invert onto racks. Peel off parchment and cool completely. For neat stacking, wrap layers and refrigerate 45-60 minutes until chilled and firm.
- In a medium bowl, beat unsalted butter with a hand mixer on medium-high until very pale and fluffy, about 2 minutes. Beat in powdered sugar, scraping once midway, until creamy. Add caramel sauce and 2 tablespoons heavy cream; beat until smooth and spreadable. Add a touch more cream if needed for silky consistency.
- Place one cake layer on a serving board. Spread generously with caramel buttercream (about ⅓ of total). Stack the second layer and apply a thin crumb coat over the entire cake. Chill for 20 minutes. Apply remaining buttercream in a smooth, even layer, using an offset spatula to create tall, tidy sides.
- In a heatproof bowl, melt the chopped chocolate in 15-second intervals in the microwave, stirring between, until mostly smooth. Stir in caramel sauce and 2 teaspoons heavy cream. Mix until glossy and fluid but thick enough to mound lightly on a spoon. Let cool to just warm, about 95°F (35°C), before decorating.
- With the cake chilled, use a spoon or piping bag to gently nudge the glossy drip over the cake edge, allowing it to flow naturally. Cover the top with remaining drip for a domed look. Sprinkle flaky sea salt over the drip once it begins to set but is still slightly tacky to the touch.
Notes
- Bring ingredients to room temp: This helps the cake batter and buttercream blend quickly and smoothly, giving you maximum volume and a lighter, tender crumb.
- Chill before stacking: Cold cake layers won’t shed crumbs into your frosting and they’re much easier to level and stack tall for bakery-style height.
- Check drip consistency before decorating: The chocolate-caramel drip should be fluid but not hot. Test on a chilled glass, if it slowly runs, you’re good.
- Always use a crumb coat: A thin buttercream base layer locks in crumbs, keeps the outside smooth, and makes your final coat look sharp and professional.
- Use a small offset spatula for control: For such a petite cake, a mini spatula gives you better accuracy on the sides and for swirling buttercream or drip edges.



