Table of Contents
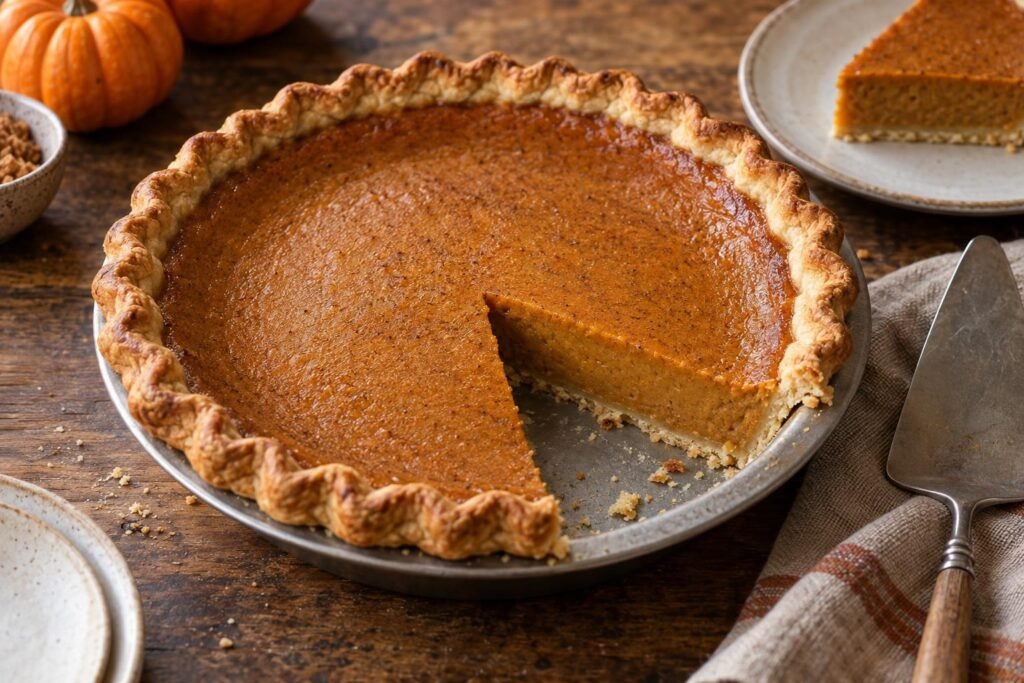
A golden, crisp-edged pastry shell gives way to silky pumpkin custard scented with cinnamon, ginger, nutmeg, and cloves. This pumpkin pie balances earthy squash, caramel-like brown sugar, and warm spice without burying the pumpkin under sweetness. The filling is creamy rather than loose, and the properly baked base stays tender instead of turning pale and soggy beneath the custard.
I blind-bake the pastry before adding the filling, because wet pumpkin custard and raw bottom crust do not finish baking at the same rate. Cornstarch reinforces the egg-set custard, while an initial burst of higher heat helps the edges set before the temperature is lowered for gentle baking. I look for puffed outer inches, a softly wobbling center, and a center temperature of about 175°F to 180°F. Four hours of cooling then finishes the set for tidy slices.

Why You’ll Love this Pumpkin Pie
- Blind-baking the weighted shell, followed by a short uncovered bake, dries and browns the bottom before the moist pumpkin filling is added.
- Cold butter remains in small, flattened pieces throughout the dough, creating a tender pastry with enough structure to support clean slices.
- Three eggs provide the primary custard set, while a small amount of cornstarch binds excess pumpkin moisture and reduces weeping after cooling.
- The combination of dark brown and granulated sugars supplies caramel depth without making the filling overly heavy or masking the pumpkin.
- Starting at 400°F encourages the custard edges to set, then lowering the oven to 350°F lets the center finish gradually without excessive puffing or cracking.
Ingredient Notes for Pumpkin Pie with a Tender Pastry Crust
- All-purpose flour: Moderate-protein all-purpose flour gives the shell enough strength to hold the custard while remaining tender. Weigh it when possible, and avoid packing flour into a measuring cup because excess flour makes pastry dry and difficult to roll.
- Unsalted butter: Keep the butter refrigerator-cold until it enters the flour. Visible flattened pieces create tenderness and light layering, while softened or greasy butter can produce a dense crust that shrinks during baking.
- Ice water: Water hydrates the flour and allows the dough to hold together, but too much encourages gluten development. Add it gradually and stop when a squeezed handful remains intact without feeling sticky.
- Pure pumpkin purée: Use plain, smooth pumpkin purée rather than sweetened pumpkin pie filling. The purée supplies flavor, starch, and body; watery homemade purée must be drained to a thick canned-purée consistency and weighed before use.
- Eggs and cornstarch: Eggs coagulate during baking to set the custard, while cornstarch manages moisture and improves sliceability. Whisk until no egg-white strands or starch pockets remain, but avoid beating in unnecessary air.
- Evaporated milk: Concentrated milk adds dairy richness with less water than regular milk. This moisture balance is important to the filling, so standard fluid milk is not a direct replacement in this formula.
- Dark brown and granulated sugars: Dark brown sugar contributes molasses flavor and moisture, while granulated sugar keeps the custard from becoming too dense. Light brown sugar may replace dark brown sugar gram for gram for a milder molasses note.
- Warm spices: Cinnamon leads the blend, with ginger, nutmeg, and cloves adding warmth and gentle heat. Measure cloves carefully because too much can overpower the pumpkin and leave a medicinal finish.
A Few Baking Tips
- Use a metal pie plate rather than a thick ceramic dish when bottom-crust browning is the priority. Metal transfers heat more quickly and makes the pastry’s color easier to judge during blind-baking.
- Fill the parchment all the way to the top of the shell with weights. A shallow layer protects the base but leaves the sides unsupported, which allows the crust to slump below the rim.
- Keep the blind-baked shell warm while mixing the filling. Warm pastry begins setting the custard at the boundary and avoids leaving a gummy layer where cool filling meets an underheated crust.
- Judge doneness by movement, not by waiting for a rigid center. A softly wobbling center will finish setting as it cools; a liquid ripple needs more baking, while a dramatically puffed or cracked center indicates overbaking.
- Plan the serving schedule backward from dessert. Allow about one hour for dough chilling and shaping, roughly 90 minutes for blind-baking and filling, and a full four hours of undisturbed cooling before slicing.
Ingredients for Pumpkin Pie
- 180 g all-purpose flour (About 1 1/2 cups, spooned and leveled if measuring by volume)
- 12 g granulated sugar (1 tablespoon, for the pastry)
- 1/2 teaspoon fine sea salt (For the pastry)
- 113 g unsalted butter (1/2 cup, cold and cut into 1/2-inch cubes)
- 60 ml ice water (1/4 cup, added gradually; use only as much as needed)
- 425 g pure pumpkin purée (One 15-ounce can, not pumpkin pie filling)
- 150 g packed dark brown sugar (About 3/4 cup; light brown sugar may be used for a milder flavor)
- 50 g granulated sugar (1/4 cup, for the filling)
- 12 g cornstarch (1 tablespoon plus 1 teaspoon)
- 1 1/2 teaspoons ground cinnamon (Use fresh, fragrant cinnamon)
- 3/4 teaspoon ground ginger (Adds warm spice and mild heat)
- 1/4 teaspoon ground nutmeg (Freshly grated or ground)
- 1/8 teaspoon ground cloves (Measure carefully because the flavor is assertive)
- 1/2 teaspoon fine sea salt (Balances the sweetness in the filling)
- 3 large eggs (At room temperature)
- 354 ml evaporated milk (One 12-fluid-ounce can, at room temperature)
- 2 teaspoons pure vanilla extract (Stirred into the custard filling)
How to Make Pumpkin Pie
- STEP 1). Mix and chill the pastry dough Whisk the flour, pastry sugar, and salt in a large bowl. Add the cold butter and cut it into the flour with a pastry blender or cool fingertips until most pieces are pea-sized, with a few thin flakes remaining. Drizzle in 45 ml of ice water and toss with a fork. Add the remaining water 1 teaspoon at a time only until a squeezed handful holds together. Press into a disk, wrap, and refrigerate for 45 minutes.
- STEP 2). Roll and fit the crust Set the chilled dough on a lightly floured work surface and roll it from the center outward into a 12-inch circle about 1/8 inch thick, rotating frequently to prevent sticking. Transfer it to a 9-inch metal pie plate without stretching the dough. Ease it into the corners, trim the overhang to 1 inch, then fold and crimp the edge. Refrigerate the shaped shell for 15 minutes while positioning a rack in the lower third of the oven.
- STEP 3). Heat the oven and prepare the weighted shell Preheat the oven to 375°F with a rimmed baking sheet inside; the hot sheet helps conduct heat directly into the bottom crust. Line the chilled shell with crumpled and flattened parchment, making sure it reaches the pastry edge. Fill completely with pie weights or dry beans so the sides cannot slump. Set the pie plate on the hot baking sheet carefully, keeping the crimped edge clear of the weights.
- STEP 4). Blind-bake until the pastry is dry and lightly golden Bake the weighted shell at 375°F for 20 minutes, until the crimp looks set and no longer raw. Lift out the parchment and weights, then prick the bottom several times with a fork without piercing completely through the plate. Return the crust to the baking sheet and bake for 8 to 10 minutes, until the base appears dry and shows light golden patches. Cool on a wire rack for 10 minutes while preparing the filling.
- STEP 5). Whisk the pumpkin custard without aerating it Lower the oven to 350°F, leaving the baking sheet in place. In a medium bowl, whisk the pumpkin, brown sugar, granulated sugar, cornstarch, cinnamon, ginger, nutmeg, cloves, and filling salt until smooth and evenly colored. Add the eggs one at a time, whisking gently after each addition until no white streaks remain. Slowly whisk in the evaporated milk and vanilla. Scrape the bowl with a spatula, then stir rather than vigorously beating to limit bubbles.
- STEP 6). Fill and bake to a softly set center Pour the filling into the warm crust and pop any large surface bubbles with a toothpick. Transfer the pie to the hot baking sheet and bake at 400°F for 15 minutes, then reduce the oven to 350°F without opening the door. Continue baking for 35 to 45 minutes. The outer 2 inches should be puffed and set, while the center should wobble as one piece rather than ripple. An instant-read thermometer inserted near the center should register 175°F to 180°F.
- STEP 7). Cool completely before slicing Move the pie plate to a wire rack and cool at room temperature for 4 hours, away from drafts. The center will settle and finish firming as the egg proteins and starch cool, so slicing early can produce a loose wedge even when the pie is fully baked. Once completely cool, loosen any caramelized filling from the edge with a thin knife. Slice with a clean sharp knife, wiping the blade between cuts, and serve at room temperature or lightly chilled.
Storage and Freezing
- Storage: Once completely cool, cover the pie loosely and refrigerate it within 2 hours. Keep refrigerated for up to 4 days.
- Freezing: Freeze the fully cooled pie or individual slices uncovered until firm, then wrap securely and place in an airtight container.
- Freeze for up to 1 month for the best pastry texture.
- Thawing: Thaw wrapped pie overnight in the refrigerator. Remove the wrapping after thawing so condensation does not collect on the custard.
- Serving: Serve chilled or let refrigerated slices stand at room temperature for 20 to 30 minutes. Do not leave the custard pie at room temperature for more than 2 hours.
Frequently Asked Questions
How do you avoid a soggy bottom in pumpkin pie?
A fully weighted blind-bake gives the bottom crust enough time to dry and begin browning before the custard is added. Removing the weights for the final 8 to 10 minutes exposes the base directly to oven heat, so it should look matte and lightly golden rather than pale or greasy.
Bake the pie on a preheated metal sheet in the lower third of the oven. That direct heat transfer is more effective than extending the custard bake, which can overcook the filling before a raw bottom crust becomes crisp.
What should pumpkin pie look like when it is done?
The outer 2 inches should appear slightly puffed and stable, while the center moves in one soft wobble when the pan is nudged. A center that ripples like liquid is underbaked. Small bubbles, deep cracks, or pronounced swelling indicate that the custard has become too hot.
For an additional check, insert an instant-read thermometer near the center without touching the crust. A reading of 175°F to 180°F confirms that the egg custard has set while retaining a creamy texture.
How long should pumpkin pie cool before slicing?
This pumpkin pie needs 4 hours on a wire rack at room temperature before slicing. Cooling is an active part of the setting process because the egg proteins stabilize and the cornstarch-thickened moisture becomes less fluid as the filling approaches room temperature.
Cutting sooner can release a loose center and soften the crust with warm custard. If making the pie ahead, cool it fully first, then refrigerate it rather than covering a warm pie and trapping condensation.
Which pumpkin pie ingredient substitutions work in this recipe?
Light brown sugar can replace dark brown sugar gram for gram, although the finished filling will have a milder molasses flavor. Thick homemade pumpkin purée may replace canned purée by weight only when it has been drained or cooked down to a similarly dense, spoonable consistency.
Regular milk is not a direct substitute for evaporated milk because it adds more water and less concentrated dairy solids. Pumpkin pie filling is also unsuitable because it already contains sweeteners and spices that would disrupt this formula.
Why did my pumpkin pie crack or pull away from the crust?
Cracks usually mean the custard baked too long or became too hot. Egg proteins tighten as their temperature rises, forcing moisture out and creating fissures. Remove the pie while the center still has a controlled wobble instead of waiting for it to become completely rigid in the oven.
A filling that pulls noticeably from the crust has often been overbaked or cooled too abruptly. Use the lower-third rack, reduce the temperature as directed, and cool the finished pie away from cold drafts.
More Ridiculously Delicious Pies & Tarts
- Classic Apple Crumble Pie with a Buttery, Crisp Topping
- Classic Double-Crust Apple Pie with Flaky Pastry
- Cranberry Apple Pie with a Flaky Double Crust
- Salted Caramel Apple Pie with Golden Pastry
- Classic Pecan Pie with Gooey Brown Sugar Filling
Pumpkin Pie with a Tender Pastry Crust
Ingredients
Equipment
Method
- Whisk the flour, pastry sugar, and salt in a large bowl. Add the cold butter and cut it into the flour with a pastry blender or cool fingertips until most pieces are pea-sized, with a few thin flakes remaining. Drizzle in 45 ml of ice water and toss with a fork. Add the remaining water 1 teaspoon at a time only until a squeezed handful holds together. Press into a disk, wrap, and refrigerate for 45 minutes.
- Set the chilled dough on a lightly floured work surface and roll it from the center outward into a 12-inch circle about 1/8 inch thick, rotating frequently to prevent sticking. Transfer it to a 9-inch metal pie plate without stretching the dough. Ease it into the corners, trim the overhang to 1 inch, then fold and crimp the edge. Refrigerate the shaped shell for 15 minutes while positioning a rack in the lower third of the oven.
- Preheat the oven to 375°F with a rimmed baking sheet inside; the hot sheet helps conduct heat directly into the bottom crust. Line the chilled shell with crumpled and flattened parchment, making sure it reaches the pastry edge. Fill completely with pie weights or dry beans so the sides cannot slump. Set the pie plate on the hot baking sheet carefully, keeping the crimped edge clear of the weights.
- Bake the weighted shell at 375°F for 20 minutes, until the crimp looks set and no longer raw. Lift out the parchment and weights, then prick the bottom several times with a fork without piercing completely through the plate. Return the crust to the baking sheet and bake for 8 to 10 minutes, until the base appears dry and shows light golden patches. Cool on a wire rack for 10 minutes while preparing the filling.
- Lower the oven to 350°F, leaving the baking sheet in place. In a medium bowl, whisk the pumpkin, brown sugar, granulated sugar, cornstarch, cinnamon, ginger, nutmeg, cloves, and filling salt until smooth and evenly colored. Add the eggs one at a time, whisking gently after each addition until no white streaks remain. Slowly whisk in the evaporated milk and vanilla. Scrape the bowl with a spatula, then stir rather than vigorously beating to limit bubbles.
- Pour the filling into the warm crust and pop any large surface bubbles with a toothpick. Transfer the pie to the hot baking sheet and bake at 400°F for 15 minutes, then reduce the oven to 350°F without opening the door. Continue baking for 35 to 45 minutes. The outer 2 inches should be puffed and set, while the center should wobble as one piece rather than ripple. An instant-read thermometer inserted near the center should register 175°F to 180°F.
- Move the pie plate to a wire rack and cool at room temperature for 4 hours, away from drafts. The center will settle and finish firming as the egg proteins and starch cool, so slicing early can produce a loose wedge even when the pie is fully baked. Once completely cool, loosen any caramelized filling from the edge with a thin knife. Slice with a clean sharp knife, wiping the blade between cuts, and serve at room temperature or lightly chilled.
Notes
- Use a metal pie plate rather than a thick ceramic dish when bottom-crust browning is the priority. Metal transfers heat more quickly and makes the pastry’s color easier to judge during blind-baking.
- Fill the parchment all the way to the top of the shell with weights. A shallow layer protects the base but leaves the sides unsupported, which allows the crust to slump below the rim.
- Keep the blind-baked shell warm while mixing the filling. Warm pastry begins setting the custard at the boundary and avoids leaving a gummy layer where cool filling meets an underheated crust.
- Judge doneness by movement, not by waiting for a rigid center. A softly wobbling center will finish setting as it cools; a liquid ripple needs more baking, while a dramatically puffed or cracked center indicates overbaking.
- Plan the serving schedule backward from dessert. Allow about one hour for dough chilling and shaping, roughly 90 minutes for blind-baking and filling, and a full four hours of undisturbed cooling before slicing.