
Table of Contents
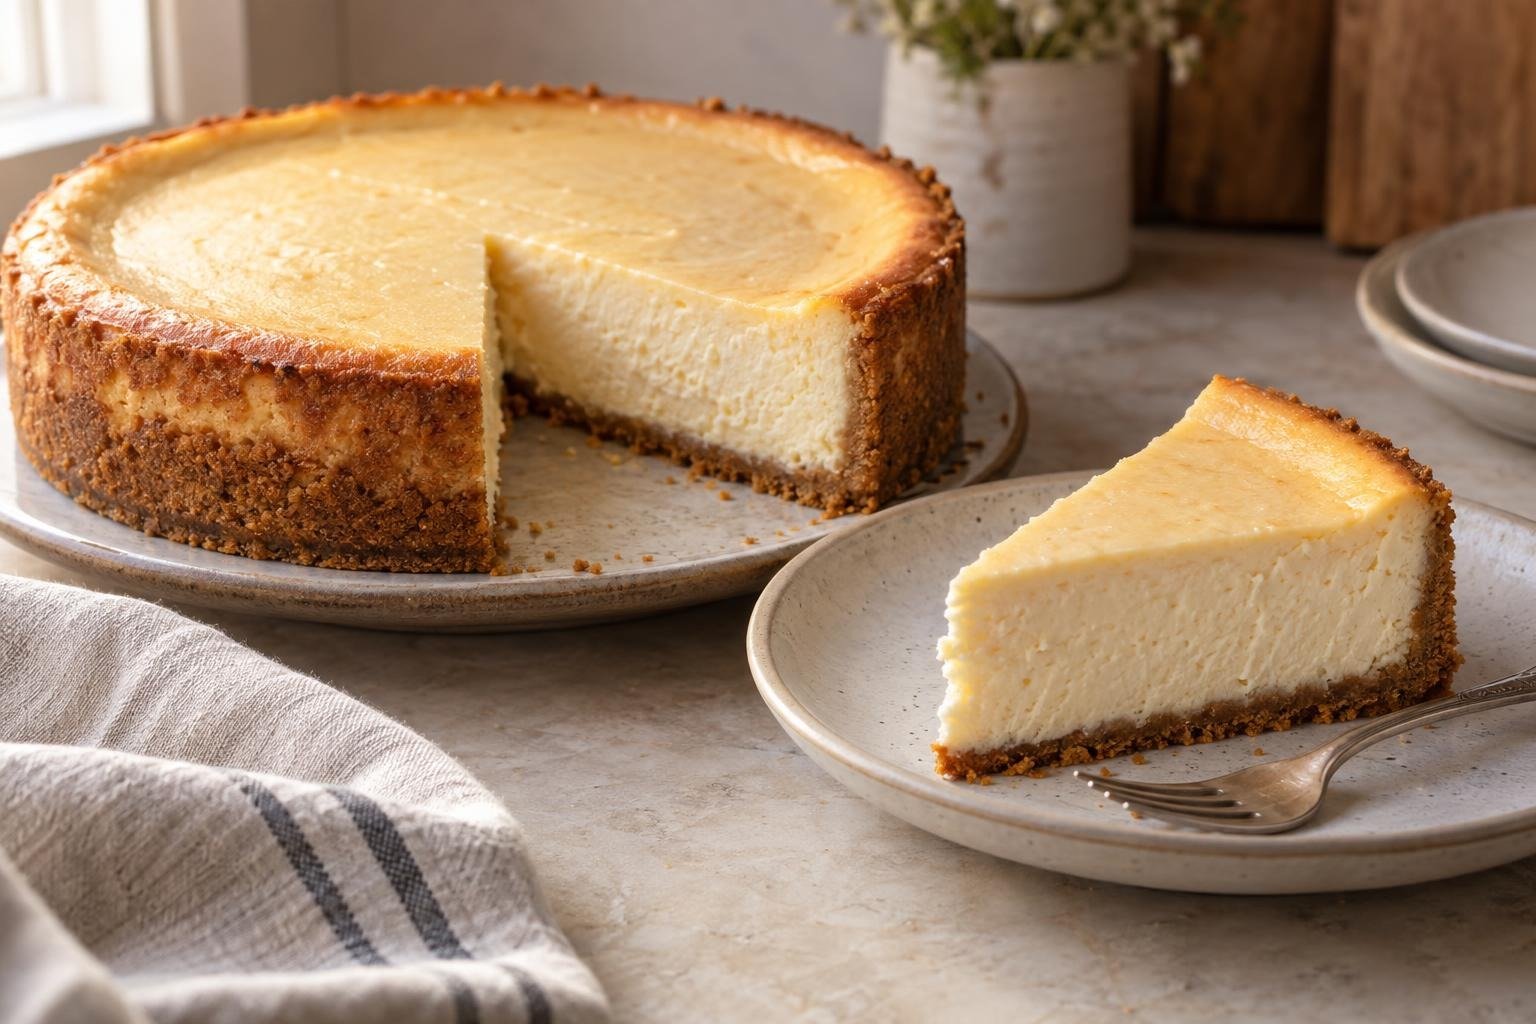
A golden graham cracker crust gives way to a dense, satin-smooth filling with gentle vanilla, fresh lemon zest, and the subtle tang that defines New York cheesecake. This New York cheesecake without a water bath relies on controlled mixing and patient cooling for a creamy interior that slices cleanly without becoming heavy or gummy.
I keep the cream cheese, sour cream, and eggs at cool room temperature so they combine without aggressive beating. The filling should look glossy and cohesive, not fluffy. After baking, I look for set edges and a softly trembling center, then cool the cheesecake gradually before refrigerating it overnight. Those visual cues matter more than chasing a perfectly pale surface or a completely motionless center.
Why This Cheesecake Recipe Frickin’ Works
- A substantial ratio of full-fat cream cheese to eggs produces the dense, creamy structure expected from a New York-style cheesecake without making the filling taste eggy.
- Cornstarch binds a small amount of free moisture, helping the filling set into neat slices while remaining smooth rather than dry or curdled.
- Low-speed mixing limits incorporated air. Fewer trapped bubbles mean less rising, shrinking, and surface cracking as the cheesecake cools.
- Baking at 325°F sets the edges gradually without the intense surface heat that can overcook a cheesecake when no water bath is present.
- A staged cooling schedule in the switched-off oven, at room temperature, and in the refrigerator reduces abrupt contraction while giving the filling enough time to become fully sliceable.
Ingredient Notes for Creamy New York Cheesecake Without a Water Bath
- Graham cracker crumbs: Fine, evenly crushed crumbs pack into a cohesive crust and leave fewer weak spots around the edge. Avoid coarse pieces, which make clean slicing difficult.
- Unsalted butter: Melted butter coats the crumbs and firms as the crust cools. Unsalted butter allows the added salt to control the final seasoning.
- Full-fat brick cream cheese: Brick-style cream cheese supplies the fat and concentrated milk solids needed for a firm New York-style filling. Bring it to about 68 to 72°F so it blends smoothly without being warm or greasy.
- Granulated sugar: Sugar sweetens the filling, softens the cream cheese proteins, and contributes to its glossy texture. Adding it gradually prevents stubborn cream cheese lumps.
- Cornstarch: This small starch addition manages moisture and gives the cheesecake extra stability without turning the filling floury. Whisking it into the sugar disperses it before it reaches wet ingredients.
- Sour cream: Full-fat sour cream adds acidity, moisture, and a restrained tang. It should be close to room temperature so it does not tighten the softened cream cheese.
- Eggs: Large eggs provide the proteins that set the filling. Room-temperature eggs incorporate with less mixing, which helps keep excess air out of the batter.
- Vanilla and lemon zest: Vanilla rounds out the dairy flavor while finely grated lemon zest adds aromatic brightness without introducing enough juice to loosen the filling.
Expert Baking Tips
- Check the ingredient temperatures before mixing. Cream cheese that is still cold forms small lumps, while overly warm cream cheese becomes loose and may require extra mixing that adds unwanted air.
- Use the paddle attachment rather than a whisk. A whisk is designed to incorporate air, but cheesecake batter needs thorough blending with minimal aeration to limit puffing and collapse.
- Do not judge doneness by browning alone. The perimeter should be stable, the center should wobble as one section, and there should be no fluid wave under the surface.
- Avoid opening the oven early. A rush of cool air before the outer structure has set can cause uneven sinking, while repeated checks extend the baking time unpredictably.
- Plan backward from serving time. This cheesecake needs two hours of gradual cooling plus at least eight hours of refrigeration, so baking it the day before produces the most practical schedule.
Ingredients for Creamy New York Cheesecake Without a Water Bath
- 200 g graham cracker crumbs (finely ground, about 2 cups)
- 30 g granulated sugar (for the crust, about 2 tablespoons plus 1 teaspoon)
- 85 g unsalted butter (melted and cooled slightly, 6 tablespoons)
- 900 g full-fat brick cream cheese (softened to 68 to 72°F, four 8-ounce packages)
- 250 g granulated sugar (for the filling, 1 1/4 cups)
- 25 g cornstarch (3 tablespoons)
- 2 g fine sea salt (1/4 teaspoon)
- 240 g full-fat sour cream (at room temperature, 1 cup)
- 10 ml pure vanilla extract (2 teaspoons)
- 1 tsp finely grated lemon zest (grate only the yellow outer peel)
- 4 large eggs (about 200 g without shells, at room temperature)
How to Make Creamy New York Cheesecake Without a Water Bath
- STEP 1). Prepare the pan and preheat the oven Position a rack in the lower third of the oven and preheat to 350°F. Lightly grease the base and sides of a 9-inch springform pan, then line the base with a parchment round. Set the pan on a heavy rimmed baking sheet to support it and catch any butter that escapes. Because this cheesecake is baked without a water bath, leave the outside of the pan unwrapped so dry oven heat can circulate evenly.
- STEP 2). Mix and bake the graham cracker crust Combine the graham cracker crumbs, 30 g sugar, and melted butter in a medium bowl until every crumb looks evenly moistened and the mixture holds together when squeezed. Press it firmly across the pan base and about 1 inch up the sides, using a flat-bottomed measuring cup to compact it. Bake on the baking sheet for 10 minutes, until fragrant and slightly darker at the edges. Cool for 10 minutes while reducing the oven to 325°F.
- STEP 3). Smooth the cream cheese at low speed Place the softened cream cheese in the bowl of a stand mixer fitted with the paddle attachment. Mix on low speed for 2 to 3 minutes, stopping twice to scrape the bowl, paddle, and dense mixture from the bottom. The cream cheese should become smooth and pliable without looking whipped. If using a hand mixer, keep it on its lowest setting and move slowly through the bowl rather than lifting the beaters and pulling air into the cheese.
- STEP 4). Add the sugar, starch, and flavorings Whisk the 250 g sugar, cornstarch, and salt together in a small bowl so the starch is evenly dispersed. Add this mixture to the cream cheese in three additions, mixing on low just until each addition disappears. Scrape the bowl thoroughly, then add the sour cream, vanilla, and lemon zest. Mix on low for about 30 seconds, stopping when the batter is glossy, uniform, and free of visible sour cream streaks rather than continuing until it becomes airy.
- STEP 5). Incorporate the eggs without aerating Crack the eggs into a separate bowl and break them up gently with a fork. With the mixer on its lowest speed, add the eggs in four portions, allowing each portion to blend almost completely before adding the next. Stop the mixer as soon as the final yellow streak disappears. Scrape the bowl and fold the batter five or six times with a flexible spatula, reaching the bottom to incorporate any dense cream cheese while releasing larger trapped air bubbles.
- STEP 6). Fill the pan and bake until softly set Pour the filling over the cooled crust and smooth the surface with the spatula. Tap the pan gently against the baking sheet two or three times, then pop any visible surface bubbles with a toothpick. Bake at 325°F for 80 to 90 minutes without opening the door during the first 70 minutes. The outer 2 inches should look set and slightly puffed, while the center 2 to 3 inches should tremble together like soft gelatin, not ripple like liquid batter. An instant-read thermometer inserted near the center should register about 150 to 155°F.
- STEP 7). Cool the cheesecake gradually Switch off the oven, prop the door open about 2 inches with a wooden spoon, and leave the cheesecake inside for 1 hour. Transfer the pan, still on its baking sheet, to a wire rack and cool at room temperature for another hour. The surface will settle slightly as the filling contracts. Run a thin knife around the upper edge if it appears attached to the pan, but do not release the springform ring while the filling is warm and structurally delicate.
- STEP 8). Chill, unmold, and slice cleanly Cover the cooled pan without touching the cheesecake surface and refrigerate for at least 8 hours, preferably overnight. To unmold, release the springform clasp and lift away the ring; leave the cheesecake on the pan base unless transferring it to a flat platter with a wide spatula. For clean portions, dip a thin knife in hot water, wipe it dry, and cut straight down. Clean and rewarm the blade between slices, then let each slice stand for 15 minutes before serving.
Storage and Freezing
- Refrigeration: Keep the cheesecake covered in its springform pan or in an airtight container for up to 5 days. Protect the cut edges with parchment or food-safe wrap to prevent drying.
- Freezing: Freeze the fully chilled cheesecake whole or in individual slices for up to 2 months. Set the pieces on a tray until firm, then wrap them securely and place them in an airtight container.
- Thawing: Thaw wrapped cheesecake overnight in the refrigerator. Unwrap it after thawing so condensation collects on the wrapping rather than the surface.
- Serving: For the creamiest texture, let refrigerated slices stand at room temperature for about 15 minutes. Do not leave the cheesecake unrefrigerated for longer than 2 hours.
Frequently Asked Questions
How do you tell when New York cheesecake without a water bath is done?
The outer 2 inches should look set and may rise slightly, while the center 2 to 3 inches should wobble together when the pan is nudged. A liquid-looking ripple means the center needs more time.
For an additional check, insert an instant-read thermometer near the center and look for approximately 150 to 155°F. Remove the cheesecake before the center becomes rigid because retained heat continues setting the eggs during gradual cooling.
Why did my cheesecake crack even though I mixed it slowly?
Slow mixing controls air, but cracks can also come from overbaking, ingredients stuck to the pan, or a sudden temperature change. A completely firm center in the oven usually indicates that the filling has cooked beyond its creamy stage.
Follow the one-hour oven cooling period and loosen an attached upper edge before the cheesecake becomes fully cold. A shallow crack does not affect flavor or food safety, and chilled slices will still hold their shape.
How long should New York cheesecake chill before slicing?
Allow at least 8 hours in the refrigerator after the two-stage cooling period. The filling continues firming as its fat chills and its moisture becomes evenly distributed, which is what produces clean slices rather than a soft, dragging center.
Overnight chilling is the most convenient serving schedule. Cutting earlier may leave the middle creamy enough to slump, even when the cheesecake reached the correct temperature in the oven.
Can I make this baked New York cheesecake ahead of time?
Making it one or two days before serving fits the recipe especially well because the cheesecake requires a long chill. Keep it in the springform pan with the surface covered, then unmold it while cold shortly before portioning.
For longer advance preparation, freeze the fully chilled cheesecake for up to 2 months. Thaw it overnight in the refrigerator while wrapped, then uncover it and rest the slices briefly at room temperature before serving.
What causes a grainy or lumpy cheesecake filling?
Cold cream cheese is the most common cause of visible lumps because it cannot blend smoothly before the eggs thin the batter. Graininess can also develop when the filling is overbaked and the egg proteins tighten enough to squeeze out moisture.
Use cream cheese at about 68 to 72°F, scrape the bowl repeatedly, and keep the mixer at low speed. Stop baking while the center still has a controlled wobble rather than waiting for the entire surface to become firm.
More Ridiculously Delicious Cheesecakes
- Chocolate Cheesecake with Creamy Filling
- Blueberry Cheesecake with a Creamy Filling
- No-Bake Banana Pudding Cheesecake with a Creamy Filling
- No-Bake Key Lime Cheesecake with a Chilled Filling
- Double Chocolate Cheesecake with a Smooth Cheesecake Filling
Creamy New York Cheesecake Without a Water Bath
Ingredients
Equipment
Method
- Position a rack in the lower third of the oven and preheat to 350°F. Lightly grease the base and sides of a 9-inch springform pan, then line the base with a parchment round. Set the pan on a heavy rimmed baking sheet to support it and catch any butter that escapes. Because this cheesecake is baked without a water bath, leave the outside of the pan unwrapped so dry oven heat can circulate evenly.
- Combine the graham cracker crumbs, 30 g sugar, and melted butter in a medium bowl until every crumb looks evenly moistened and the mixture holds together when squeezed. Press it firmly across the pan base and about 1 inch up the sides, using a flat-bottomed measuring cup to compact it. Bake on the baking sheet for 10 minutes, until fragrant and slightly darker at the edges. Cool for 10 minutes while reducing the oven to 325°F.
- Place the softened cream cheese in the bowl of a stand mixer fitted with the paddle attachment. Mix on low speed for 2 to 3 minutes, stopping twice to scrape the bowl, paddle, and dense mixture from the bottom. The cream cheese should become smooth and pliable without looking whipped. If using a hand mixer, keep it on its lowest setting and move slowly through the bowl rather than lifting the beaters and pulling air into the cheese.
- Whisk the 250 g sugar, cornstarch, and salt together in a small bowl so the starch is evenly dispersed. Add this mixture to the cream cheese in three additions, mixing on low just until each addition disappears. Scrape the bowl thoroughly, then add the sour cream, vanilla, and lemon zest. Mix on low for about 30 seconds, stopping when the batter is glossy, uniform, and free of visible sour cream streaks rather than continuing until it becomes airy.
- Crack the eggs into a separate bowl and break them up gently with a fork. With the mixer on its lowest speed, add the eggs in four portions, allowing each portion to blend almost completely before adding the next. Stop the mixer as soon as the final yellow streak disappears. Scrape the bowl and fold the batter five or six times with a flexible spatula, reaching the bottom to incorporate any dense cream cheese while releasing larger trapped air bubbles.
- Pour the filling over the cooled crust and smooth the surface with the spatula. Tap the pan gently against the baking sheet two or three times, then pop any visible surface bubbles with a toothpick. Bake at 325°F for 80 to 90 minutes without opening the door during the first 70 minutes. The outer 2 inches should look set and slightly puffed, while the center 2 to 3 inches should tremble together like soft gelatin, not ripple like liquid batter. An instant-read thermometer inserted near the center should register about 150 to 155°F.
- Switch off the oven, prop the door open about 2 inches with a wooden spoon, and leave the cheesecake inside for 1 hour. Transfer the pan, still on its baking sheet, to a wire rack and cool at room temperature for another hour. The surface will settle slightly as the filling contracts. Run a thin knife around the upper edge if it appears attached to the pan, but do not release the springform ring while the filling is warm and structurally delicate.
- Cover the cooled pan without touching the cheesecake surface and refrigerate for at least 8 hours, preferably overnight. To unmold, release the springform clasp and lift away the ring; leave the cheesecake on the pan base unless transferring it to a flat platter with a wide spatula. For clean portions, dip a thin knife in hot water, wipe it dry, and cut straight down. Clean and rewarm the blade between slices, then let each slice stand for 15 minutes before serving.
Notes
- Check the ingredient temperatures before mixing. Cream cheese that is still cold forms small lumps, while overly warm cream cheese becomes loose and may require extra mixing that adds unwanted air.
- Use the paddle attachment rather than a whisk. A whisk is designed to incorporate air, but cheesecake batter needs thorough blending with minimal aeration to limit puffing and collapse.
- Do not judge doneness by browning alone. The perimeter should be stable, the center should wobble as one section, and there should be no fluid wave under the surface.
- Avoid opening the oven early. A rush of cool air before the outer structure has set can cause uneven sinking, while repeated checks extend the baking time unpredictably.
- Plan backward from serving time. This cheesecake needs two hours of gradual cooling plus at least eight hours of refrigeration, so baking it the day before produces the most practical schedule.