Table of Contents
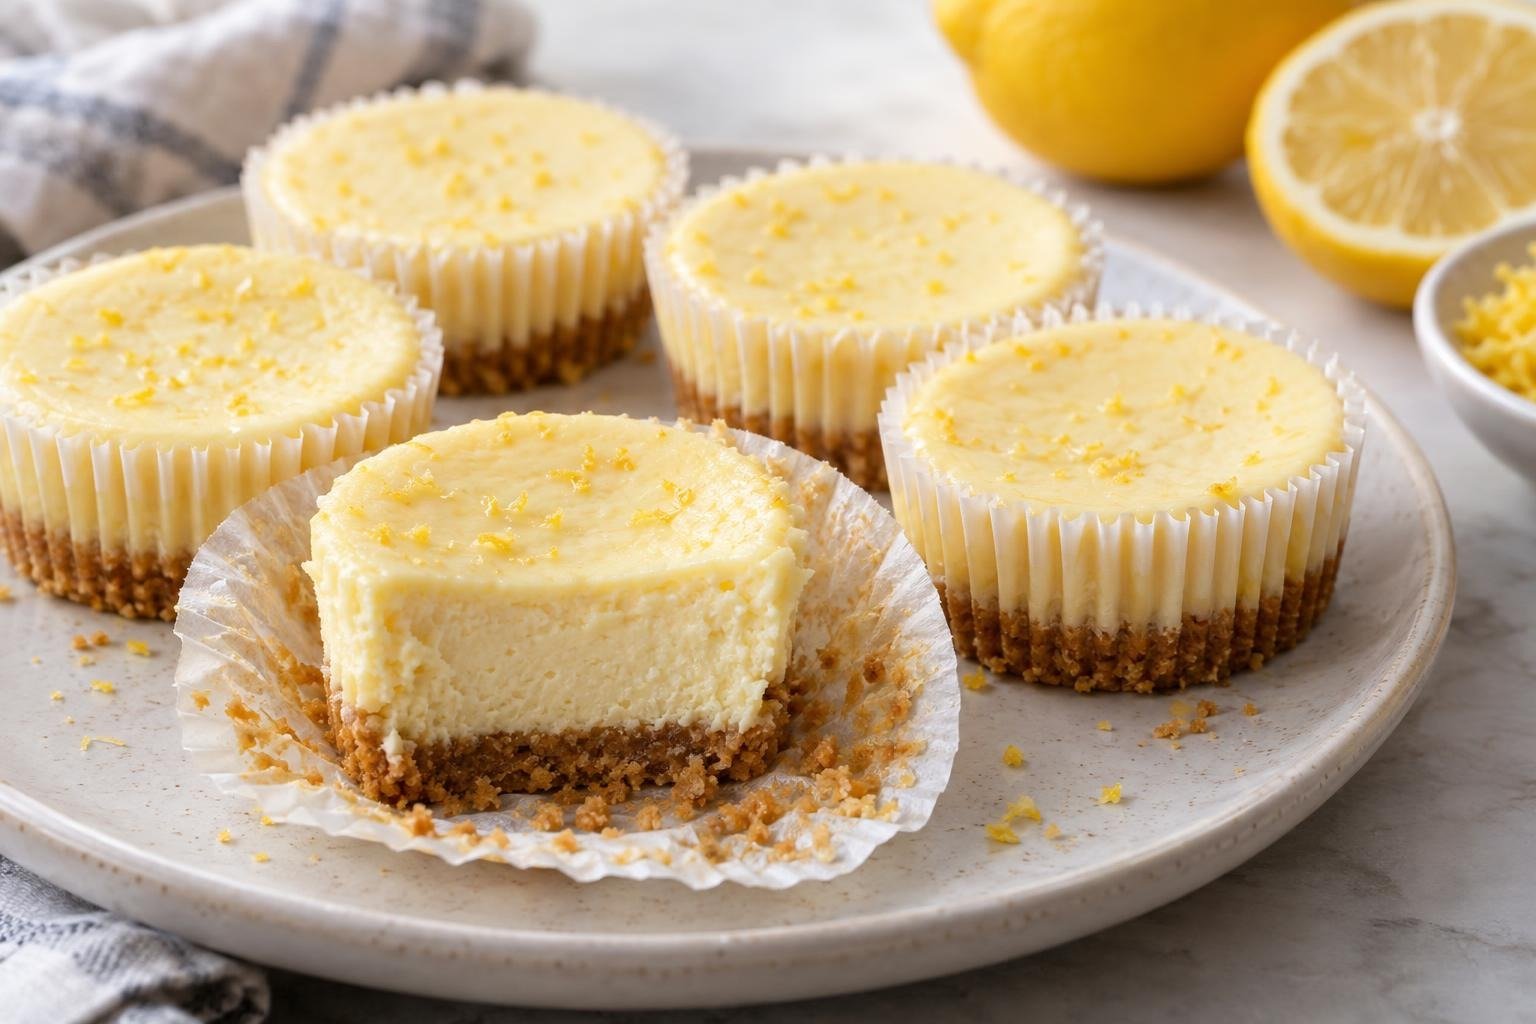
Fresh lemon aroma, a buttery graham crust, and a dense but creamy center give these mini lemon cheesecakes their bright, tidy little personality. Lemon zest supplies fragrant citrus oil, while fresh juice adds enough acidity to sharpen the cream cheese without making the filling loose. Each cheesecake is baked in a lined standard muffin pan, so the portions set quickly and release neatly after chilling.
I use block-style cream cheese at room temperature and mix the filling on low speed, stopping as soon as it becomes smooth. That keeps excess air out of the batter and helps prevent puffing, sinking, and cracking. These are baked cheesecakes, not no-bake cups, so look for set edges and a center that moves as one soft unit rather than rippling like liquid. A gradual cooling period followed by at least four hours of refrigeration finishes the set.
Why This Lemon Cheesecake Recipe Frickin’ Works
- A 2:1 ratio of cream cheese to sour cream keeps the filling rich and sliceable while preserving a smooth, creamy mouthfeel.
- Fresh lemon zest contributes concentrated citrus aroma without thinning the batter, while measured lemon juice provides clean acidity and balanced flavor.
- A small amount of cornstarch binds excess moisture from the lemon juice and sour cream, helping the individual cheesecakes set without becoming rubbery.
- Low-speed mixing limits incorporated air, preventing the dramatic rise and collapse that can leave miniature cheesecakes sunken or cracked.
- Baking at 325°F sets the egg proteins gently, and the combined room-temperature cooling and four-hour chill create clean edges without a water bath.
Ingredient Notes for Creamy Mini Lemon Cheesecakes
- Graham cracker crumbs: Finely ground crumbs compact into a stable crust and distribute the butter evenly. Large pieces leave weak spots that may crumble when the liners are removed.
- Unsalted butter: Melted butter coats the crumbs and firms as the cheesecakes chill. Let it cool slightly before mixing so it does not dissolve the sugar or make the crust greasy.
- Block-style cream cheese: Full-fat blocks provide the fat, protein, and low moisture needed for a firm yet creamy baked filling. Spreadable tub cream cheese contains more moisture and is not suitable for this formula.
- Granulated sugar and cornstarch: Sugar sweetens and softens the cream cheese structure. Cornstarch manages moisture from the lemon juice and reduces the chance of a loose center without turning the filling floury.
- Fresh lemons: Zest the lemons before juicing, removing only the yellow outer layer. Fresh juice gives the cleanest flavor; strain out seeds and pulp before measuring so the filling stays smooth.
- Sour cream: Full-fat sour cream softens the density of the cream cheese and contributes gentle tang. Full-fat plain Greek yogurt may replace it by weight, although the finished filling will taste slightly tangier and feel a little firmer.
- Eggs: Room-temperature eggs blend into the fat-based filling with less mixing. They provide the proteins that set the cheesecakes, so add them last and avoid whipping once they are incorporated.
My Baking Tips
- Use truly room-temperature cream cheese, not cheese softened unevenly in a microwave. Warm outer edges and a cold center create persistent lumps that encourage overmixing.
- Scrape the mixer bowl after every major addition. Dense cream cheese commonly sticks beneath the paddle or at the bottom, where it can remain hidden until the batter is portioned.
- Keep the mixer on low once the sugar is added. A fluffy batter may look attractive in the bowl, but trapped air expands in the oven and can cause domed tops, cracks, and sunken centers.
- Judge doneness by movement rather than browning. Properly baked centers wobble together like soft gelatin; underbaked filling produces a loose wave, while an entirely rigid center is likely overbaked.
- Do not remove the liners while the cheesecakes are warm. The crust and filling continue firming during refrigeration, and cold portions release with much cleaner sides.
Ingredients for Mini Lemon Cheesecakes
- 120 g graham cracker crumbs (about 1 1/4 cups, finely ground)
- 28 g granulated sugar (about 2 tablespoons, for the crust)
- 56 g unsalted butter (4 tablespoons, melted and cooled slightly)
- 454 g full-fat block-style cream cheese (two 8-ounce blocks, softened to 68 to 72°F)
- 150 g granulated sugar (3/4 cup, for the filling)
- 8 g cornstarch (about 1 tablespoon)
- 1.5 g fine salt (about 1/4 teaspoon)
- 120 g full-fat sour cream (1/2 cup, at room temperature)
- 2 tbsp finely grated lemon zest (from about 2 large lemons, yellow outer zest only)
- 60 ml fresh lemon juice (1/4 cup, strained and at room temperature)
- 5 ml pure vanilla extract (1 teaspoon)
- 2 large eggs (at room temperature)
How to Make Mini Lemon Cheesecakes
- STEP 1). Prepare the oven, pan, and ingredients Position a rack in the center of the oven and preheat to 325°F. Line all 12 wells of a standard muffin pan with paper liners. Set the cream cheese, sour cream, and eggs out until they reach cool room temperature, about 68 to 72°F. Properly softened cream cheese should yield to gentle finger pressure but should not look oily or melted. Room-temperature ingredients combine with less mixing, which helps keep excess air out of the batter.
- STEP 2). Mix and portion the graham crust Combine the finely ground graham cracker crumbs and 28 g sugar in a medium bowl. Pour in the melted, slightly cooled butter and stir until every crumb looks evenly moistened and the mixture resembles damp sand. Divide it among the 12 liners, using about 1 packed tablespoon per cup. Press each portion into a level, compact layer with the flat bottom of a small glass or measuring cup, concentrating on the edges so the finished crust does not crumble during unmolding.
- STEP 3). Bake and cool the crusts Bake the crusts on the center rack for 5 minutes, just until they smell toasted and the surfaces look set rather than wet with butter. Do not wait for deep browning because they will bake again with the filling. Transfer the muffin pan to a wire rack and let the crusts cool for 10 minutes while preparing the filling. Keep the oven at 325°F so the batter enters a stable, fully heated oven.
- STEP 4). Make the smooth cream cheese base Place the softened cream cheese in the bowl of a stand mixer fitted with the paddle, or use a large bowl and hand mixer. Beat on low speed for 45 to 60 seconds, stopping once the cheese is smooth. Whisk the 150 g sugar, cornstarch, and salt together separately, then add them to the cream cheese. Mix on low for another 45 seconds. Scrape the bowl and paddle thoroughly; the mixture should be creamy and free of visible lumps, not fluffy or aerated.
- STEP 5). Add the lemon mixture and eggs Add the room-temperature sour cream, lemon zest, strained lemon juice, and vanilla to the cream cheese mixture. Blend on low speed for 20 to 30 seconds, then scrape the bowl so no dense cream cheese remains at the bottom. Add the eggs one at a time, mixing on low only until each yolk disappears. Finish folding with a flexible spatula. The batter should be glossy, pourable, and uniform, with tiny flecks of zest but no streaks of egg or pockets of cream cheese.
- STEP 6). Fill and bake the cheesecakes Divide the filling evenly over the cooled crusts, filling each liner almost to the top with about 65 g batter. Tap the pan gently on the counter two or three times to release large air pockets. Bake at 325°F for 17 to 20 minutes. The outer 1/2 inch should look set and slightly puffed, while each center should wobble softly as one piece when the pan is nudged. Continue baking if the centers ripple like liquid or appear wet and glossy.
- STEP 7). Cool gradually and chill until set Place the pan on a wire rack and leave the cheesecakes undisturbed for 45 minutes. They will settle slightly as steam escapes, but the centers should not collapse into wet craters. Cover the pan loosely without touching the tops and refrigerate for at least 4 hours, preferably overnight. Once thoroughly cold, lift each cheesecake out by its liner and peel the paper away gently. Serve chilled, or let the portions stand for 10 minutes for a slightly softer, creamier texture.
Storage and Freezing
- Refrigeration: Store the chilled mini lemon cheesecakes in a single layer in an airtight container for up to 4 days. Keep them refrigerated until shortly before serving.
- Freezing: Freeze fully chilled cheesecakes without removing their liners. Place them uncovered on a tray until firm, then transfer them to an airtight container with parchment between layers.
- Freeze for up to 1 month.
- Thawing: Move frozen cheesecakes to the refrigerator, keep them covered, and thaw overnight.
- Thawing at room temperature can create condensation and soften the crust.
- Serving: For a firm, clean set, serve directly from the refrigerator. For a creamier texture and fuller lemon aroma, let each portion stand at room temperature for about 10 minutes.
Frequently Asked Questions
Why will my mini lemon cheesecakes not set?
A loose center usually comes from underbaking, inaccurate lemon juice measurement, tub-style cream cheese, or insufficient chilling. At the end of baking, the center should wobble as one cohesive section rather than ripple like uncooked batter.
Cooling alone does not complete the set. Refrigerate the cheesecakes for at least four hours after their 45-minute room-temperature cooling period. Cutting or unmolding them sooner can make a properly baked filling appear underdone.
How far ahead should mini lemon cheesecakes be made?
Preparing them one day before serving gives the filling enough time to cool completely and develop a clean, stable set. Bake the cheesecakes, cool them in the pan for 45 minutes, then refrigerate them covered overnight.
They may be made up to four days ahead when stored airtight in the refrigerator. Keep the paper liners attached until serving because they protect the crust and prevent the creamy sides from sticking together.
Are these baked or no-bake mini lemon cheesecakes?
These are baked mini lemon cheesecakes set with eggs and a small amount of cornstarch. Baking gently coagulates the egg and cream cheese proteins, producing a creamy filling that holds its shape after chilling without gelatin.
A no-bake method cannot use this same ingredient ratio or procedure. Simply omitting the oven would leave the egg-based filling unsafe and unset, so the baking, cooling, and refrigeration stages are all essential.
Which mini lemon cheesecake ingredient substitutions work?
Full-fat plain Greek yogurt can replace the sour cream by equal weight. Its higher protein content may make the filling slightly firmer and tangier, but it still supplies the moisture and acidity needed for a creamy result.
Tub-style cream cheese, low-fat cream cheese, and extra lemon juice are not direct substitutions in this formula. Their additional moisture can weaken the set. Digestive biscuit crumbs may replace graham crumbs by weight if they are finely ground.
Can mini lemon cheesecakes be frozen without becoming grainy?
Properly cooled cheesecakes freeze well because their fat and protein structure is already set before freezing. Chill them completely, freeze them on a tray until firm, and then pack them airtight for up to one month.
Thaw the covered cheesecakes overnight in the refrigerator rather than on the counter. Slow thawing limits condensation and protects the crust. Avoid repeated freezing and thawing, which can release moisture and make the filling feel grainy.
Still Craving Something Sweet?
- No-Bake Lemon Cheesecake with a Chilled Filling
- Lemon No-Bake Cheesecake Bars with Tangy Citrus Filling
- Blueberry Lemon No-Bake Cheesecake Bars with a Creamy Filling
- Best Creamy Mini Oreo Cheesecakes Recipe
- Creamy Mini Salted Caramel Cheesecakes Recipe
Creamy Mini Lemon Cheesecakes
Ingredients
Equipment
Method
- Position a rack in the center of the oven and preheat to 325°F. Line all 12 wells of a standard muffin pan with paper liners. Set the cream cheese, sour cream, and eggs out until they reach cool room temperature, about 68 to 72°F. Properly softened cream cheese should yield to gentle finger pressure but should not look oily or melted. Room-temperature ingredients combine with less mixing, which helps keep excess air out of the batter.
- Combine the finely ground graham cracker crumbs and 28 g sugar in a medium bowl. Pour in the melted, slightly cooled butter and stir until every crumb looks evenly moistened and the mixture resembles damp sand. Divide it among the 12 liners, using about 1 packed tablespoon per cup. Press each portion into a level, compact layer with the flat bottom of a small glass or measuring cup, concentrating on the edges so the finished crust does not crumble during unmolding.
- Bake the crusts on the center rack for 5 minutes, just until they smell toasted and the surfaces look set rather than wet with butter. Do not wait for deep browning because they will bake again with the filling. Transfer the muffin pan to a wire rack and let the crusts cool for 10 minutes while preparing the filling. Keep the oven at 325°F so the batter enters a stable, fully heated oven.
- Place the softened cream cheese in the bowl of a stand mixer fitted with the paddle, or use a large bowl and hand mixer. Beat on low speed for 45 to 60 seconds, stopping once the cheese is smooth. Whisk the 150 g sugar, cornstarch, and salt together separately, then add them to the cream cheese. Mix on low for another 45 seconds. Scrape the bowl and paddle thoroughly; the mixture should be creamy and free of visible lumps, not fluffy or aerated.
- Add the room-temperature sour cream, lemon zest, strained lemon juice, and vanilla to the cream cheese mixture. Blend on low speed for 20 to 30 seconds, then scrape the bowl so no dense cream cheese remains at the bottom. Add the eggs one at a time, mixing on low only until each yolk disappears. Finish folding with a flexible spatula. The batter should be glossy, pourable, and uniform, with tiny flecks of zest but no streaks of egg or pockets of cream cheese.
- Divide the filling evenly over the cooled crusts, filling each liner almost to the top with about 65 g batter. Tap the pan gently on the counter two or three times to release large air pockets. Bake at 325°F for 17 to 20 minutes. The outer 1/2 inch should look set and slightly puffed, while each center should wobble softly as one piece when the pan is nudged. Continue baking if the centers ripple like liquid or appear wet and glossy.
- Place the pan on a wire rack and leave the cheesecakes undisturbed for 45 minutes. They will settle slightly as steam escapes, but the centers should not collapse into wet craters. Cover the pan loosely without touching the tops and refrigerate for at least 4 hours, preferably overnight. Once thoroughly cold, lift each cheesecake out by its liner and peel the paper away gently. Serve chilled, or let the portions stand for 10 minutes for a slightly softer, creamier texture.
Notes
- Use truly room-temperature cream cheese, not cheese softened unevenly in a microwave. Warm outer edges and a cold center create persistent lumps that encourage overmixing.
- Scrape the mixer bowl after every major addition. Dense cream cheese commonly sticks beneath the paddle or at the bottom, where it can remain hidden until the batter is portioned.
- Keep the mixer on low once the sugar is added. A fluffy batter may look attractive in the bowl, but trapped air expands in the oven and can cause domed tops, cracks, and sunken centers.
- Judge doneness by movement rather than browning. Properly baked centers wobble together like soft gelatin; underbaked filling produces a loose wave, while an entirely rigid center is likely overbaked.
- Do not remove the liners while the cheesecakes are warm. The crust and filling continue firming during refrigeration, and cold portions release with much cleaner sides.