Table of Contents
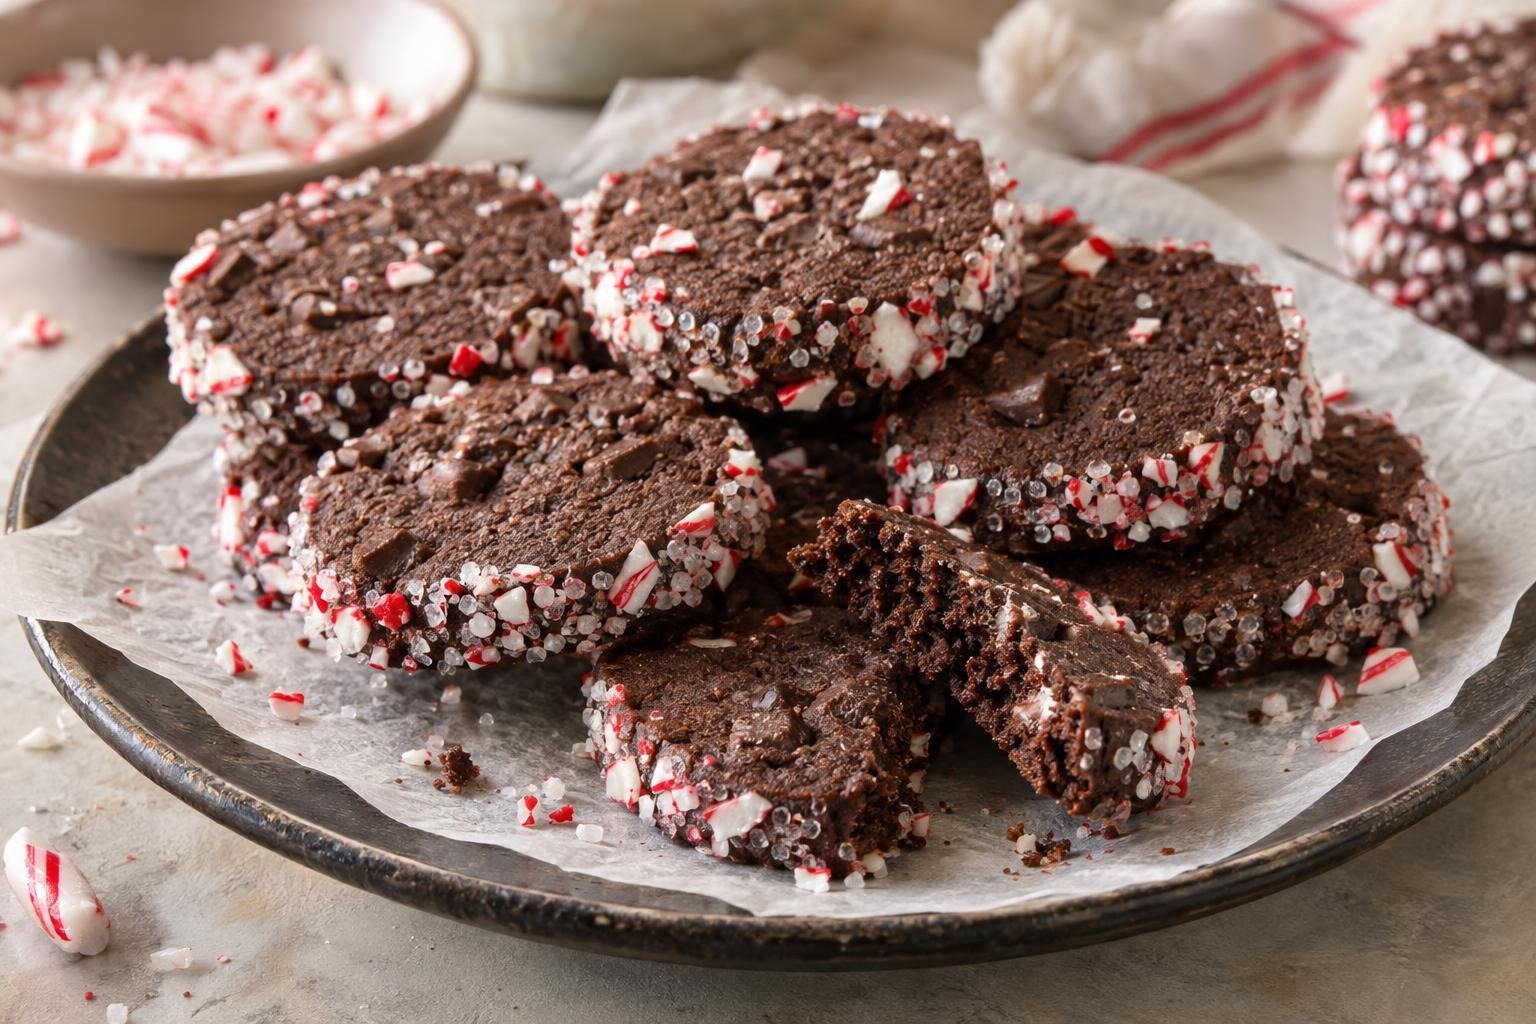
Chocolate and peppermint are practically made for the holidays, and these holiday peppermint chocolate slice-and-bake cookies bring both flavors together without making decorating a full-time job! The cookies have rich cocoa dough, little pockets of melted semisweet chocolate, and crisp edges coated in peppermint sugar. I particularly enjoy that cool burst of peppermint against the chocolate, especially when the centers stay soft and chewy. Brown sugar helps give the dough that tender texture, while chilling the shaped logs keeps the cookies from spreading too much in the oven. I make two smaller logs because they’re much easier to handle and slice evenly than one giant roll of dough. And here’s the part I appreciate most during the busy holiday season: the dough can wait in the refrigerator or freezer until you’re ready to bake. Fresh chocolate peppermint cookies without starting from scratch? I’ll happily take that little shortcut!
Why This Holiday Peppermint Chocolate Cookies Recipe Frickin’ Work
- Two little dough logs make life easier: I shape the dough into two logs about 4.5 cm (1¾ inches) thick, then slice them into 8 mm rounds. Smaller logs are easier to handle, especially when the dough is cold, and the cookies bake more evenly. No wrestling with a giant chocolate cylinder on the cutting board!
- Brown sugar keeps the centers chewy: I use brown sugar for its caramel-like flavor and moisture, while a little granulated sugar helps the edges turn delicately crisp. That contrast between the slightly crunchy rim and soft, chocolatey middle is exactly what I want from these cookies.
- Rich chocolate flavor without a crumbly dough: Cocoa powder can make cookie dough surprisingly dry if the flour balance isn’t right. Using 270 g of flour with 40 g of cocoa gives these cookies enough structure to slice neatly while keeping the centers tender. You get plenty of chocolate flavor without cookies that fall apart before reaching the plate.
- Peppermint that doesn’t overpower the chocolate: A little peppermint goes a long way, so I keep the extract to ¾ teaspoon. It’s enough to give the cocoa dough that refreshing holiday flavor without making it taste like toothpaste! The crushed peppermint candies around the edges add an extra minty crunch and a festive finish.
- Chilling keeps the cookies round: I let the shaped logs chill thoroughly before slicing and baking. Firm butter slows the initial spreading in the oven, helping the cookies bake into neat rounds approximately 5.5–6 cm wide. It also makes cutting through the chocolate-studded dough much easier, which means fewer broken cookies and more presentable holiday treats.
Ingredient Notes for Peppermint Chocolate Slice-And-Bake Cookies
- Unsalted butter: Butter supplies flavor, tenderness, and controlled spread. It should be pliable at about 18 to 20°C, not greasy or partly melted, so it can hold tiny air pockets during mixing.
- Granulated and light brown sugars: Granulated sugar promotes crisp edges, while brown sugar contributes moisture and chew. Break up any hard brown sugar lumps before measuring so they disperse evenly.
- Egg: One large room-temperature egg binds the dough and provides enough water for the flour and cocoa to hydrate. A cold egg can tighten the butter and leave the mixture curdled.
- All-purpose flour: This moderate-protein flour gives the chilled logs enough strength for clean slices without making the cookies tough. Weigh it when possible and stop mixing as soon as the dry streaks disappear.
- Dutch-process cocoa powder: Dutch cocoa provides deep color and a mellow chocolate flavor. Sifting it with the flour removes dry pockets that would otherwise appear as bitter streaks.
- Peppermint and vanilla extracts: Peppermint supplies the clear, cooling flavor, while vanilla rounds out the cocoa. Measure peppermint carefully because a small excess can overwhelm the chocolate.
- Semisweet chocolate: Finely chopped chocolate distributes more evenly than large chunks and allows the knife to pass through the cold logs without dragging or breaking the slices.
- Peppermint candy and sanding sugar: The finely crushed candy adds flavor and color to the rims, while coarse sugar keeps the coating crisp. Crush the candy into small 2 to 4 mm pieces rather than powder.
My Best Baking Tips
- Keep the chocolate pieces petite: Chunks larger than 6 mm catch on the knife and pull through the chilled dough, leaving broken slices instead of clean rounds.
- Watch the butter before mixing: Properly softened butter dents under a fingertip but still feels cool; shiny or greasy butter encourages excess spread even after chilling.
- Cut with steady downward pressure: Avoid sawing aggressively through the log, which can flatten its underside and dislodge the peppermint coating from the rim.
- Use visual doneness cues: Remove the cookies when their centers have lost the wet shine but still feel slightly soft, since waiting for firm centers produces a crisp cookie throughout.
- Cool the baking sheet between batches: Placing cold slices on a hot pan melts their butter prematurely, creating wider cookies with thinner, less defined edges.
My Best Tips for Shaping and Slicing Peppermint Chocolate Cookie Logs
Slice-and-bake dough is wonderfully practical, but tidy rounds depend on how the logs are compressed, chilled, and conditioned before cutting. I focus on firmness without letting the dough become brittle.
- Compress as you roll: Press the dough firmly through the parchment to eliminate hidden air pockets, which otherwise leave holes or flat sections in the sliced cookies.
- Use a ruler for consistent diameter: Keep both logs close to 4.5 cm across so their slices share the same baking time and produce a uniform finished yield.
- Rotate during the first chill: Turn the wrapped logs every 20 to 30 minutes while the butter is firming to prevent one side from settling noticeably flat.
- Condition before cutting: A refrigerator-cold log may crack if sliced immediately, so let it stand briefly until it reaches approximately 7 to 10°C and yields slightly to steady pressure.
- Repair rather than discard: Press minor cracks together with cool fingers and reshape the perimeter before placing each slice on the baking sheet.
A clean log does most of the decorating for you, which is exactly the kind of efficient pastry trick I appreciate.
Ingredients for Peppermint Chocolate Slice-And-Bake Cookies
- 226 g unsalted butter (1 cup, softened to 18 to 20°C)
- 120 g granulated sugar (about 1/2 cup plus 1 tablespoon)
- 80 g light brown sugar (about 1/3 cup plus 1 tablespoon, firmly packed)
- 1 large egg (about 50 g without shell, at room temperature)
- 1 tsp pure vanilla extract
- 3/4 tsp peppermint extract (measure carefully)
- 270 g all-purpose flour (about 2 1/4 cups, spooned and leveled if not weighed)
- 40 g Dutch-process cocoa powder (about 1/2 cup)
- 1/2 tsp fine sea salt
- 1/4 tsp baking soda
- 100 g semisweet chocolate (about 2/3 cup, finely chopped into pieces no larger than 6 mm)
- 30 g hard peppermint candies or candy canes (finely crushed into 2 to 4 mm pieces)
- 25 g coarse white sanding sugar (about 2 tablespoons)
How to Make Peppermint Chocolate Slice-And-Bake Cookies
- STEP 1). Combine the dry ingredients Set a medium bowl on the scale and add the flour, cocoa powder, salt, and baking soda. Sift the mixture once through a fine-mesh sieve, then whisk for about 20 seconds so the small quantity of baking soda is evenly dispersed. Keep the finely chopped chocolate nearby but separate. Breaking up the cocoa now prevents dry, bitter pockets later and allows the finished dough to come together with minimal mixing.
- STEP 2). Cream the butter and sugars Place the softened butter, granulated sugar, and brown sugar in the bowl of a stand mixer fitted with the paddle. Beat on medium speed for 2 to 3 minutes, stopping once to scrape the bowl and paddle. The mixture should look creamy and slightly lighter but not extremely fluffy. Excessive aeration can make the cookie rounds puff unevenly and lose their tidy slice-and-bake shape.
- STEP 3). Add the egg and extracts Add the room-temperature egg, vanilla, and peppermint extract to the butter mixture. Mix on medium-low speed for 45 to 60 seconds, then scrape the bottom and sides of the bowl and mix for another 15 seconds. The mixture should be smooth, thick, and evenly emulsified, with no glossy streaks of egg. If it looks slightly curdled, continue mixing briefly rather than adding extra flour.
- STEP 4). Finish and shape the dough Add the sifted dry ingredients and mix on low speed just until only a few flour streaks remain, about 30 to 45 seconds. Fold in the chopped chocolate with a silicone spatula until evenly distributed; the dough should be soft, cohesive, and slightly tacky but not wet. Divide it equally into two portions of about 455 grams. Using parchment paper, compress and roll each portion into a firm 4.5 cm diameter log approximately 20 cm long.
- STEP 5). Coat and chill the logs Combine the crushed peppermint candy and sanding sugar on a clean sheet of parchment. Unwrap each dough log, roll it firmly through the coating, and press loose pieces onto bare spots. Wrap each log tightly in fresh parchment, twist the ends, and refrigerate for at least 2 hours, turning the logs after 30 and 60 minutes to preserve their round shape. They are ready when completely firm with no soft center under gentle pressure.
- STEP 6). Slice and bake the cookies Heat the oven to 175°C and line two light-colored baking sheets with parchment. Let one log stand at room temperature for 5 to 10 minutes, aiming for a firm but sliceable dough temperature of roughly 7 to 10°C. Cut straight down with a sharp knife to make sixteen 8 mm slices, repairing small cracks with cool fingers. Arrange them 5 cm apart and bake one sheet at a time for 10 to 12 minutes, until the edges feel set and the centers look matte but remain slightly soft.
- STEP 7). Cool to set the chewy centers Leave the baked cookies on the hot sheet for 5 minutes; they will finish setting without losing their chewy centers. Their finished diameter should be about 5.5 to 6 cm, with firm rims and centers that yield gently when touched. Slide the cookies onto a wire rack and cool completely for about 25 minutes before stacking or storing. Repeat slicing and baking with the second log on a cooled or separate lined baking sheet.
Storage and Freezing
- Storage: Keep completely cooled cookies in an airtight container at room temperature for up to 5 days. Separate layers with parchment to protect the peppermint rims.
- Refrigerating dough: Tightly wrapped unsliced logs may be refrigerated for up to 3 days. Let them stand briefly before slicing if the dough cracks under the knife.
- Freezing dough: Wrap each parchment-covered log in plastic wrap and freeze for up to 2 months.
- Thaw overnight in the refrigerator, then condition at room temperature until firm but sliceable.
- Freezing baked cookies: Freeze cooled cookies in an airtight container with parchment between layers for up to 2 months.
- Thawing and serving: Thaw baked cookies in their closed container at room temperature for about 1 hour. Keeping the container closed prevents condensation from settling directly on the cookies.
Frequently Asked Questions
Why does my slice-and-bake cookie dough crack when I cut it?
Cracking usually means the log is too cold or contains air pockets. Let a refrigerated log stand for 5 to 10 minutes, until it remains firm but yields very slightly when pressed. A dough temperature around 7 to 10°C is a useful slicing range.
Use a sharp, thin-bladed knife and press straight down instead of sawing. Small perimeter cracks can be pressed together with cool fingers without affecting the baked texture.
How thick should peppermint chocolate slice-and-bake cookies be?
Cut each 4.5 cm diameter log into 8 mm slices, producing about sixteen cookies per log. This thickness gives the edges enough time to become crisp while the center retains moisture and finishes with a chewy texture.
Thinner slices bake more quickly and become crisp throughout. Uneven slices also finish at different times, so a ruler or a few light guide marks on the parchment can help maintain consistent portions.
What keeps these chocolate and peppermint cookies from spreading?
The flour-to-butter ratio, compact log shape, and full two-hour chill all limit spread. The dough should feel solid through the center before it is sliced, and the baking sheet must be cool when the rounds are arranged.
Creaming the butter only until creamy also matters. Beating excessive air into the mixture creates puffier, less even rounds, while softened or greasy butter can cause the edges to flow before the cookie structure sets.
Can I freeze peppermint chocolate cookie dough logs?
Tightly wrapped logs freeze well for up to 2 months. Keep the parchment around each shaped log, add a close layer of plastic wrap, and place the logs in a freezer-safe container to protect them from odors and dry surfaces.
Thaw the dough overnight in the refrigerator rather than on the counter. Before cutting, let the log stand briefly until a sharp knife passes through cleanly without crushing or splintering the slices.
How do I know when chocolate slice-and-bake cookies are done?
Look for set edges and a center that has changed from glossy to matte. At 175°C, that usually takes 10 to 12 minutes for 8 mm slices, although dark cocoa makes browning an unreliable doneness cue.
The centers should still feel slightly soft when the cookies leave the oven. A five-minute rest on the hot baking sheet completes the set, producing crisp edges and chewy centers rather than a dry, uniformly crunchy cookie.
More Ridiculously Delicious Cookies
- Chocolate Sandwich Cookies with Vanilla Cream with Silky Vanilla Filling
- Fudgy Chocolate Crinkle Cookies with Crackled Sugar Tops
- Chocolate-Stuffed Chocolate Chip Cookies with a Filled Center
- Thick Brown Butter Chocolate Chunk Cookies with Chewy Centers
- Bakery-Style Chocolate Chip Cookies with Make-Ahead Dough
Peppermint Chocolate Slice-and-Bake Cookies
Ingredients
Equipment
Method
- Set a medium bowl on the scale and add the flour, cocoa powder, salt, and baking soda. Sift the mixture once through a fine-mesh sieve, then whisk for about 20 seconds so the small quantity of baking soda is evenly dispersed. Keep the finely chopped chocolate nearby but separate. Breaking up the cocoa now prevents dry, bitter pockets later and allows the finished dough to come together with minimal mixing.
- Place the softened butter, granulated sugar, and brown sugar in the bowl of a stand mixer fitted with the paddle. Beat on medium speed for 2 to 3 minutes, stopping once to scrape the bowl and paddle. The mixture should look creamy and slightly lighter but not extremely fluffy. Excessive aeration can make the cookie rounds puff unevenly and lose their tidy slice-and-bake shape.
- Add the room-temperature egg, vanilla, and peppermint extract to the butter mixture. Mix on medium-low speed for 45 to 60 seconds, then scrape the bottom and sides of the bowl and mix for another 15 seconds. The mixture should be smooth, thick, and evenly emulsified, with no glossy streaks of egg. If it looks slightly curdled, continue mixing briefly rather than adding extra flour.
- Add the sifted dry ingredients and mix on low speed just until only a few flour streaks remain, about 30 to 45 seconds. Fold in the chopped chocolate with a silicone spatula until evenly distributed; the dough should be soft, cohesive, and slightly tacky but not wet. Divide it equally into two portions of about 455 grams. Using parchment paper, compress and roll each portion into a firm 4.5 cm diameter log approximately 20 cm long.
- Combine the crushed peppermint candy and sanding sugar on a clean sheet of parchment. Unwrap each dough log, roll it firmly through the coating, and press loose pieces onto bare spots. Wrap each log tightly in fresh parchment, twist the ends, and refrigerate for at least 2 hours, turning the logs after 30 and 60 minutes to preserve their round shape. They are ready when completely firm with no soft center under gentle pressure.
- Heat the oven to 175°C and line two light-colored baking sheets with parchment. Let one log stand at room temperature for 5 to 10 minutes, aiming for a firm but sliceable dough temperature of roughly 7 to 10°C. Cut straight down with a sharp knife to make sixteen 8 mm slices, repairing small cracks with cool fingers. Arrange them 5 cm apart and bake one sheet at a time for 10 to 12 minutes, until the edges feel set and the centers look matte but remain slightly soft.
- Leave the baked cookies on the hot sheet for 5 minutes; they will finish setting without losing their chewy centers. Their finished diameter should be about 5.5 to 6 cm, with firm rims and centers that yield gently when touched. Slide the cookies onto a wire rack and cool completely for about 25 minutes before stacking or storing. Repeat slicing and baking with the second log on a cooled or separate lined baking sheet.
Notes
- Keep the chocolate pieces petite: Chunks larger than 6 mm catch on the knife and pull through the chilled dough, leaving broken slices instead of clean rounds.
- Watch the butter before mixing: Properly softened butter dents under a fingertip but still feels cool; shiny or greasy butter encourages excess spread even after chilling.
- Cut with steady downward pressure: Avoid sawing aggressively through the log, which can flatten its underside and dislodge the peppermint coating from the rim.
- Use visual doneness cues: Remove the cookies when their centers have lost the wet shine but still feel slightly soft, since waiting for firm centers produces a crisp cookie throughout.
- Cool the baking sheet between batches: Placing cold slices on a hot pan melts their butter prematurely, creating wider cookies with thinner, less defined edges.