Table of Contents
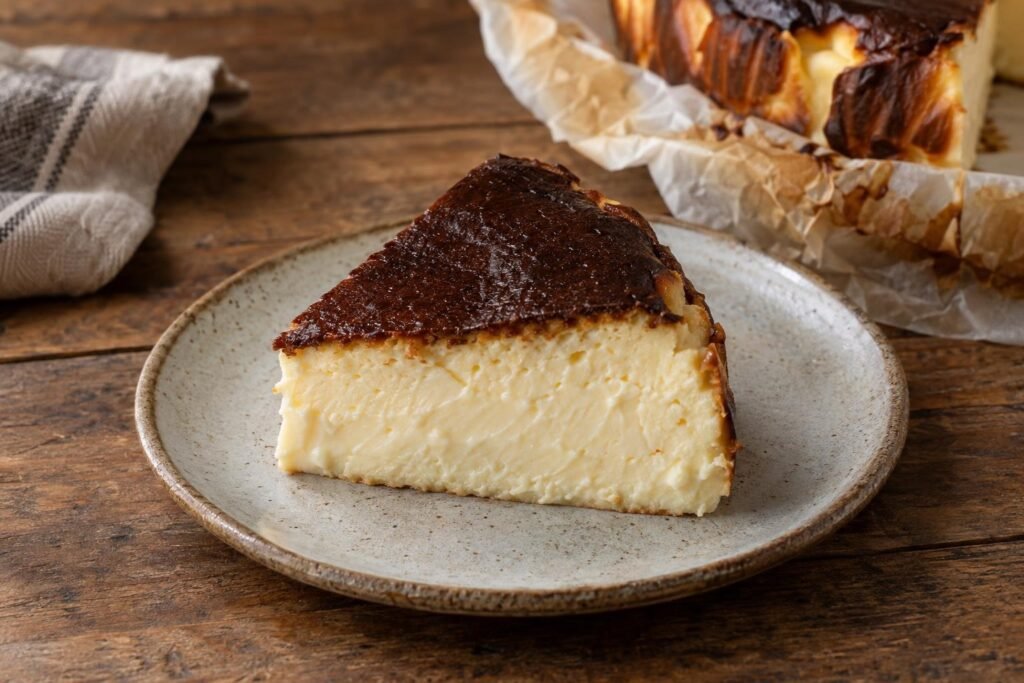
The moment you slice into a Basque burnt cheesecake, you’re greeted by a dramatic swath of dark, caramelized top, its aroma hinting at bittersweet toffee. Inside, the center parts softly into velvety, custardy layers, with the creamy bite yielding to just enough structure to hold a clean wedge. This Basque burnt cheesecake recipe stands apart with its striking contrast: deeply bronzed exterior and an ultra-smooth, rich interior, no crust in sight.
I rely on a high oven temperature and heavy parchment sling to give this crustless cheesecake its distinctive burnt top and plush center, all without a water bath. The recipe’s ratios encourage gentle set, not a dense or dry crumb. You’ll see the cheesecake puff and brown dramatically, then settle and sink as it cools, a sign your creamy San Sebastian cheesecake is ready for slicing after a chill. Let’s break down every visual and sensory cue so you land the signature Basque texture every time.

Why This Recipe Frickin’ Works
- A high oven temp caramelizes the exposed surface quickly, producing the signature deep brown color and bittersweet aroma without resorting to a broiler.
- No water bath means direct, rapid heat sets the outer layer while the center remains creamy and custardy, not grainy or dense.
- Extra heavy cream and a generous amount of cream cheese ensure a silky texture that holds its shape after chilling, with no starchy fillers.
- A simple batter mixing process limits air incorporation, giving a dense, homogenous crumb without bubbles or cracks.
- Precise parchment lining allows for easy pan removal and keeps the edges softly wrinkled, classic for San Sebastian cheesecake.
Ingredient Notes for Basque Burnt Cheesecake with a Creamy Center
- Cream Cheese: Use full-fat cream cheese, brick style, at room temperature. Blocks ensure thick, creamy consistency and clean flavor.
- Heavy Cream: This boosts silkiness and balances the tang, crucial for a creamy center. Whipping cream (35-38% fat) produces the lushest result.
- Eggs: Large eggs provide structure and set the custard. Add them one at a time at room temperature for even blending.
- Granulated Sugar: Delivers sweetness and caramelizes for the burnt top. Weigh for accuracy.
- All-purpose Flour: Just a scant bit stabilizes the custard. Sift to avoid any lumps, but don’t overdo, it’s not a dense cake.
- Vanilla Extract: Adds aromatic depth. Pure extract is worth using here since the flavors are simple.
- Kosher Salt: Just enough lifts all the flavors and balances the richness.
Expert Baking Tips
- Use two large parchment sheets and crumple them first for easier fitting into the pan’s corners.
- Beat cream cheese until completely smooth before adding eggs to avoid a lumpy batter.
- Always add eggs one at a time and fully incorporate each for a uniform, dense and creamy crumb.
- Watch for the deeply bronzed top but look for a controlled wobble only in the very center for perfect doneness.
- For ultra-clean slices, dip your knife in hot water and wipe between each cut. Let the cheesecake stand 20-30 minutes out of the fridge for the best texture.
Ingredients for Basque Burnt Cheesecake
- 675 grams full-fat cream cheese (room temperature (3 US bricks))
- 285 grams granulated sugar (about 1 1/3 cups)
- 4 large eggs (room temperature)
- 300 ml heavy cream (about 1 1/4 cups, 35% or higher fat)
- 1 teaspoon pure vanilla extract
- 1/4 teaspoon kosher salt
- 20 grams all-purpose flour (sifted, about 2 1/2 tablespoons)
How to Make Basque Burnt Cheesecake
- STEP 1). Prepare the springform pan and parchment sling Line a 9-inch (23cm) springform pan with two large sheets of parchment paper, positioning them in a criss-cross so the paper rises at least 2 inches above the pan rim on all sides. Firmly press the paper into the edges and sides, pleating as needed. This reinforced sling is key for lifting out the soft cheesecake and avoids overflow during baking.
- STEP 2). Preheat the oven Set your oven rack to the center and heat oven to 425°F (220°C), at least 25 minutes before baking. Use an oven thermometer to guarantee the temperature, as the high heat is critical for rapid browning and proper set. Do not use convection mode for this cheesecake.
- STEP 3). Beat the cream cheese and sugar In a large mixing bowl, beat the room temperature cream cheese and granulated sugar together on medium speed with an electric mixer until absolutely smooth and creamy, scraping down the bowl and beater at least twice. Target: no visible lumps remain and mixture turns satiny after about 2-3 minutes of beating.
- STEP 4). Incorporate the eggs one by one Crack the eggs into a small bowl. Add them to the cream cheese mixture one at a time, mixing well and scraping after each addition. Blend just until the last streak disappears before adding the next. Avoid whipping in excess air; the batter should be lush and glossy, not foamy.
- STEP 5). Mix in heavy cream, vanilla, and salt On low speed, pour in heavy cream, vanilla extract, and sprinkle in the kosher salt. Blend until smooth and uniform, stopping to scrape down the bowl and beaters once. The finished batter should be pourable and viscous, not runny or overly thick.
- STEP 6). Sift and fold in flour Sift the all-purpose flour directly over the batter, then gently fold it in with a spatula, rotating the bowl to avoid overmixing. Fold only until no dry streaks remain, overmixing here can toughen the final custard.
- STEP 7). Pour and bake Pour the batter into the lined pan, smoothing the top with a spatula. Tap pan gently to eliminate air bubbles. Bake at 425°F (220°C) for 26-32 minutes until the surface is deeply caramelized but the very center jiggles like set custard (not soupy). Rotate pan once during baking for even coloring. Do not overbake, the center should wobble.
- STEP 8). Cool, unmold, and chill Transfer pan to a cooling rack. Cool at room temperature until barely warm (about 2 hours); the cake will settle and deflate slightly. Once fully cooled, lift out carefully by grasping the parchment edges and transfer, still in paper, to the fridge. Chill uncovered for at least 4 hours, or overnight for the cleanest slices. Serve at cool room temperature, using a hot wet knife for neat cuts.
Storage and Freezing
- Store the cheesecake in its baking parchment, loosely covered with foil or plastic wrap, in the refrigerator for up to 4 days.
- Freeze individual slices, well wrapped in plastic and then foil, for up to 1 month.
- Thaw slices overnight in the refrigerator before serving. Serve slightly chilled or at cool room temperature for the best creamy consistency.
- Do not freeze the whole cheesecake in one piece, as the delicate caramelized top may weep or stick.
Frequently Asked Questions
What’s the ideal baking cue for Basque burnt cheesecake doneness?
The cheesecake is ready when the entire top turns deep golden brown and the ring of cake around the edge looks set, while a two-inch center wobbles like rich custard if you gently shake the pan. As it cools, residual heat finishes setting the center to creamy but sliceable, not liquid or raw. Avoid overbaking or you’ll lose the signature soft texture.
After baking, let the cheesecake cool completely in the pan before chilling. It will sink and firm up as it rests, so don't worry if it looks puffed or unstable fresh from the oven.
Can I use a different pan size or shape?
A 9-inch (23cm) springform pan is ideal for this Basque burnt cheesecake recipe and ensures the perfect height and creamy-to-caramelized ratio. Using a larger pan will give you a thinner cake that sets more firmly, while a smaller pan results in an undercooked center and may overflow. If you do change pan size, adjust baking time and monitor the doneness cues very closely.
The classic wrinkled parchment overhang is meant for a round pan, so switching to a square or another shape may cause uneven browning, especially with high heat.
Does this Basque cheesecake need a water bath?
This recipe is designed to be baked without a water bath. The high-heat, dry oven environment is essential for caramelizing the top and rapidly setting the edges while allowing the center to stay creamier than a traditional cheesecake. A water bath would prevent the signature burnt top and slow down the bake, leading to a less dramatic result.
Pan protection is handled entirely by the double parchment lining, which makes unmolding easy even with the soft custard interior.
How do I prevent cracks in Basque burnt cheesecake?
Unlike classic New York cheesecakes, Basque burnt cheesecake is meant to puff, fall, and develop cracks, especially around the edges, this is part of its character, not a flaw. The creamy center and wrinkled parchment edge disguise any fissures. If you notice very deep or excessive cracks, it may indicate overbaking or that the oven was a bit too hot.
For best appearance, avoid overmixing the batter and bake just until the center wobbles. The cheesecake will continue setting as it cools and cracks typically meld back together.
What’s the best way to serve Basque burnt cheesecake?
For the dreamiest texture, slice when cold but let wedges warm up 15 to 20 minutes at room temperature before serving. The flavor and creaminess intensify as the chill comes off but the cake still holds its shape. Use a large sharp knife dipped in hot water for tidy cuts.
I like this San Sebastian cheesecake plain, with its complex burnt sugar notes shining, or with a scattering of fresh berries for something bright. Avoid gilding the lily with sauces or whipped cream, as the texture is already intensely creamy.
Keep the Frickin’ Deliciousness Going!
- Creamy Vanilla Cheesecake with a Buttery Cookie Crust
- Classic New York Cheesecake with a Dense, Creamy Filling
- Cinnamon Streusel Coffee Cake with a Soft Sour Cream Crumb
- Moist Lemon Pound Cake with a Tender Crumb and Lemon Glaze
- Moist Chocolate Fudge Layer Cake with Silky Fudge Frosting
- Key Lime Cheesecake with a Smooth Citrus Filling
- Raspberry Cheesecake with a Creamy Berry Filling
Basque Burnt Cheesecake with a Creamy Center
Ingredients
Equipment
Method
- Line a 9-inch (23cm) springform pan with two large sheets of parchment paper, positioning them in a criss-cross so the paper rises at least 2 inches above the pan rim on all sides. Firmly press the paper into the edges and sides, pleating as needed. This reinforced sling is key for lifting out the soft cheesecake and avoids overflow during baking.
- Set your oven rack to the center and heat oven to 425°F (220°C), at least 25 minutes before baking. Use an oven thermometer to guarantee the temperature, as the high heat is critical for rapid browning and proper set. Do not use convection mode for this cheesecake.
- In a large mixing bowl, beat the room temperature cream cheese and granulated sugar together on medium speed with an electric mixer until absolutely smooth and creamy, scraping down the bowl and beater at least twice. Target: no visible lumps remain and mixture turns satiny after about 2-3 minutes of beating.
- Crack the eggs into a small bowl. Add them to the cream cheese mixture one at a time, mixing well and scraping after each addition. Blend just until the last streak disappears before adding the next. Avoid whipping in excess air; the batter should be lush and glossy, not foamy.
- On low speed, pour in heavy cream, vanilla extract, and sprinkle in the kosher salt. Blend until smooth and uniform, stopping to scrape down the bowl and beaters once. The finished batter should be pourable and viscous, not runny or overly thick.
- Sift the all-purpose flour directly over the batter, then gently fold it in with a spatula, rotating the bowl to avoid overmixing. Fold only until no dry streaks remain, overmixing here can toughen the final custard.
- Pour the batter into the lined pan, smoothing the top with a spatula. Tap pan gently to eliminate air bubbles. Bake at 425°F (220°C) for 26-32 minutes until the surface is deeply caramelized but the very center jiggles like set custard (not soupy). Rotate pan once during baking for even coloring. Do not overbake, the center should wobble.
- Transfer pan to a cooling rack. Cool at room temperature until barely warm (about 2 hours); the cake will settle and deflate slightly. Once fully cooled, lift out carefully by grasping the parchment edges and transfer, still in paper, to the fridge. Chill uncovered for at least 4 hours, or overnight for the cleanest slices. Serve at cool room temperature, using a hot wet knife for neat cuts.
Notes
- Use two large parchment sheets and crumple them first for easier fitting into the pan’s corners.
- Beat cream cheese until completely smooth before adding eggs to avoid a lumpy batter.
- Always add eggs one at a time and fully incorporate each for a uniform, dense and creamy crumb.
- Watch for the deeply bronzed top but look for a controlled wobble only in the very center for perfect doneness.
- For ultra-clean slices, dip your knife in hot water and wipe between each cut. Let the cheesecake stand 20-30 minutes out of the fridge for the best texture.