
Table of Contents
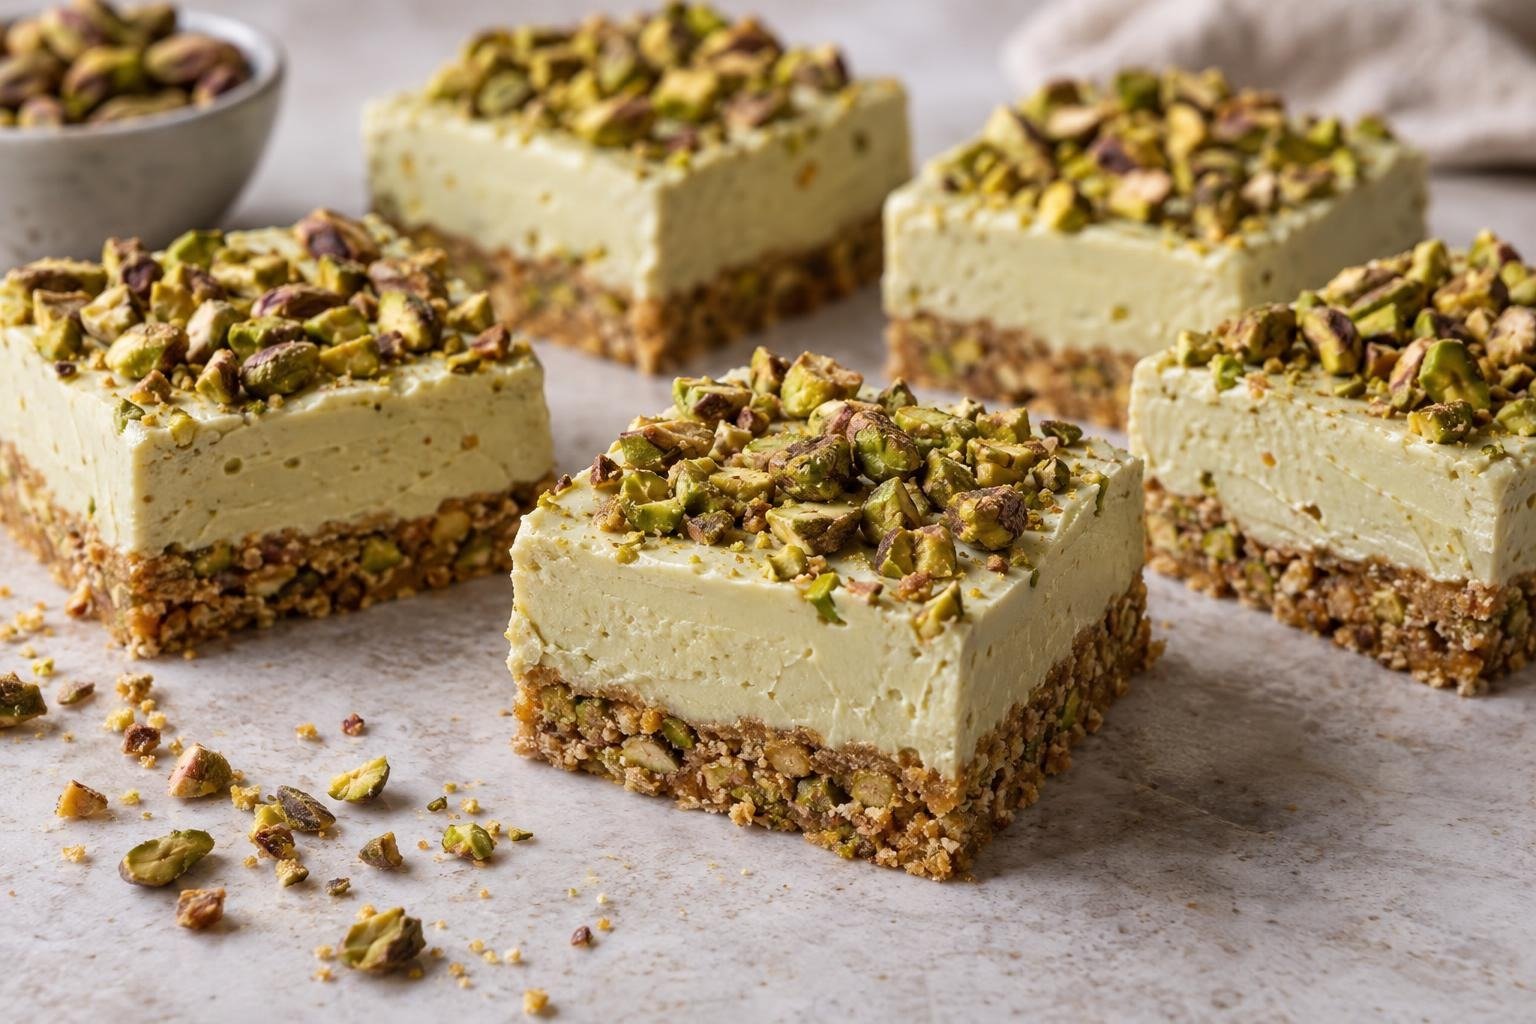
A buttery pistachio crumb base, cool mousse-like filling, and crunchy roasted nut topping give these pistachio no-bake dessert bars three distinct textures in every bite. White chocolate brings mellow vanilla sweetness without overpowering the pistachio, while a pinch of salt keeps the rich dairy filling from tasting flat.
I use both white chocolate and powdered gelatin to control the set. The chocolate firms as its cocoa butter cools, while gelatin supports clean slicing without turning the filling rubbery. The useful cue is not simply elapsed time: the chilled center should look matte, resist a light fingertip touch, and remain still when I gently move the pan. Ten minutes outside the refrigerator then restores the filling’s creamy texture for serving.
Why These Pistachio Bars Turn Out So Good
- The chilled base uses melted butter and white chocolate to bind the crumbs, preventing a loose, sandy layer when the bars are sliced.
- Finely ground graham crackers pack more evenly than coarse pieces, while chopped pistachios interrupt the base with controlled crunch.
- Full-fat block cream cheese provides enough protein and fat to support the filling without introducing the excess moisture found in spreadable cream cheese.
- White chocolate supplies sweetness and cocoa butter, which firms in the refrigerator and complements the gelatin rather than relying on it alone.
- Whipped cream is folded in after the pistachio mixture is stabilized, creating a lighter filling while preserving enough structure for neat chilled portions.
Ingredient Notes for Pistachio No-Bake Dessert Bars with a Chilled Base
- Graham cracker crumbs: Process the crackers to fine, even crumbs so the base compresses without large gaps. Coarse shards can make the finished bars fracture at the bottom.
- Roasted unsalted pistachios: Roasting intensifies their nutty aroma, while using unsalted nuts lets me control the seasoning. Chop them finely for the base and slightly more coarsely for the topping.
- Unsalted butter: Butter moistens the crumbs and firms when chilled. Melting it with the base’s white chocolate distributes both fats evenly through the dry ingredients.
- White chocolate: Choose real white chocolate containing cocoa butter rather than white baking chips. Cocoa butter is important to the chilled setting mechanism, and chips may remain thicker when melted.
- Full-fat block cream cheese: Bring it to cool room temperature before mixing. Cold cream cheese forms persistent lumps, while tub-style spread contains more moisture and can weaken the set.
- Pure pistachio butter: Use a smooth, unsweetened product made from pistachios. Stir it thoroughly before measuring because natural nut oil can separate during storage.
- Powdered gelatin: Blooming gelatin in cold water hydrates each granule before melting. Boiling it can reduce its setting strength, so warm it only until clear and fluid.
- Heavy whipping cream: Keep the cream cold before whipping. Its fat partially coalesces around air bubbles, providing volume that lightens the dense cream cheese and white chocolate mixture.
My No-Bake Dessert Tips
- Weigh both portions of white chocolate separately before beginning. Accidentally reversing them will leave the base too hard and the filling too soft.
- Scrape the cream cheese bowl before adding the white chocolate. Even a small pocket of unmixed cream cheese becomes obvious against the smooth pistachio filling.
- Add the gelatin while it is fluid and the filling is not refrigerator-cold. Gelatin that contacts a very cold mixture can set into thin rubbery strands before it disperses.
- Stop whipping the cream at medium peaks. Very stiff cream is harder to fold evenly and can give the filling a slightly grainy, aerated appearance.
- Use the center of the slab as the final setting check. If that area ripples or clings heavily to a clean knife, return the pan to the refrigerator for another hour before portioning.
Ingredients for Pistachio No-Bake Dessert Bars
- 180 g fine graham cracker crumbs (about 1 1/2 cups)
- 80 g roasted unsalted pistachios (finely chopped, about 2/3 cup)
- 85 g unsalted butter (6 tablespoons, cut into pieces)
- 60 g white chocolate (finely chopped, about 1/3 cup)
- 1/4 teaspoon fine sea salt (for the chilled base)
- 7 g unflavored powdered gelatin (1 standard packet or about 2 1/4 teaspoons)
- 30 ml cold water (2 tablespoons, for blooming the gelatin)
- 240 g white chocolate (finely chopped, about 1 1/3 cups)
- 225 g full-fat block cream cheese (8 ounces, softened to cool room temperature)
- 120 g smooth unsweetened pistachio butter (stirred thoroughly before measuring, about 1/2 cup)
- 30 g confectioners’ sugar (about 1/4 cup, sifted if lumpy)
- 1 teaspoon pure vanilla extract (for aroma and balance)
- 1/4 teaspoon fine sea salt (for the filling)
- 360 ml cold heavy whipping cream (1 1/2 cups, at least 35 percent milk fat)
- 40 g roasted unsalted pistachios (coarsely chopped, for the topping)
How to Make Pistachio No-Bake Dessert Bars
- STEP 1). Prepare the pistachio crumb mixture Line an 8-inch square metal pan with two crossed strips of parchment, leaving enough overhang to lift out the bars. Combine the graham cracker crumbs, finely chopped pistachios, and salt in a medium bowl. Place the butter and 60 grams white chocolate in a microwave-safe bowl, then heat at 50 percent power in 20-second intervals, stirring after each, until smooth. Pour over the crumbs and mix until everything resembles evenly damp sand with no dry pockets.
- STEP 2). Compress and chill the base Transfer the crumb mixture to the lined pan and distribute it into an even layer. Use the flat bottom of a measuring cup to press firmly, working from the center toward the corners, but stop before the surface becomes greasy from excessive compression. The finished base should feel compact and level, with no visibly loose crumbs along the edges. Refrigerate for 30 minutes while preparing the filling so the butter and cocoa butter can solidify before the softer layer is added.
- STEP 3). Bloom the gelatin and melt the white chocolate Sprinkle the powdered gelatin evenly over the cold water in a small microwave-safe bowl; do not dump it into one mound. Leave it undisturbed for 5 minutes, until the water is absorbed and the gelatin looks thick and wrinkled. Meanwhile, melt the 240 grams white chocolate at 50 percent microwave power in 20-second intervals, stirring thoroughly each time. Stop when only a few small pieces remain, then stir until smooth and let it cool for 3 to 5 minutes until fluid but not hot.
- STEP 4). Build the pistachio filling base Using an electric mixer and a large bowl, beat the softened cream cheese on medium speed for 60 to 90 seconds, scraping the bowl, until completely smooth. Beat in the pistachio butter, confectioners’ sugar, vanilla, and salt until uniform. Mix in the lukewarm white chocolate on low speed. Heat the bloomed gelatin in 5-second microwave bursts just until clear and liquid, without boiling. Whisk two spoonfuls of filling into it, then stream that mixture into the bowl on low speed and mix until fully incorporated.
- STEP 5). Whip, fold, and spread the filling In a clean chilled bowl, whip the cold heavy cream on medium-high speed until medium peaks form, about 2 to 3 minutes. The cream should hold a curved peak and look smooth rather than grainy. Fold one-third into the pistachio mixture with a silicone spatula to loosen it, then gently fold in the remainder in two additions until no white streaks remain. Spread the filling over the cold base with an offset spatula, pressing it into the corners and smoothing the top without deflating it unnecessarily.
- STEP 6). Chill until completely set Cover the pan without allowing the wrap to touch the filling and refrigerate for at least 6 hours, preferably overnight. Do not rely on a firm-looking perimeter alone because the center chills last. The bars are ready when the surface appears matte, the middle does not ripple as the pan is gently moved, and a light fingertip touch leaves no wet filling behind. Keep the pan level and refrigerated until slicing so the gelatin and cocoa butter maintain an even set.
- STEP 7). Top, portion, and serve Scatter the coarsely chopped pistachios over the set filling and press them very lightly so they adhere. Use the parchment overhang to lift the slab onto a cutting board. Warm a large sharp knife under hot water, dry it completely, and make four cuts in each direction to create 16 bars, cleaning and reheating the blade between cuts. Refrigerate the portions if not serving immediately. For the creamiest texture, let them stand at room temperature for 10 minutes before serving, but avoid prolonged warmth.
Storage and Freezing
- Refrigeration: Store the bars in a single layer in an airtight container for up to 4 days. Keep them cold until shortly before serving because the filling softens as it warms.
- Freezing: Freeze the sliced bars on a parchment-lined tray until firm, then transfer them to an airtight freezer container with parchment between layers.
- Freeze for up to 1 month.
- Thawing: Thaw frozen bars overnight in the refrigerator without unwrapping or uncovering the container. This limits surface condensation.
- Serving: Let refrigerated bars stand at room temperature for about 10 minutes for a creamy texture. Return leftovers to the refrigerator within 2 hours.
Frequently Asked Questions
How long should pistachio no-bake dessert bars chill before slicing?
Allow at least 6 hours of final chilling after the filling is spread over the base. Overnight chilling is convenient for a make-ahead schedule and gives the center enough time to reach the same firm consistency as the edges.
Check the middle before lifting the slab from the pan. It should remain still when gently moved and should not leave wet filling on a fingertip. If it ripples, chill it for another hour.
What is the best serving temperature for these pistachio bars?
Serve the bars cool rather than refrigerator-hard. About 10 minutes at room temperature softens the cocoa butter and dairy fat enough to make the filling creamy while the gelatin continues to support each portion.
Very warm bars lose definition around the edges and become harder to pick up cleanly. Keep the unserved portions refrigerated, especially in a warm kitchen, and bring out only what will be eaten promptly.
Why did my pistachio filling turn lumpy or develop gelatin strands?
Cream cheese lumps usually result from using it too cold, while gelatin strands form when warm liquid gelatin hits a very cold mixture and sets immediately. The cream cheese should be smooth and at cool room temperature before the remaining filling ingredients are incorporated.
Temper the melted gelatin with two spoonfuls of filling before streaming it into the bowl. Mix on low speed as it is added, then scrape the bowl to confirm the mixture is uniform before folding in the whipped cream.
Can you freeze pistachio no-bake dessert bars?
Freezing works best after the bars are fully chilled and sliced. Freeze the portions uncovered on a lined tray until firm, then pack them in an airtight container with parchment between layers for up to one month.
Thaw the covered container overnight in the refrigerator so condensation forms on the container rather than directly on the filling. Add no extra heat during thawing, and serve the bars after a brief 10-minute softening period.
Which ingredient substitutions are suitable for this no-bake bar recipe?
The cream cheese, heavy cream, real white chocolate, pistachio butter, and powdered gelatin all contribute to the filling’s set, so replacing them can change its moisture, fat balance, or firmness. Tub-style cream cheese, white baking chips, and sweetened pistachio spread are not direct equivalents in this formula.
The chopped pistachio garnish may be omitted without affecting the set. Other structural ingredient changes require reformulating the ratios rather than making a simple one-for-one substitution.
Pistachio No-Bake Dessert Bars with a Chilled Base
Ingredients
Equipment
Method
- Line an 8-inch square metal pan with two crossed strips of parchment, leaving enough overhang to lift out the bars. Combine the graham cracker crumbs, finely chopped pistachios, and salt in a medium bowl. Place the butter and 60 grams white chocolate in a microwave-safe bowl, then heat at 50 percent power in 20-second intervals, stirring after each, until smooth. Pour over the crumbs and mix until everything resembles evenly damp sand with no dry pockets.
- Transfer the crumb mixture to the lined pan and distribute it into an even layer. Use the flat bottom of a measuring cup to press firmly, working from the center toward the corners, but stop before the surface becomes greasy from excessive compression. The finished base should feel compact and level, with no visibly loose crumbs along the edges. Refrigerate for 30 minutes while preparing the filling so the butter and cocoa butter can solidify before the softer layer is added.
- Sprinkle the powdered gelatin evenly over the cold water in a small microwave-safe bowl; do not dump it into one mound. Leave it undisturbed for 5 minutes, until the water is absorbed and the gelatin looks thick and wrinkled. Meanwhile, melt the 240 grams white chocolate at 50 percent microwave power in 20-second intervals, stirring thoroughly each time. Stop when only a few small pieces remain, then stir until smooth and let it cool for 3 to 5 minutes until fluid but not hot.
- Using an electric mixer and a large bowl, beat the softened cream cheese on medium speed for 60 to 90 seconds, scraping the bowl, until completely smooth. Beat in the pistachio butter, confectioners’ sugar, vanilla, and salt until uniform. Mix in the lukewarm white chocolate on low speed. Heat the bloomed gelatin in 5-second microwave bursts just until clear and liquid, without boiling. Whisk two spoonfuls of filling into it, then stream that mixture into the bowl on low speed and mix until fully incorporated.
- In a clean chilled bowl, whip the cold heavy cream on medium-high speed until medium peaks form, about 2 to 3 minutes. The cream should hold a curved peak and look smooth rather than grainy. Fold one-third into the pistachio mixture with a silicone spatula to loosen it, then gently fold in the remainder in two additions until no white streaks remain. Spread the filling over the cold base with an offset spatula, pressing it into the corners and smoothing the top without deflating it unnecessarily.
- Cover the pan without allowing the wrap to touch the filling and refrigerate for at least 6 hours, preferably overnight. Do not rely on a firm-looking perimeter alone because the center chills last. The bars are ready when the surface appears matte, the middle does not ripple as the pan is gently moved, and a light fingertip touch leaves no wet filling behind. Keep the pan level and refrigerated until slicing so the gelatin and cocoa butter maintain an even set.
- Scatter the coarsely chopped pistachios over the set filling and press them very lightly so they adhere. Use the parchment overhang to lift the slab onto a cutting board. Warm a large sharp knife under hot water, dry it completely, and make four cuts in each direction to create 16 bars, cleaning and reheating the blade between cuts. Refrigerate the portions if not serving immediately. For the creamiest texture, let them stand at room temperature for 10 minutes before serving, but avoid prolonged warmth.
Notes
- Weigh both portions of white chocolate separately before beginning. Accidentally reversing them will leave the base too hard and the filling too soft.
- Scrape the cream cheese bowl before adding the white chocolate. Even a small pocket of unmixed cream cheese becomes obvious against the smooth pistachio filling.
- Add the gelatin while it is fluid and the filling is not refrigerator-cold. Gelatin that contacts a very cold mixture can set into thin rubbery strands before it disperses.
- Stop whipping the cream at medium peaks. Very stiff cream is harder to fold evenly and can give the filling a slightly grainy, aerated appearance.
- Use the center of the slab as the final setting check. If that area ripples or clings heavily to a clean knife, return the pan to the refrigerator for another hour before portioning.