Table of Contents
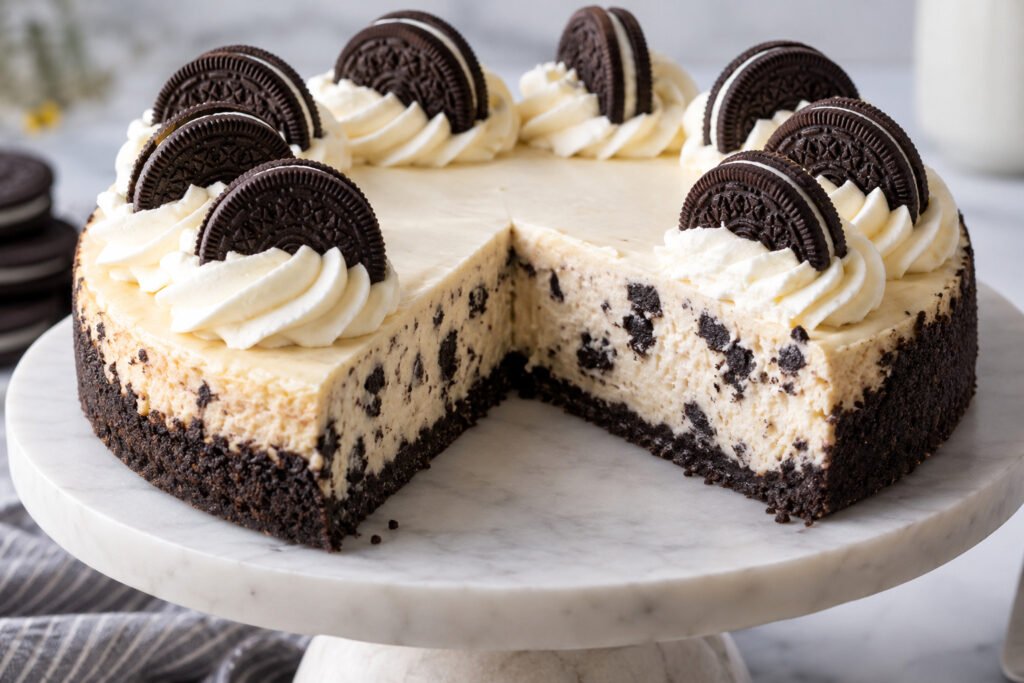
Dark cocoa cookie crumbs frame a pale, creamy filling packed with chunky Oreo pieces, giving this Oreo cheesecake a crisp edge, a smooth center, and unmistakable cookies-and-cream flavor in every slice. The lightly sweetened whipped cream softens the cocoa contrast without burying the cheesecake under an unnecessarily heavy topping.
I use full-fat block cream cheese at a cool room temperature, mix the filling only on low speed, and add the eggs last to control excess air. The cheesecake is ready when the outer area looks set and slightly puffed while the center moves as one soft, gelatin-like circle. A slow oven cool followed by a full eight-hour chill finishes the set, so the first slice is creamy rather than slouchy.

Why This Recipe Is Deliciously Ridiculous
- A baked Oreo crust creates a firm, cocoa-rich base that remains distinct beneath the creamy filling.
- Four blocks of full-fat cream cheese provide enough fat and milk solids for a dense but smooth 9-inch cheesecake.
- Low-speed mixing limits incorporated air, reducing excessive rising, sinking, and cracking during cooling.
- The water bath moderates the heat around the pan, allowing the egg-thickened filling to set gradually without dry edges.
- Staged cooling and an eight-hour refrigerator rest stabilize the filling for clean slices while preserving its creamy texture.
Ingredient Notes for Bakery-Style Oreo Cheesecake with a Creamy Filling
- Oreo sandwich cookies: Keep the filling inside the cookies. It contributes sweetness and helps the crust bind, while coarsely chopped cookies create recognizable pockets in the cheesecake filling.
- Unsalted butter: Melted butter coats the cookie crumbs and firms as the crust cools. Unsalted butter prevents the already seasoned cookies from tasting overly salty.
- Full-fat block cream cheese: Block-style cream cheese supplies the fat and protein needed for a stable baked filling. Bring it to a cool room temperature so it blends smoothly without requiring prolonged mixing.
- Granulated sugar: Sugar sweetens the tangy dairy and delays egg protein setting, which helps the filling remain creamy. Scrape the bowl after mixing because sugar can collect beneath the cream cheese.
- Sour cream: Full-fat sour cream loosens the cream cheese base, adds gentle acidity, and makes the finished texture less pasty. Room-temperature sour cream blends in without chilling the mixture.
- Eggs: Large eggs provide the structure that sets the filling in the oven. Add them individually on low speed and stop as soon as each one disappears to avoid creating a foamy batter.
- Heavy whipping cream: Use cream with at least 35 percent milk fat and keep it cold until whipping. Cold fat traps air more efficiently and produces a topping that holds its piped shape.
- Vanilla and salt: Vanilla rounds out the cocoa and cream flavors, while a small amount of salt keeps the cookie filling and added sugar from tasting flat.
A Few Baking Tips
- Check the cream cheese before mixing by pressing the center of a block. It should yield easily but still feel cool; cold cores create lumps, while overly warm cream cheese makes the batter unusually loose.
- Scrape the bottom of the mixer bowl, not only the sides. Dense cream cheese and undissolved sugar often collect beneath the paddle and can leave pale lumps in the baked filling.
- Use low speed from beginning to end. A fluffy batter may look appealing in the bowl, but trapped air expands in the oven and can produce a domed cheesecake that sinks or cracks as it cools.
- Test the center by nudging the roasting pan gently rather than shaking the springform pan. A cohesive wobble is correct; concentric ripples or a visibly wet center indicate that the cheesecake needs more time.
- Plan to bake the cheesecake the day before serving. The full refrigerator rest is part of the setting process, not optional waiting time, and it makes decorating and slicing substantially neater.
Ingredients for Bakery-Style Oreo Cheesecake with a Creamy Filling
- 24 cookies Oreo sandwich cookies (264 g, cookies and filling included, for the crust)
- 5 tablespoons unsalted butter (70 g, melted and cooled slightly)
- 32 ounces full-fat block cream cheese (907 g, softened to 68 to 72°F)
- 1 cup granulated sugar (200 g)
- 1/2 cup full-fat sour cream (120 g, at room temperature)
- 1 tablespoon pure vanilla extract (for the filling)
- 1/4 teaspoon fine salt
- 4 large eggs (about 200 g without shells, at room temperature)
- 12 cookies Oreo sandwich cookies (coarsely chopped, for the filling)
- 5 to 6 cups very hot water (for the water bath, as needed)
- 1 cup heavy whipping cream (240 ml, cold)
- 1/4 cup confectioners' sugar (30 g, sifted)
- 1 teaspoon pure vanilla extract (for the whipped cream)
- 6 cookies Oreo sandwich cookies (halved carefully, for decorating)
How to Make Bakery-Style Oreo Cheesecake with a Creamy Filling
- STEP 1). Prepare the oven, pan, and water-bath setup Position a rack in the lower-middle of the oven and preheat to 325°F. Lightly grease the bottom and sides of a 9-inch springform pan. Wrap the outside in three snug layers of heavy-duty foil, bringing the foil above the bottom seam without folding it over the rim. Set the wrapped pan inside a large roasting pan. Heat the water for the bath separately so it will be ready when the filled cheesecake goes into the oven.
- STEP 2). Bake and cool the Oreo crust Process 24 whole Oreo cookies in a food processor until they form fine, evenly dark crumbs. Add the melted butter and pulse until the crumbs resemble damp sand and hold together when squeezed. Press the mixture firmly over the bottom and about 1 inch up the sides of the springform pan, using a flat-bottomed cup to compact it. Bake for 10 minutes, then transfer the pan to a wire rack and let the crust cool while preparing the filling.
- STEP 3). Mix the cream cheese base on low speed Place the softened cream cheese in the bowl of a stand mixer fitted with the paddle attachment. Beat on low speed for 1 minute, scrape the bowl and paddle thoroughly, then mix for another 30 seconds until smooth with no firm lumps. Add the granulated sugar and mix on low for 1 minute. Scrape again, then blend in the sour cream, filling vanilla, and salt just until the mixture looks satiny and uniform. Do not whip at medium or high speed.
- STEP 4). Add the eggs and Oreo pieces gently With the mixer running on its lowest setting, add the eggs one at a time, mixing for about 15 seconds after each addition and scraping the bowl after the second and fourth eggs. Stop when the final streaks of egg disappear; the batter should flow thickly from the spatula without looking foamy. Fold in the 12 coarsely chopped Oreos by hand with a silicone spatula, using broad strokes that distribute the pieces without crushing them into gray crumbs.
- STEP 5). Fill the pan and bake in the water bath Pour the filling over the cooled crust and smooth the surface with an offset spatula. Place the roasting pan on the oven rack, then carefully pour very hot water around the springform pan until it reaches about halfway up the sides. Bake at 325°F for 65 to 75 minutes. The outer 2 inches should look set and slightly puffed, while the center should wobble together like soft gelatin rather than ripple like liquid. An optional center reading should be about 150 to 155°F.
- STEP 6). Cool the cheesecake gradually Turn off the oven, prop the door open about 2 inches with a wooden spoon, and leave the cheesecake inside the water bath for 1 hour. This gradual temperature change limits sudden contraction and cracking. Remove the roasting pan carefully, lift out the springform pan, and discard the foil if any water collected inside its layers. Run a thin knife around the upper edge to release sticking, then cool the cheesecake uncovered on a wire rack for 1 hour.
- STEP 7). Chill and release the fully set cheesecake Cover the pan without touching the cheesecake surface and refrigerate for at least 8 hours, preferably overnight. Do not remove the springform ring while the center is warm because the filling continues to firm as its fat cools and its moisture redistributes. Once thoroughly chilled, unlatch and lift away the ring. If the crust resists, warm the outside briefly with a towel dampened in hot water, then slide a thin spatula between the crust and pan base if transferring to a serving plate.
- STEP 8). Whip, decorate, and slice Combine the cold heavy cream, sifted confectioners' sugar, and topping vanilla in a chilled mixing bowl. Whip on medium speed until medium-stiff peaks stand with slightly curved tips, stopping before the cream looks grainy. Pipe or spoon 12 evenly spaced portions around the chilled cheesecake and place half an Oreo into each. For clean servings, dip a thin sharp knife in hot water, wipe it dry, and cut straight down. Clean and rewarm the blade between every slice, then serve the cheesecake cold but not icy.
Storage and Freezing
- Refrigerate: Keep the decorated cheesecake covered in the refrigerator for up to 4 days. Use a deep container or loose cover that does not crush the whipped cream.
- Freeze: Freeze undecorated individual slices on a parchment-lined tray until firm, then wrap each slice tightly and place it in an airtight container for up to 1 month.
- Thaw: Unwrap frozen slices and thaw them covered in the refrigerator for 6 to 8 hours. Add whipped cream and Oreo garnish after thawing.
- Serve: For the creamiest texture, let refrigerated slices stand at room temperature for 15 to 20 minutes. Do not leave the cheesecake unrefrigerated for more than 2 hours.
Frequently Asked Questions
How can I tell when Oreo cheesecake is done baking?
The outer 2 inches should appear set and slightly puffed, while the center moves as one soft circle when the roasting pan is nudged. It should not slosh, form liquid ripples, or show wet batter beneath the surface.
An instant-read thermometer is optional, but a center temperature around 150 to 155°F supports the visual check. Residual heat continues setting the filling during the one-hour oven cool.
How long should Oreo cheesecake chill before slicing?
This Oreo cheesecake needs at least 8 hours in the refrigerator after its staged oven and counter cooling. Overnight chilling is especially practical when the cheesecake is intended for a scheduled gathering or decorated presentation.
Cutting sooner can produce a center that clings to the knife and leans outward on the plate. Properly chilled filling feels firm at the edge but remains creamy when eaten.
Why did my baked Oreo cheesecake crack or sink?
Cracking or sinking commonly follows high-speed mixing, overbaking, or a sudden temperature change. Excess air makes the filling rise dramatically, while excessive heat firms the edges before the center has finished setting.
Keep the mixer on low, stop baking at a cohesive center wobble, and complete the one-hour oven cool with the door cracked. A shallow surface line is cosmetic and can be covered with whipped cream.
What type of cream cheese produces a creamy Oreo cheesecake filling?
Full-fat block cream cheese provides the most reliable balance of fat, protein, and moisture for this formula. Spreadable tub cream cheese contains a different moisture balance and can leave the baked filling softer than intended.
Bring every block to 68 to 72°F before mixing. If the outside is soft but the center remains firm and cold, give it more time rather than beating aggressively to force out the lumps.
Is this Oreo cheesecake baked or no-bake?
This is a baked Oreo cheesecake set with four eggs and gentle oven heat. Baking creates a smooth, sliceable custard structure that is distinct from a no-bake filling stabilized with whipped cream or gelatin.
The cheesecake still requires a long cold set after baking. Chilling firms the cream cheese fat and allows moisture to settle evenly, so the final texture becomes creamy without behaving like mousse.
Should I use a water bath for Oreo cheesecake?
A water bath is recommended because it buffers the oven heat around the springform pan. The filling sets more evenly, helping the center catch up before the edges become dry, grainy, or excessively puffed.
Wrap the pan in three layers of heavy-duty foil and add hot water only after placing the roasting pan on the oven rack. This method reduces awkward lifting and lowers the chance of splashing water into the filling.
More Ridiculously Delicious Cheesecakes
- No-Bake Oreo Cheesecake with a Creamy Filling and Cookie Crust
- Best Creamy Mini Oreo Cheesecakes
- Small-Batch Cheesecake in a Loaf Pan with a Smooth Filling
- Vanilla Bean Cheesecake with a Creamy Filling
- Creamy Vanilla Cheesecake with a Buttery Cookie Crust
Bakery-Style Oreo Cheesecake with a Creamy Filling
Ingredients
Equipment
Method
- Position a rack in the lower-middle of the oven and preheat to 325°F. Lightly grease the bottom and sides of a 9-inch springform pan. Wrap the outside in three snug layers of heavy-duty foil, bringing the foil above the bottom seam without folding it over the rim. Set the wrapped pan inside a large roasting pan. Heat the water for the bath separately so it will be ready when the filled cheesecake goes into the oven.
- Process 24 whole Oreo cookies in a food processor until they form fine, evenly dark crumbs. Add the melted butter and pulse until the crumbs resemble damp sand and hold together when squeezed. Press the mixture firmly over the bottom and about 1 inch up the sides of the springform pan, using a flat-bottomed cup to compact it. Bake for 10 minutes, then transfer the pan to a wire rack and let the crust cool while preparing the filling.
- Place the softened cream cheese in the bowl of a stand mixer fitted with the paddle attachment. Beat on low speed for 1 minute, scrape the bowl and paddle thoroughly, then mix for another 30 seconds until smooth with no firm lumps. Add the granulated sugar and mix on low for 1 minute. Scrape again, then blend in the sour cream, filling vanilla, and salt just until the mixture looks satiny and uniform. Do not whip at medium or high speed.
- With the mixer running on its lowest setting, add the eggs one at a time, mixing for about 15 seconds after each addition and scraping the bowl after the second and fourth eggs. Stop when the final streaks of egg disappear; the batter should flow thickly from the spatula without looking foamy. Fold in the 12 coarsely chopped Oreos by hand with a silicone spatula, using broad strokes that distribute the pieces without crushing them into gray crumbs.
- Pour the filling over the cooled crust and smooth the surface with an offset spatula. Place the roasting pan on the oven rack, then carefully pour very hot water around the springform pan until it reaches about halfway up the sides. Bake at 325°F for 65 to 75 minutes. The outer 2 inches should look set and slightly puffed, while the center should wobble together like soft gelatin rather than ripple like liquid. An optional center reading should be about 150 to 155°F.
- Turn off the oven, prop the door open about 2 inches with a wooden spoon, and leave the cheesecake inside the water bath for 1 hour. This gradual temperature change limits sudden contraction and cracking. Remove the roasting pan carefully, lift out the springform pan, and discard the foil if any water collected inside its layers. Run a thin knife around the upper edge to release sticking, then cool the cheesecake uncovered on a wire rack for 1 hour.
- Cover the pan without touching the cheesecake surface and refrigerate for at least 8 hours, preferably overnight. Do not remove the springform ring while the center is warm because the filling continues to firm as its fat cools and its moisture redistributes. Once thoroughly chilled, unlatch and lift away the ring. If the crust resists, warm the outside briefly with a towel dampened in hot water, then slide a thin spatula between the crust and pan base if transferring to a serving plate.
- Combine the cold heavy cream, sifted confectioners' sugar, and topping vanilla in a chilled mixing bowl. Whip on medium speed until medium-stiff peaks stand with slightly curved tips, stopping before the cream looks grainy. Pipe or spoon 12 evenly spaced portions around the chilled cheesecake and place half an Oreo into each. For clean servings, dip a thin sharp knife in hot water, wipe it dry, and cut straight down. Clean and rewarm the blade between every slice, then serve the cheesecake cold but not icy.
Notes
- Check the cream cheese before mixing by pressing the center of a block. It should yield easily but still feel cool; cold cores create lumps, while overly warm cream cheese makes the batter unusually loose.
- Scrape the bottom of the mixer bowl, not only the sides. Dense cream cheese and undissolved sugar often collect beneath the paddle and can leave pale lumps in the baked filling.
- Use low speed from beginning to end. A fluffy batter may look appealing in the bowl, but trapped air expands in the oven and can produce a domed cheesecake that sinks or cracks as it cools.
- Test the center by nudging the roasting pan gently rather than shaking the springform pan. A cohesive wobble is correct; concentric ripples or a visibly wet center indicate that the cheesecake needs more time.
- Plan to bake the cheesecake the day before serving. The full refrigerator rest is part of the setting process, not optional waiting time, and it makes decorating and slicing substantially neater.